 |
|
|
| Author |
Message |
Dr Tank
User
Joined: Wed Apr 1st 2009
Location: Southampton, UK
|
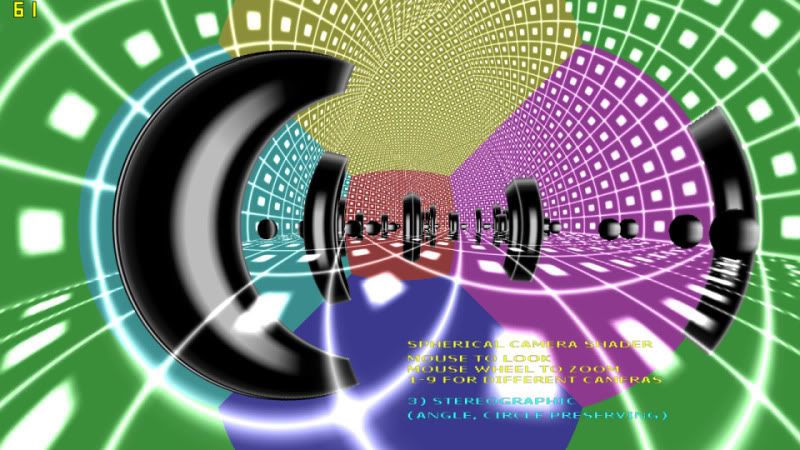
This is a demonstration of fisheye cameras using a dynamic cube mapping shader. Shader has many techniques for different fisheye variations: Stereographic, Area Preserving, Linear Angle, Cylindrical. Most have an exact and faster approximate version using series expansions instead of slow functions (sin, cos, sqrt) in pixel shader. Standard flat camera is also implemented for comparison.
Attached is project folder with .dba and .fx files in a .rar. Download is 7.19kB. I append the code for reference purposes. I have tried to clearly lay out and comment the code, but if you have questions, please ask.
.DBA code:
+ Code SnippetRem Project: spherical camera using shader
Rem Created: 17/05/2010 00:08:12
Rem ***** Main Source File *****
`By Dr Tank aka Ed Filby. 20/05/10
`Demonstration of various fisheye cameras using a shader and dynamic cube map.
`use mouse to look around, move using the left/right mouse buttons, and zoom with the mouse wheel.
`hold spacebar to see test cylinder object. Note that coloured areas in background show the 6 camera views for the cube map
`press keys 1-9 to see different camera types:
`1) Flat. Standard camera view. Note that using this cubemap shader method for a flat camera is hugely inefficent,
`and the example is only included for comparison. FOV can approach 180 degrees. Note how for large Field of View (FOV)
`off centre spheres appear as ellipses on the screen, stretched radially.
`2) Intermediate. Uses variable shader that can act as flat camera (constant curve = 0), stereographic (constant curve =1)
`or anything between or beyond. Can be used for smooth transitions between these cameras. In this example, the intermediate
`camera provides a balance between the wide angle, angle preserving nature of the stereographic camera, with less curved
`lines. FOV can approach 360 degrees
`3) Stereographic. Preserves angles and circles. FOV can approach 360 degrees. Does not preserve solid angles (areas). If you
`look at a ball, and then turn away, the ball is still seen as a circle, but it changes size.
`4,5) Area Preserving. If you look at an object and rotate the view, the area of the object remains constant. However, the
`aspect of the object changes. Wikipedia states that many commercially available fisheye lenses are of this type. FOV can
`approach 360 degrees.
`4 is an exact implementation. 5 uses a series expansion to avoid square root function in the shader. It deviates
`from the exact solution for large FOV.
`6,7) Linear Angle. Angle from straight ahead, to an object scales linearly with distance from the centre of the screen
`to the position of the object on the screen. FOV can approach 360 degrees.
`6 is exact. 7 uses series expansion to avoid trig functions in the shader.
`8,9) Cylindrical. Maps the view onto a cylinder, and unfurls that cylinder. Up/down acts like flat camera : vertical
`FOV can approach 180. Horizontally, FOV is unlimited, although the view loops. Main downside of this cam is that it is not
`symmetric about the centre like the other cameras. If the camera can roll, it can be very disorientating.
`8 is an exact implementation. 9 uses a series expansion to avoid trig functions in the shader. It deviates obviously from
`the exact solution for large FOV.
`For small FOV (zoomed in), all these cameras look the same. I you wanted to make a game where you can zoom right in,
`you would not want to use a fixed cube map like this. I would recommend switching to an equivalent shader using a single
`camera view for small FOVs.
w=desktop width():h=desktop height()
`sync rate 50:w=800:h=600 `FOR YT VID CAPTURE
set display mode w,h,32,0
sync on:sync rate 0
autocam off
hide mouse
backdrop off
set normalization on `so scaled world objects (cubes used for pillars) have correct normals
`very cheap solution to different aspect ratios. the shader think screen is 16:9. don't think can send 2vectors to shader,
`so just use the following trick.
`Assuming square pixels, for standard widescreen 16:9 ratio, generates aspect ratio of 1 and sets up cam 0 to show
`object 1 filling the screen. Cuts off sides for 4:3 etc.
set camera aspect w/(1.7777777777*h)
set camera fov 90
make object plain 1,20,20
set object mask 1,1 `only render to cam 0
position object 1,0,0,10
`MAKE CAMERAS FOR TAKING CUBE MAP IMAGES
for n=1 to 6
make camera n
set camera to image n,n,512,512
set camera range n,0.1,1000
set camera aspect n,1
next n
color backdrop 1,rgb(255,0,0)
color backdrop 2,rgb(0,255,0)
color backdrop 3,rgb(0,0,255)
color backdrop 4,rgb(255,255,0)
color backdrop 5,rgb(255,0,255)
color backdrop 6,rgb(0,255,255)
cube_eff=1
load effect "FX/final.fx",cube_eff,1
set effect technique cube_eff,"Spherical"
set object effect 1,cube_eff
set cube mapping on 1,5,6,3,4,1,2
`HUD IMAGES =======================================================
set text font "Verdana":set text size 15:set text to bold
ink rgb(255,255,50),0
create bitmap 1,256,256
`line 1,1,1,255
text 5,0,"SPHERICAL CAMERA SHADER"
text 5,20,"MOUSE TO LOOK"
text 5,35,"MOUSE WHEEL TO ZOOM"
text 5,50,"1-9 FOR DIFFERENT CAMERAS"
get image 20,0,0,256,256
ink rgb(50,255,255),0
delete bitmap 1:create bitmap 1,256,256:text 5,0,"1) FLAT CAMERA" :get image 21,0,0,256,256
delete bitmap 1:create bitmap 1,256,256:text 5,0,"2) STEREOGRAPHIC x0.5"
:text 5,20,"(HALF WAY BETWEEN"
:text 5,35,"FLAT AND STEREOGRAPHIC)" :get image 22,0,0,256,256
delete bitmap 1:create bitmap 1,256,256:text 5,0,"3) STEREOGRAPHIC"
:text 5,20,"(ANGLE, CIRCLE PRESERVING)" :get image 23,0,0,256,256
`delete bitmap 1:create bitmap 1,256,256:text 5,0,"4) STEREOGRAPHIC x2" :get image 24,0,0,256,256
delete bitmap 1:create bitmap 1,256,256:text 5,0,"6) AREA PRESERVING (EXACT)"
:text 5,20,"(EQUI SOLID ANGLE)" :get image 24,0,0,256,256
delete bitmap 1:create bitmap 1,256,256:text 5,0,"7) AREA PRESERVING (APPROX)"
:text 5,20,"(EQUI SOLID ANGLE)" :get image 25,0,0,256,256
delete bitmap 1:create bitmap 1,256,256:text 5,0,"8) LINEAR ANGLE (EXACT)" :get image 26,0,0,256,256
delete bitmap 1:create bitmap 1,256,256:text 5,0,"9) LINEAR ANGLE (APPROX)" :get image 27,0,0,256,256
delete bitmap 1:create bitmap 1,256,256:text 5,0,"4) CYLINDRICAL (EXACT)" :get image 28,0,0,256,256
delete bitmap 1:create bitmap 1,256,256:text 5,0,"5) CYLINDRICAL (APPROX)" :get image 29,0,0,256,256
delete bitmap 1
set current bitmap 0
textobj=3
make object plain textobj,8,8
position object textobj,4,-9,9.9
texture object textobj,20
set object mask textobj,1
set object light textobj,0
set object transparency textobj,1
textobj2=4
clone object textobj2,textobj
position object textobj2,4,-11.5,9.9
texture object textobj2,23
set object mask textobj2,1
`SCENE ================================================
`LIGHT SETTINGS
set directional light 0,1,-10,2
color light 0,rgb(300,300,300)
set ambient light 50
`TEXTURE FOR WORLD OBJECTS (boxes and room)
ink rgb(250,250,250),0
create bitmap 1,16,16
set current bitmap 1
cls
line 0,0,15,0
box 5,5,10,10
line 0,0,0,15
get image 10,0,0,15,15
delete bitmap 1
`"ROOM" (big inverted cube)
make object cube 10,100
position object 10,50,50-1,50
scale object 10,-100,-100,-100
texture object 10,10
scale object texture 10,20,20
xrotate object 10,90
set object mask 10,126
`set object transparency 10,1
ghost object on 10
set object light 10,0
`"SKY", now room is transparent. means can see cube map sides - colours are camera backdrop colours
clone object 9,10
color object 9,rgb(100,100,0)
single_pixel_image(9,50,50,50,200) `not quite opaque- so can see cube map faces
set alpha mapping on 9,100
texture object 9,9
scale object 9,200,-200,200
set object light 9,0
ghost object off 9
set object mask 9,126 `with clones, seems mask data not copied
`CUBES
for n=11 to 60
x=rnd(19):z=rnd(19)
if rnd(1)
make object cube n,4
h=1+(int(x+z)^1.2) mod 10 `random random function. means dependent on x,z, so if 2 in 1 square, no z-fighting because
`same height!
scale object n,100,100*h,100
else
`make object sphere n,4
make object sphere n,4,15,30
endif
texture object n,10
position object n,5*x+2.5,1,5*z+2.5
`set object mask n,2 `allow only to be seen by cam 1
set object mask n,126
next n
`make a dummy object to move around as camera
camobj=2
make object cube camobj,1
exclude object on camobj
`INITIAL VIEW SETTINGS
position object camobj,50,20,50
camwide#=2.0
`test cylinder around camera
testobj=1000
make object cylinder testobj,10
scale object testobj,100,314,100
disable object zdepth testobj
set object cull testobj,0
set object mask testobj,126
`color object testobj,rgb(255,0,0)
texture object testobj,10
scale object texture testobj,20,20
`set object wireframe testobj,1
set object light testobj,0
ghost object on testobj
`set current bitmap 0 `doesn't work for writing text to screen. perhaps need to look into using different render targets
`============================================================
timenow as dword
timelast as dword
timediff as dword
timenow=timer()
`Start loop
do
timelast=timenow
timenow=timer()
timediff=timenow-timelast
`MOVE AND LOOK
mx#=wrapvalue(mx#+0.1*mousemovey())
my#=wrapvalue(my#+0.1*mousemovex())
rotate object camobj,180.0-mx#,-my#,0.0
mc=mouseclick()
move object camobj, ((((mc&&1)<<1)-(mc&&2))*0.01 +0.1*(leftkey()-rightkey()))*timediff
camheight#=object position y(camobj)
`camheight#=camheight#*(1.0+(upkey()-downkey())*0.01)
if camheight#<1.0 then camheight#=1.0
cx#=object position x(camobj)
cz#=object position z(camobj)
position object camobj,cx#,camheight#,cz#
for n=1 to 6
position camera n,cx#,camheight#,cz#
set camera to object orientation n, camobj
set camera aspect n,1
set camera fov n,90
next n
turn camera left 5,-90
turn camera left 6,90
pitch camera up 4,-90
pitch camera up 3,90
turn camera left 2,180
`test cylinder around cam
if spacekey() then show object testobj else hide object testobj
position object testobj,cx#,camheight#,cz#
`SWITCH CAMERAS WITH NUMBER KEYS 1-9
if keystate(2) `1= flat
set effect technique 1,"Flat"
`set effect technique 1,"Variable":set effect constant float cube_eff,"curve",0.0
endif
if keystate(3) `2= intermediate between flat and spherical
set effect technique 1,"Variable"
set effect constant float cube_eff,"curve",0.5
endif
if keystate(4) `3= spherical
set effect technique 1,"Spherical"
`set effect technique 1,"Variable":set effect constant float cube_eff,"curve",1.0
endif
if keystate(5) `4
set effect technique 1,"EArea"
endif
if keystate(6) `5
set effect technique 1,"EAreaB"
endif
if keystate(7) `6
set effect technique 1,"Linear"
endif
if keystate(8) `7
set effect technique 1,"LinearB"
endif
if keystate(9) `8
set effect technique 1,"Cyl"
endif
if keystate(10) `9
set effect technique 1,"CylB"
endif
for n=2 to 10
if keystate(n)
texture object textobj2,19+n
endif
next n
`ZOOM
camwide#=camwide#*(1.0-0.001*mousemovez())
set effect constant float cube_eff,"Wide",camwide#
`==============================================================
`RENDERING
sync mask 126:fastsync `cams 1 to 6 = 2^7 -2
sync mask 1:sync `render cam0, viewing spherical camera shader object
sync
loop
end
function single_pixel_image(imagenum,red,green,blue,alpha)
temp_memblocknum=1
make memblock temp_memblocknum,16
write memblock dword temp_memblocknum,0,1
write memblock dword temp_memblocknum,4,1
write memblock dword temp_memblocknum,8,32
write memblock dword temp_memblocknum,12,rgba(red,green,blue,alpha)
make image from memblock imagenum,1
delete memblock temp_memblocknum
endfunction
`RGBA function by Aaron Miller
function rgba(r,g,b,a)
c = (a and 0xff) << 24 or ((r and 0xff) << 16) or ((g and 0xff) << 8) or (b and 0xff)
endfunction c
.FX (FX/final.fx) code:
+ Code Snippet
// The following lines are variables which are recognised and passed by the
// application and often referred to as "untweaks".
matrix wvp : WorldViewProjection;
float4 lightColour = {0.5, 0.0, 1.5, 1.0}; // {red, green, blue, alpha}
float Wide =4.0f;
float curve =1.0f; //allow smooth transition from flat, to spherical and beyond
// The following lines are variables which can be set by the application
// (these are usually variables which the user may want to adjust from
// their program).
//float2 uvaspect = {1.6667, 1.0}; //uv on square- scale to get real world.
//scale from real world back onto world cam- here fov is important- make as set in dbp
float2 uvaspect = {1.777777, 1.0};
// The following lines define structures that are used as input and output
// to the vertex and pixel shader functions.
struct VSInput {
float4 Pos : Position;
float2 UV : TEXCOORD0;
};
struct VSOutput {
float4 Pos : Position;
float2 UV : TEXCOORD0;
};
// The pixel shader does not need an input structure for this example.
struct PSOutput { float4 Col : Color; };
//texture stuff
texture bumpTexture < string ResourceName = ""; > ; //need to have dummy tex, but now am specifying register for the other, i needn't
//sample from it, or even declare a sampler!
//the actual texture we want to use:
texture cubeTexture
< string ResourceName = "";
string Type = "CUBE";
>;
samplerCUBE cubeSample:register(s1) = sampler_state { texture = <cubeTexture>; };
// The vertex shader code:
VSOutput VShader (VSInput In, VSOutput Out)
{ // Transforms the objects model coordinates to
// screen space coordinates
Out.Pos = mul(In.Pos, wvp); //for sphr cam, obj is fixed relative to cam, so can avoid this step.
//(may matter if using large mesh)
Out.UV = Wide*uvaspect*(In.UV - 0.5); //change 0-1 to -0.5 to +0.5. could just scroll texture in DBP if want to lose this step
//Wide: bigger value= wider angle.
//now change so that UV co-ord represents "y" on paper calculations - scaling here is pretty unimportant - it
//sets fov of final camera. ratio is important as sets fov.
return Out;
};
// The pixel shader code:
PSOutput PShader (VSOutput In,PSOutput Out)
{
float2 UV2=In.UV;
//float rsq=UV2.x*UV2.x + UV2.y*UV2.y;
//float z=0.5*(1-rsq);
float z = 0.5*(1-(UV2.x*UV2.x + UV2.y*UV2.y));
float3 cubeuvw=z;
cubeuvw.xy=UV2;
Out.Col = 1.5*texCUBE(cubeSample, cubeuvw); //brighten scene also!
//Out.Col.xyz+=cubeuvw+0.5; //test
return Out;
};
PSOutput PShaderFlat (VSOutput In,PSOutput Out)
{
float2 UV2=In.UV;
float3 cubeuvw=0.5f;
cubeuvw.xy=UV2;
Out.Col = 1.5*texCUBE(cubeSample, cubeuvw); //brighten scene also!
//Out.Col.xyz+=cubeuvw+0.5; //test
return Out;
};
PSOutput PShaderVar (VSOutput In,PSOutput Out)
{
float2 UV2=In.UV;
float z = 0.5*(1-curve*(UV2.x*UV2.x + UV2.y*UV2.y));
float3 cubeuvw=z;
cubeuvw.xy=UV2;
Out.Col = 1.5*texCUBE(cubeSample, cubeuvw); //brighten scene also!
return Out;
};
PSOutput PShaderEArea (VSOutput In,PSOutput Out)
{
float2 UV2=In.UV;
float rsq=UV2.x*UV2.x + UV2.y*UV2.y;
float z = 0.5-rsq;
float3 cubeuvw=z;
cubeuvw.xy=UV2*sqrt(1.0-rsq);
Out.Col = 1.5*texCUBE(cubeSample, cubeuvw); //brighten scene also!
return Out;
};
PSOutput PShaderEAreaB (VSOutput In,PSOutput Out)
{
float2 UV2=In.UV;
float rsq=UV2.x*UV2.x + UV2.y*UV2.y;
float z = 0.5-rsq;
float3 cubeuvw=z;
//cubeuvw.xy=UV2*(1-0.5*rsq-0.125*(rsq+0.5*rsq*rsq));
//cubeuvw.xy=UV2*(1-0.5*rsq-0.125*rsq*rsq);
cubeuvw.xy=UV2*(1-0.5*rsq);
Out.Col = 1.5*texCUBE(cubeSample, cubeuvw); //brighten scene also!
return Out;
};
PSOutput PShaderLin (VSOutput In,PSOutput Out)
{
float2 UV2=2*In.UV; //can lose this part by changing UVs sent by VShader. This is here so different PShaders are consistent.
float r=length(UV2);
float z = r*cos(r);
float3 cubeuvw=z;
cubeuvw.xy=UV2*sin(r);
Out.Col = 1.5*texCUBE(cubeSample, cubeuvw); //brighten scene also!
return Out;
};
PSOutput PShaderLinB (VSOutput In,PSOutput Out)
{
//possible method to make this faster: use series expansion instead of sin and cos.
//http://home.scarlet.be/~ping1339/taylor.htm#Expansion-of-sin%28x%29
// will have r^2 term, then square to get r^4 etc.
//for sinr / r -> even powers
// cosr ->even powers.
// can get squared length instead of length. no need for trig calls.
float2 UV2=2*In.UV; //can lose this part by changing UVs sent by VShader. This is here so different PShaders are consistent.
float rsq=UV2.x*UV2.x + UV2.y*UV2.y;
float r4=rsq*rsq;
//float z = cos(r);
float z=1-0.5*rsq+0.041667*r4;
float3 cubeuvw=z;
//cubeuvw.xy=UV2*sin(r)/r;
cubeuvw.xy=UV2*(1-0.16667*rsq+0.008333*r4); //not sure how shader works this out. best to calc factor then multiply each vector component by it.
Out.Col = 1.5*texCUBE(cubeSample, cubeuvw); //brighten scene also!
return Out;
};
PSOutput PShaderCyl (VSOutput In,PSOutput Out)
{
float2 UV2=2*In.UV;
float z = cos(UV2.x);
float3 cubeuvw=z;
cubeuvw.x=sin(UV2.x);
cubeuvw.y=UV2.y;
Out.Col = 1.5*texCUBE(cubeSample, cubeuvw); //brighten scene also!
return Out;
};
PSOutput PShaderCylB (VSOutput In,PSOutput Out)
{
float2 UV2=2*In.UV;
float x2=UV2.x*UV2.x;
float x4=x2*x2;
float z = 1-0.5*x2+0.041667*x4; //cos expansion
float3 cubeuvw=z;
cubeuvw.x=UV2.x*(1-0.16667*x2+0.008333*x4); //sin expansion
cubeuvw.y=UV2.y;
Out.Col = 1.5*texCUBE(cubeSample, cubeuvw); //brighten scene also!
return Out;
};
// The following lines just put this together as a single technique
// with a single pass.
technique Spherical
{ pass p1
{ VertexShader = compile vs_2_0 VShader();
PixelShader = compile ps_2_0 PShader();
}
}
technique Flat
{ pass p1
{ VertexShader = compile vs_2_0 VShader();
PixelShader = compile ps_2_0 PShaderFlat();
}
}
technique Variable
{ pass p1
{ VertexShader = compile vs_2_0 VShader();
PixelShader = compile ps_2_0 PShaderVar();
}
}
technique EArea
{ pass p1
{ VertexShader = compile vs_2_0 VShader();
PixelShader = compile ps_2_0 PShaderEArea();
}
}
technique EAreaB
{ pass p1
{ VertexShader = compile vs_2_0 VShader();
PixelShader = compile ps_2_0 PShaderEAreaB();
}
}
technique Linear
{ pass p1
{ VertexShader = compile vs_2_0 VShader();
PixelShader = compile ps_2_0 PShaderLin();
}
}
technique LinearB
{ pass p1
{ VertexShader = compile vs_2_0 VShader();
PixelShader = compile ps_2_0 PShaderLinB();
}
}
technique Cyl
{ pass p1
{ VertexShader = compile vs_2_0 VShader();
PixelShader = compile ps_2_0 PShaderCyl();
}
}
technique CylB
{ pass p1
{ VertexShader = compile vs_2_0 VShader();
PixelShader = compile ps_2_0 PShaderCylB();
}
}
|
Back to top
 |
|
Green Gandalf
Valued Member
 Joined: Mon Jan 3rd 2005
Location: Cornwall UK
|
Very nice demo.  
Two comments:
1. I had to change rgba to rgbaAM (or anything really) as rgba is one of IanM's Matrix1 functions (which I have) which probably does the same thing.
2. I didn't understand your comment "don't think can send 2vectors to shader," in the dba file. You can only pass vector4's to shaders using DBPro but you can declare them as float2's in the shader, the extra components get ignored. If you want to play safe by making the types match then declare them as float4's in the shader as well but use swizzling to pick out the components you want, e.g.
+ Code Snippetfloat4 aspect = {16.0, 9.0, 0.0, 0.0};
(etc)
float2 myWhatever = aspect.xy; // aspect.xyzw is same as aspect
You could also pack two float2's into a single float4 and use swizzling to pick out the ones you want.
You can swizzle constants as well. For example if you want the vector {1.0, 1.0, 1.0, 1.0} you can write it as 1.0.xxxx in calculations, i.e. 4 copies of the first (and only) component of the constant 1.0.
PS2 and above support arbitrary swizzling, earlier PS1 versions have irritating limitations hidden away in the small print. But you're using SM2 so you're OK.
Hope this helps.
|
Back to top
 |
|
Dr Tank
User
Joined: Wed Apr 1st 2009
Location: Southampton, UK
|
|
Posted: 21st May 2010 16:30 Edited: 21st May 2010 16:39 |
| link | toggle |
Thanks dude. I pondered doing the my4vector.xy thing but in the end went with easier solution. Perhaps i'll implement it when I update. Difference is that currently for 4:3, the sides of the object seen by cam 0 are off screen. But I figure the shader skips over drawing these parts anyway so with luck speed is unaffected.
I did wonder what might happen if a 4vector was sent to a 2 vector. Might it write to the pointer or something and overwrite other data? But as you say there's no need to do that.
I'm basically using shader model 2 for everything now. I get the impression that most users' computers support it. Is this a valid assumption? I find swizzling, casting etc kind of confusing. If you check out the pixel shaders here maybe you can see some speed improvements. I'm doing things like:
+ Code Snippet
//uv is a float2
//z is a float
float3 uvw=z;
uvw.xy=uv;
when i would rather do something like
+ Code Snippet
float3 uvw=float3(uv,z);
but i couldn't figure out how to get that kind of thing working. Perhaps they result in the same compiled code. I've really got to check out FXComposer!
Played a little with this since. By sync masking out the back facing camera when it's not required, FPS gains about 10%. Possible improvements to this include squashing the cube map co-ordinates and camera frustrums along the z-axis to achieve more uniform texture scaling across the screen, and switching to a single extra camera with variable FOV when zoomed in.
|
Back to top
 |
|
|
Google Ad
AdBot
Joined: Aug 26th 2002
Location: Everywhere
|
|
Back to top
 |
|
Green Gandalf
Valued Member
 Joined: Mon Jan 3rd 2005
Location: Cornwall UK
|
Quote: "when i would rather do something like"
+ Code Snippetfloat3 uvw=float3(uv,z);
Quote: "but i couldn't figure out how to get that kind of thing working."
I do that a lot. Can you give an example where that snippet doesn't work for you?
Quote: "Perhaps they result in the same compiled code."
Quite possible.  I've often tried fiddling with things like that to save an instruction or two and failed. The DX9 fx compiler has a built-in optimizer which is hard to beat.
Quote: "I've really got to check out FXComposer!"
Or Dark Shader - both will give you the compiled asm listing.
Quote: "I'm basically using shader model 2 for everything now. I get the impression that most users' computers support it. Is this a valid assumption?"
Yes. I use SM3 (or PS2a) when I run into instruction count limits, or just PS3 if I want texture reads in the vertex shader. Both are supported by DBPro. I haven't tried SM4 yet because it's not supported by DX9/DBPro.
|
Back to top
 |
|
Dr Tank
User
Joined: Wed Apr 1st 2009
Location: Southampton, UK
|
Quote: "I do that a lot. Can you give an example where that snippet doesn't work for you?"
It appears I may have been talking out of my bottom. What i said didn't work did work.
I'm will give shader model 3 a bash, because i want to use texture lookup in the vertex shader to scrolling, level of detail terrain. Any idea how commonly suppoerted it is?
|
Back to top
 |
|
Green Gandalf
Valued Member
 Joined: Mon Jan 3rd 2005
Location: Cornwall UK
|
Quote: "What i said didn't work did work."
Quote: "Any idea how commonly suppoerted it is?"
It's quite widely supported on games machines with a reasonable spec - but I'd guess it is less common on machines you might find in a standard commercial, industrial or education environment. SM2 is more standard there.
|
Back to top
 |
|
Dr Tank
User
Joined: Wed Apr 1st 2009
Location: Southampton, UK
|
|
Posted: 15th Jul 2010 15:39 Edited: 15th Jul 2010 15:44 |
| link | toggle |
Sorry for tardy reply. I guess I'll stick with SM2 for a bit.
Here's another demo. This only has the sterographic camera (angle, circle preserving), but has a clear zoom, using a single extra camera instead of the cube map for small FOV.
I attach the rar compressed project folder. Exe is included because future versions of DBP may complile the code differently. Download is 880 kB.
I also append the code for quick reference. Note that from the second shader, only one technique (Spherical) and pixel shader (PShader) is used by the program.
Here is the .dba: + Code SnippetRem Project: spherical camera using shader
Rem Created: 17/05/2010 00:08:12
Rem ***** Main Source File *****
`By Dr Tank aka Ed Filby. 15/07/10
`JULY 10 - UPDATE
`Demonstration of sterographic projection fisheye cameras using a shader and dynamic cube map.
`This version switches to a single extra camera shader when zoomed in, avoiding pixellation seen in previous version.
`use mouse to look around, move using the left/right mouse buttons, and zoom with the mouse wheel.
`hold spacebar to see test cylinder object. Note that coloured areas in background show the 6 camera views for the cube map
`Stereographic Camera: Preserves angles and circles. FOV can approach 360 degrees. Does not preserve solid angles (areas). If you
`look at a ball, and then turn away, the ball is still seen as a circle, but it changes size.
w=desktop width():h=desktop height() `my desktop res is 1280 by 720 and this works OK at that resolution
`for larger resolutions and faster computers, may be best to increase res of
`cameras rendering cube map images and the single cam images.
`i selected 512x512 for the cube map images (there are six)
`and 1600x900 for the single cam image - the same aspect ratio as the desktop.
`this means the total number of pixels and the framerate is similar for each method.
`for 4:3 final image, it is optimal to have a 4:3 single cam image,
`rather than my simple solution here: cropping the widescreen image.
`this is unfair to the player, and also renders more than is required.
`sync rate 50:w=800:h=600 `FOR YT VID CAPTURE
set display mode w,h,32,1
sync on:sync rate 0
autocam off
hide mouse
backdrop off
set normalization on `so scaled world objects (cubes used for pillars) have correct normals
`very cheap solution to different aspect ratios.
`Assuming square pixels, for standard widescreen 16:9 ratio, generates aspect ratio of 1 and sets up cam 0 to show
`object 1 filling the screen. Cuts off sides for 4:3 etc.
set camera aspect w/(1.7777777777*h)
set camera fov 90
make object plain 1,20,20
set object mask 1,1 `only render to cam 0
position object 1,0,0,10
`same, but for single camera shader. could use multi techniques and same obj, but this keeps it separate
singcamobj=5
make object plain singcamobj,20,20
set object mask singcamobj,1 `only render to cam 0
position object singcamobj,0,0,10
`MAKE CAMERAS FOR TAKING CUBE MAP IMAGES
for n=1 to 6
make camera n
set camera to image n,n,512,512
set camera range n,0.1,1000
set camera aspect n,1
next n
color backdrop 1,rgb(255,0,0)
color backdrop 2,rgb(0,255,0)
color backdrop 3,rgb(0,0,255)
color backdrop 4,rgb(255,255,0)
color backdrop 5,rgb(255,0,255)
color backdrop 6,rgb(0,255,255)
`NEW CAMERA FOR SINGLE CAM VERSION (for small FOV)
n=7
make camera n
set camera to image n,n,1600,900
set camera range n,0.1,1000
set camera aspect n,1.777777778 `now using single cam with same ratio as final.
texture object singcamobj,n
`OVERRIDE BACKDROPS
for n=1 to 7
color backdrop n,rgb(100,180,200) `COMMENT THIS OUT TO SEE CUBE MAP CAM VIEWS
next n
cube_eff=1
load effect "FX/final2.fx",cube_eff,1 `SHADER FROM PREVIOUS DEMO. MANY TECHNIQUES. ONLY ONE USED HERE.
set effect technique cube_eff,"Spherical"
set object effect 1,cube_eff
set cube mapping on 1,5,6,3,4,1,2
sing_eff=2
load effect "FX/singlecam16by9zoom.fx",sing_eff,1
set object effect singcamobj,sing_eff
`HUD IMAGES =======================================================
set text font "Verdana":set text size 15:set text to bold
ink rgb(255,255,50),0
create bitmap 1,256,256
`line 1,1,1,255
text 5,0,"STEREOGRAPHIC CAMERA SHADER"
text 5,20,"MOUSE TO LOOK"
text 5,35,"MOUSE WHEEL TO ZOOM"
get image 20,0,0,256,256
ink rgb(250,5,250),0
delete bitmap 1:create bitmap 1,256,256:text 5,0,"USING SINGLE EXTRA CAMERA":get image 22,0,0,256,256
delete bitmap 1:create bitmap 1,256,256:text 5,0,"USING CUBE MAP (NO BACK CAM)":get image 23,0,0,256,256
delete bitmap 1:create bitmap 1,256,256:text 5,0,"USING CUBE MAP":get image 24,0,0,256,256
delete bitmap 1
set current bitmap 0
textobj=3
make object plain textobj,8,8
position object textobj,4,-9,9.9
texture object textobj,20
set object mask textobj,1
set object light textobj,0
set object transparency textobj,1
textobj2=4
clone object textobj2,textobj
position object textobj2,4,-11.5,9.9
texture object textobj2,23
set object mask textobj2,1
`SCENE ================================================
`LIGHT SETTINGS
set directional light 0,1,-10,2
color light 0,rgb(300,300,300)
set ambient light 50
`TEXTURE FOR WORLD OBJECTS (boxes and room)
ink rgb(250,250,250),0
create bitmap 1,16,16
set current bitmap 1
cls
line 0,0,15,0
box 5,5,10,10
line 0,0,0,15
get image 10,0,0,15,15
delete bitmap 1
`"ROOM" (big inverted cube)
make object cube 10,100
position object 10,50,50-1,50
scale object 10,-100,-100,-100
texture object 10,10
scale object texture 10,20,20
xrotate object 10,90
set object mask 10,126+128
`set object transparency 10,1
ghost object on 10
set object light 10,0
`"SKY", now room is transparent. means can see cube map sides - colours are camera backdrop colours
clone object 9,10
single_pixel_image(9,50,50,50,200) `not quite opaque- so can see cube map faces
set alpha mapping on 9,100
texture object 9,9
scale object 9,200,-200,200
set object light 9,0
ghost object off 9
set object mask 9,126+128 `with clones, seems mask data not copied
`CUBES
for n=11 to 60
x=rnd(19):z=rnd(19)
if rnd(1)
make object cube n,4
h=1+(int(x+z)^1.2) mod 10 `random random function. means dependent on x,z, so if 2 in 1 square, no z-fighting because
`same height!
scale object n,100,100*h,100
else
`make object sphere n,4
make object sphere n,4,15,30
endif
texture object n,10
position object n,5*x+2.5,1,5*z+2.5
`set object mask n,2 `allow only to be seen by cam 1
set object mask n,126+128
next n
`make a dummy object to move around as camera
camobj=2
make object cube camobj,1
exclude object on camobj
`INITIAL VIEW SETTINGS
position object camobj,50,20,50
camwide#=2.0
camwidetarget#=2.0
sczoom#=1.0
`============================================================
timenow as dword
timelast as dword
timediff as dword
timenow=timer()
`Start loop
do
timelast=timenow
timenow=timer()
timediff=timenow-timelast
`MOVE AND LOOK
mx#=wrapvalue(mx#+0.1*camwide#*mousemovey())
my#=wrapvalue(my#+0.1*camwide#*mousemovex())
rotate object camobj,180.0-mx#,-my#,0.0
mc=mouseclick()
move object camobj, ((((mc&&1)<<1)-(mc&&2))*0.01 +0.1*(leftkey()-rightkey()))*timediff
camheight#=object position y(camobj)
`camheight#=camheight#*(1.0+(upkey()-downkey())*0.01)
if camheight#<1.0 then camheight#=1.0
cx#=object position x(camobj)
cz#=object position z(camobj)
position object camobj,cx#,camheight#,cz#
for n=1 to 7 `6
position camera n,cx#,camheight#,cz#
set camera to object orientation n, camobj
` set camera aspect n,1
set camera fov n,90
next n
turn camera left 5,-90
turn camera left 6,90
pitch camera up 4,-90
pitch camera up 3,90
turn camera left 2,180
`ZOOM
camwidetarget#=camwidetarget#*(1.002^-mousemovez())
camwide#=camwidetarget#+(camwide#-camwidetarget#)*0.99^(timediff)
set effect constant float cube_eff,"Wide",camwide#
`==============================================================
sczoom#=camwide#/ (1.0- 1.040123457 * camwide#* camwide#) `1.04.. is result of calculation ((16/9)^2 +1) * (0.5^2)
set camera fov 7,2.0*atan(sczoom#)
set effect constant float sing_eff,"ZoomSq",sczoom#*sczoom#
set effect constant float sing_eff,"Wide",camwide#/sczoom#
`RENDERING
`text 0,0,str$(camwide#)
if camwide# < 0.75 `have not worked this out exactly.
`this is about the point where resolution of central square for 2 methods (single cam and cube map)
`is equal.
sync mask 128:fastsync
show object singcamobj
hide object 1
texture object textobj2,22
else
sync mask 126-4*(camwide#<2.0):fastsync `does not render backwards cam when not seen.
hide object singcamobj
show object 1
if camwide#<2.0
texture object textobj2,23
else
texture object textobj2,24
endif
endif
sync mask 1:sync `render cam0, viewing spherical camera shader object
sync
loop
end
function single_pixel_image(imagenum,red,green,blue,alpha)
temp_memblocknum=1
make memblock temp_memblocknum,16
write memblock dword temp_memblocknum,0,1
write memblock dword temp_memblocknum,4,1
write memblock dword temp_memblocknum,8,32
write memblock dword temp_memblocknum,12,rgba(red,green,blue,alpha)
make image from memblock imagenum,1
delete memblock temp_memblocknum
endfunction
`RGBA function by Aaron Miller
function rgba(r,g,b,a)
c = (a and 0xff) << 24 or ((r and 0xff) << 16) or ((g and 0xff) << 8) or (b and 0xff)
endfunction c
shader "fx/singlecam16by9zoom.fx": + Code Snippet
// The following lines are variables which are recognised and passed by the
// application and often referred to as "untweaks".
matrix wvp : WorldViewProjection;
float4 lightColour = {0.5, 0.0, 1.5, 1.0}; // {red, green, blue, alpha}
float Wide =1.0f; // =4.0f;
float curve =1.0f; //allow smooth transition from flat, to spherical and beyond
//float Zoom =1.0f;
float ZoomSq =1.0f;
// The following lines are variables which can be set by the application
// (these are usually variables which the user may want to adjust from
// their program).
//float2 uvaspect = {1.6667, 1.0}; //uv on square- scale to get real world.
//scale from real world back onto world cam- here fov is important- make as set in dbp
//float2 uvaspect = {1.777777, -1.0};
float2 uvaspect = {1.0, -1.0};
// The following lines define structures that are used as input and output
// to the vertex and pixel shader functions.
struct VSInput {
float4 Pos : Position;
float2 UV : TEXCOORD0;
};
struct VSOutput {
float4 Pos : Position;
float2 UV : TEXCOORD0;
};
// The pixel shader does not need an input structure for this example.
struct PSOutput { float4 Col : Color; };
//texture stuff
texture singleTexture
< string ResourceName = "";
>;
sampler2D singleSample = sampler_state {
texture = <singleTexture>;
//MinFilter=Linear;
MinFilter = Anisotropic;
MagFilter=Linear;
MipFilter = Linear;
};
// The vertex shader code:
VSOutput VShader (VSInput In, VSOutput Out)
{ // Transforms the objects model coordinates to
// screen space coordinates
Out.Pos = mul(In.Pos, wvp); //for sphr cam, obj is fixed relative to cam, so can avoid this step.
//(may matter if using large mesh)
//Out.UV = (1.0f/Zoom)*Wide*uvaspect*(In.UV - 0.5); //change 0-1 to -0.5 to +0.5. could just scroll texture in DBP if want to lose this step
Out.UV = Wide*uvaspect*(In.UV - 0.5); //wude sent from DBP incorporates 1/zoom now
//Wide: bigger value= wider angle.
//now change so that UV co-ord represents "y" on paper calculations - scaling here is pretty unimportant - it
//sets fov of final camera. ratio is important as sets fov.
return Out;
};
// The pixel shader code:
PSOutput PShader (VSOutput In,PSOutput Out)
{
float2 UV2=In.UV;
//float rsq=UV2.x*UV2.x + UV2.y*UV2.y;
//float z=0.5*(1-rsq);
//float z = 0.5*(1-(UV2.x*UV2.x + UV2.y*UV2.y));
float z = 1-ZoomSq*( 3.1605*UV2.x*UV2.x + UV2.y*UV2.y); //guess fudge. seems to make things work
//introduced 3.16 (1.77777 squared) after started using 16 by 9 cam to get image fed to shader.
//float3 cubeuvw=float3(UV2,z);
//Out.Col = 1.5*texCUBE(cubeSample, cubeuvw); //brighten scene also!
Out.Col = 1.5*tex2D(singleSample, (UV2/z) -0.5); //brighten scene also!
return Out;
};
// The following lines just put this together as a single technique
// with a single pass.
technique Spherical
{ pass p1
{ VertexShader = compile vs_2_0 VShader();
PixelShader = compile ps_2_0 PShader();
}
}
shader "fx/final2.fx": + Code Snippet
// The following lines are variables which are recognised and passed by the
// application and often referred to as "untweaks".
matrix wvp : WorldViewProjection;
float4 lightColour = {0.5, 0.0, 1.5, 1.0}; // {red, green, blue, alpha}
float Wide =4.0f;
float curve =1.0f; //allow smooth transition from flat, to spherical and beyond
// The following lines are variables which can be set by the application
// (these are usually variables which the user may want to adjust from
// their program).
//float2 uvaspect = {1.6667, 1.0}; //uv on square- scale to get real world.
//scale from real world back onto world cam- here fov is important- make as set in dbp
float2 uvaspect = {1.777777, 1.0};
// The following lines define structures that are used as input and output
// to the vertex and pixel shader functions.
struct VSInput {
float4 Pos : Position;
float2 UV : TEXCOORD0;
};
struct VSOutput {
float4 Pos : Position;
float2 UV : TEXCOORD0;
};
// The pixel shader does not need an input structure for this example.
struct PSOutput { float4 Col : Color; };
//texture stuff
texture bumpTexture < string ResourceName = ""; > ; //need to have dummy tex, but now am specifying register for the other, i needn't
//sample from it, or even declare a sampler!
//the actual texture we want to use:
texture cubeTexture
< string ResourceName = "";
string Type = "CUBE";
>;
samplerCUBE cubeSample:register(s1) = sampler_state {
texture = <cubeTexture>;
MinFilter=Linear;
MagFilter=Linear;
MipFilter = Linear;
};
// The vertex shader code:
VSOutput VShader (VSInput In, VSOutput Out)
{ // Transforms the objects model coordinates to
// screen space coordinates
Out.Pos = mul(In.Pos, wvp); //for sphr cam, obj is fixed relative to cam, so can avoid this step.
//(may matter if using large mesh)
Out.UV = Wide*uvaspect*(In.UV - 0.5); //change 0-1 to -0.5 to +0.5. could just scroll texture in DBP if want to lose this step
//Wide: bigger value= wider angle.
//now change so that UV co-ord represents "y" on paper calculations - scaling here is pretty unimportant - it
//sets fov of final camera. ratio is important as sets fov.
return Out;
};
// The pixel shader code:
PSOutput PShader (VSOutput In,PSOutput Out)
{
float2 UV2=In.UV;
//float rsq=UV2.x*UV2.x + UV2.y*UV2.y;
//float z=0.5*(1-rsq);
float z = 0.5*(1-(UV2.x*UV2.x + UV2.y*UV2.y));
// float3 cubeuvw=z;
// cubeuvw.xy=UV2;
float3 cubeuvw=float3(UV2,z);
Out.Col = 1.5*texCUBE(cubeSample, cubeuvw); //brighten scene also!
//Out.Col.xyz+=cubeuvw+0.5; //test
return Out;
};
PSOutput PShaderFlat (VSOutput In,PSOutput Out)
{
/*
float2 UV2=In.UV;
float3 cubeuvw=0.5f;
cubeuvw.xy=UV2;
Out.Col = 1.5*texCUBE(cubeSample, cubeuvw); //brighten scene also!
*/
float3 cubeuvw=float3(In.UV,0.5f);
Out.Col = 1.5*texCUBE(cubeSample, cubeuvw);
//Out.Col.xyz+=cubeuvw+0.5; //test
return Out;
};
PSOutput PShaderVar (VSOutput In,PSOutput Out)
{
float2 UV2=In.UV;
float z = 0.5*(1-curve*(UV2.x*UV2.x + UV2.y*UV2.y));
float3 cubeuvw=z;
cubeuvw.xy=UV2;
Out.Col = 1.5*texCUBE(cubeSample, cubeuvw); //brighten scene also!
return Out;
};
PSOutput PShaderEArea (VSOutput In,PSOutput Out)
{
float2 UV2=In.UV;
float rsq=UV2.x*UV2.x + UV2.y*UV2.y;
float z = 0.5-rsq;
float3 cubeuvw=z;
cubeuvw.xy=UV2*sqrt(1.0-rsq);
Out.Col = 1.5*texCUBE(cubeSample, cubeuvw); //brighten scene also!
return Out;
};
PSOutput PShaderEAreaB (VSOutput In,PSOutput Out)
{
float2 UV2=In.UV;
float rsq=UV2.x*UV2.x + UV2.y*UV2.y;
float z = 0.5-rsq;
float3 cubeuvw=z;
//cubeuvw.xy=UV2*(1-0.5*rsq-0.125*(rsq+0.5*rsq*rsq));
//cubeuvw.xy=UV2*(1-0.5*rsq-0.125*rsq*rsq);
cubeuvw.xy=UV2*(1-0.5*rsq);
Out.Col = 1.5*texCUBE(cubeSample, cubeuvw); //brighten scene also!
return Out;
};
PSOutput PShaderLin (VSOutput In,PSOutput Out)
{
float2 UV2=2*In.UV; //can lose this part by changing UVs sent by VShader. This is here so different PShaders are consistent.
float r=length(UV2);
float z = r*cos(r);
float3 cubeuvw=z;
cubeuvw.xy=UV2*sin(r);
Out.Col = 1.5*texCUBE(cubeSample, cubeuvw); //brighten scene also!
return Out;
};
PSOutput PShaderLinB (VSOutput In,PSOutput Out)
{
//possible method to make this faster: use series expansion instead of sin and cos.
//http://home.scarlet.be/~ping1339/taylor.htm#Expansion-of-sin%28x%29
// will have r^2 term, then square to get r^4 etc.
//for sinr / r -> even powers
// cosr ->even powers.
// can get squared length instead of length. no need for trig calls.
float2 UV2=2*In.UV; //can lose this part by changing UVs sent by VShader. This is here so different PShaders are consistent.
float rsq=UV2.x*UV2.x + UV2.y*UV2.y;
float r4=rsq*rsq;
//float z = cos(r);
float z=1-0.5*rsq+0.041667*r4;
float3 cubeuvw=z;
//cubeuvw.xy=UV2*sin(r)/r;
cubeuvw.xy=UV2*(1-0.16667*rsq+0.008333*r4); //not sure how shader works this out. best to calc factor then multiply each vector component by it.
Out.Col = 1.5*texCUBE(cubeSample, cubeuvw); //brighten scene also!
return Out;
};
PSOutput PShaderCyl (VSOutput In,PSOutput Out)
{
float2 UV2=2*In.UV;
float z = cos(UV2.x);
float3 cubeuvw=z;
cubeuvw.x=sin(UV2.x);
cubeuvw.y=UV2.y;
Out.Col = 1.5*texCUBE(cubeSample, cubeuvw); //brighten scene also!
return Out;
};
PSOutput PShaderCylB (VSOutput In,PSOutput Out)
{
float2 UV2=2*In.UV;
float x2=UV2.x*UV2.x;
float x4=x2*x2;
float z = 1-0.5*x2+0.041667*x4; //cos expansion
float3 cubeuvw=z;
cubeuvw.x=UV2.x*(1-0.16667*x2+0.008333*x4); //sin expansion
cubeuvw.y=UV2.y;
Out.Col = 1.5*texCUBE(cubeSample, cubeuvw); //brighten scene also!
return Out;
};
// The following lines just put this together as a single technique
// with a single pass.
technique Spherical
{ pass p1
{ VertexShader = compile vs_2_0 VShader();
PixelShader = compile ps_2_0 PShader();
}
}
technique Flat
{ pass p1
{ VertexShader = compile vs_2_0 VShader();
PixelShader = compile ps_2_0 PShaderFlat();
}
}
technique Variable
{ pass p1
{ VertexShader = compile vs_2_0 VShader();
PixelShader = compile ps_2_0 PShaderVar();
}
}
technique EArea
{ pass p1
{ VertexShader = compile vs_2_0 VShader();
PixelShader = compile ps_2_0 PShaderEArea();
}
}
technique EAreaB
{ pass p1
{ VertexShader = compile vs_2_0 VShader();
PixelShader = compile ps_2_0 PShaderEAreaB();
}
}
technique Linear
{ pass p1
{ VertexShader = compile vs_2_0 VShader();
PixelShader = compile ps_2_0 PShaderLin();
}
}
technique LinearB
{ pass p1
{ VertexShader = compile vs_2_0 VShader();
PixelShader = compile ps_2_0 PShaderLinB();
}
}
technique Cyl
{ pass p1
{ VertexShader = compile vs_2_0 VShader();
PixelShader = compile ps_2_0 PShaderCyl();
}
}
technique CylB
{ pass p1
{ VertexShader = compile vs_2_0 VShader();
PixelShader = compile ps_2_0 PShaderCylB();
}
}
|
Back to top
 |
|
Sorry, but it has been so long since anyone replied to this Thread that it has been automatically locked.
You may read it but not reply.
Enter a word or phrase to search our Forum for:
|
|
 |