TUTORIAL:
Light mapping your level in DarkBASIC Classic
A while back I posted another tutorial similar to this one, only it used different applications. This is a better way to get the effect done.
List of what you'll need:
The GIMP (
www.gimp.org)
Some basic knowledge of how to USE The GIMP
DarkBASIC Classic (Pro will work, but why bother when you have Dark Lights at your disposal?)
Okay, so you have everything you need, right? Good.
Now, assuming that you have basic knowledge of how to program and how to use/create textures, then you are ready to learn this technique. There will be no code examples, seeing as it's a visual tutorial, but you must know how to load your own media and how to make a small, running program where you can control the camera independently and see your world.
I recommend using Anim8or for your 3D models and exporting them as .3DS. However, you can use Blender and export it as an .X file, but that has presented problems in the past for me. Use whatever you want, it doesn't really matter.
Idea behind the effect.
Well, this effect is very effective. With the right coloring of lights, you can make your level look either creepy, cheery, dark, dank, or just all-around awesome.
Think of the Harry Potter games for PC. The lights in Hogwarts (depending on the area) are bright and cheery in the upper levels, however, in the dungeons, the light mapping is different and has a dark feeling to it, with an eerie blue or gray-ish light. Very effective.
Now, EA used a nice light mapping program (most likely designed by their programmers for their engine) to do this. We cannot do this, unfortunately.
A while back I really wanted to do some lighting experiments. I thought that maybe I could achieve it using the lights built in to DarkBASIC. This, sadly, was not the case, as those use vertex lighting, and can't create lighted textures.
I eventually found a program that was free. It was called Light Map Maker. It seems as though it would work really well, as long as you design your level in Blender 3D, export is an .X, find all of the textures you want to use, open Light Map Maker, texture the whole thing, then light map it, then saving it as a light mapped 'model, saving the image, then going back into Blender, importing the model, then texturing it using the light map. I did that, all by myself, figuring it out. And then I loaded the model into DBC, and it looked really nice! Also, you could use Cartography Shop 4, which is a lot easier. Unfortunately, the only way this would be effective is if you used polygon collision detection, which is slow. So, I came up with an alternative. To use it requires patience, understanding of how GIMP works, the willingness to have multiple textures, and TIME. Have fun, and good luck!
Here's how to create the effect:
First, copy the image that you want to 'light map'. Then open up the copy into GIMP.
Make sure the images are no bigger than 256x256. Any bigger and it will slow down your VRAM.
Make a new, transparent layer over the original image. Make sure it has alpha channels!
Now, take the ellipse selection tool and make a circle on the transparent layer. Take the fill tool, select the color of your light, and fill the selection.
De-select everything. Now go to Filters>Blur>Gaussian Blur, and give it about a 45.0 blur radius. Yeah, it's a lot to blur.
Now go to the layer and select a blending mode. Try them all until you find one that looks realistic, keeps the color the same as you filled it in with, and blends perfectly.
The modes that work the best are Multiply, Additive and Overlay. It may be different for you, so don't be afraid to experiment!
Now, save the image as "texturelightmap.bmp", whereas your original would be called "texture.bmp". You're done!
Here's an example image of what this technique will do to your simple DBC level:
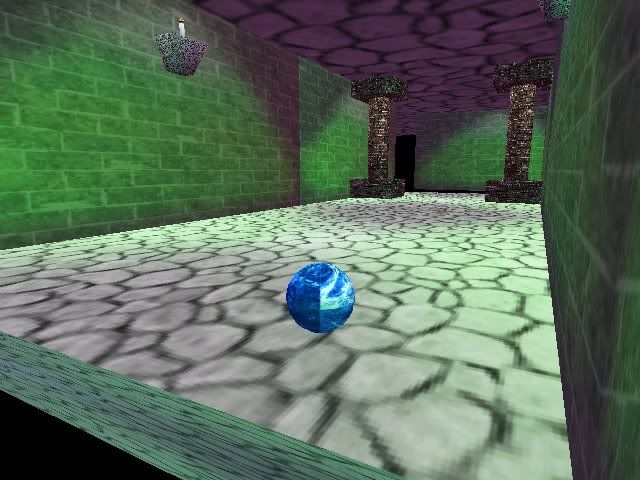
That's how to light map your DBC level! Light map the textures you want to use for your ceiling, floors and walls for a slick effect.
Now, create a 3D model in your program of choice, texture however you find easiest, then make a small program to load your objects and see what the lighting job looks like.
If it's not what you expected, first mess with the ambient lighting in DarkBASIC, as changing that can make all the difference. If that doesn't work then go back and re-light map your textures. Good luck, and I hope this tutorial was helpful!
"People still have 1024x768?" -Jeku
