Sorry your browser is not supported!

You are using an outdated browser that does not support modern web technologies, in order to use this site please update to a new browser.

Browsers supported include Chrome, FireFox, Safari, Opera, Internet Explorer 10+ or Microsoft Edge.

FPSC Classic Product Chat / How to Create Custom Text HUDS (GIMP Tutorial)

Author
Message
Kravenwolf
15
Years of Service
User Offline
Joined: 14th Apr 2009
Location: Silent Hill
Posted: 4th May 2009 04:13 Edited at: 4th May 2009 04:30
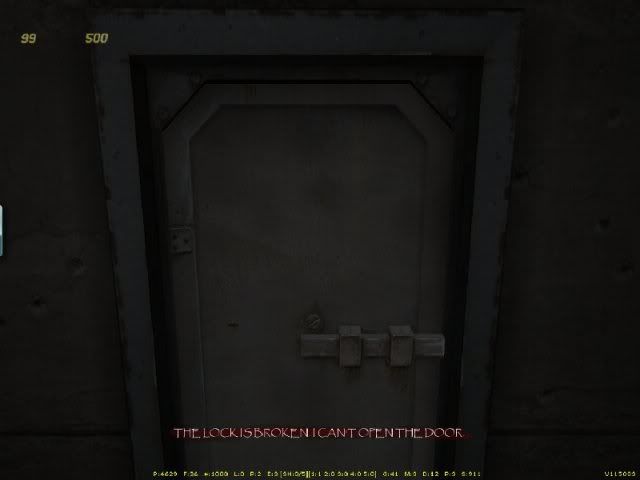
How to Create Custom Text HUDS in GIMP (GIMP Tutorial)


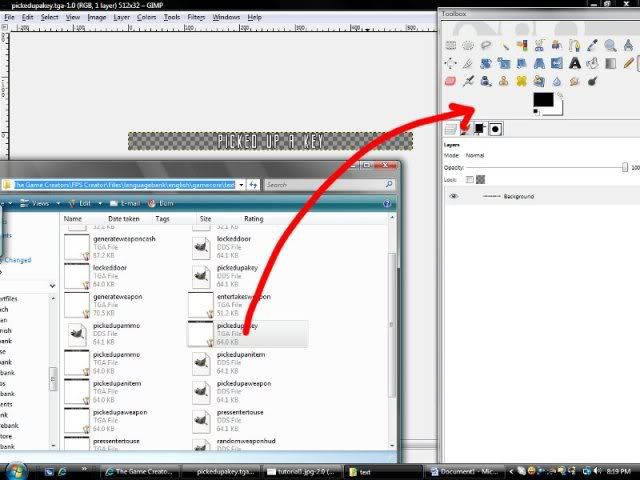
STEP #1

Double-click GIMP to open it. DO NOT open a new image under the file menu. Instead, go into your FPSC files and open an existing text HUD. (You can start from scratch if you like, but this way is faster because the existing HUDS are already set up properly by size, transparency, etc). Choose any HUD in the gamecore text file and drag it to the GIMP toolbar to open the HUD.

C:/Program Files/The Game Creators/FPS Creator/Files/languagebank/english/gamecore/text


STEP #2

Select the current text in the HUD (CTRL + A), and delete it. You should now be left with an empty and transparent, narrow strip. Now, from the toolbar, select the text tool, and open the tool options dialog (both are circled in the preview). This tool allows you to add text to your image. You can choose the font color, the size, and so on.
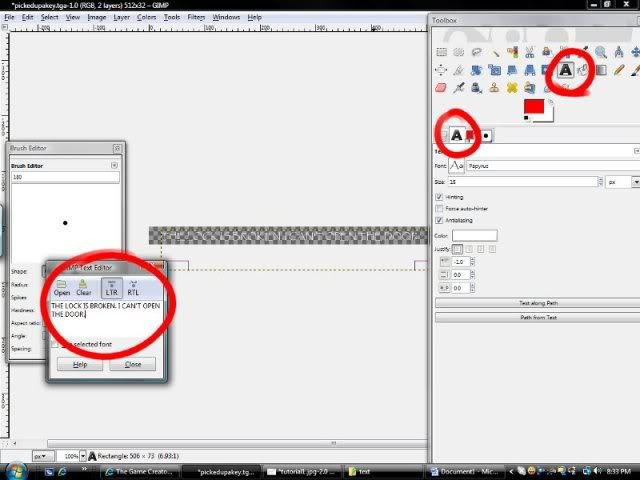


To add text to the HUD, click and drag on the image to create a text box. Once you do that, a text box will appear (circled in preview). Type your HUD here, and it will appear in the box on the image. If you’re not happy with the size, or position of the text at this point, you can go back over to the tool options dialog and change them. If the position of your text box isn’t where you want it to be, just click on the text box you drew on the image, and move it with either the mouse or the arrow keys.


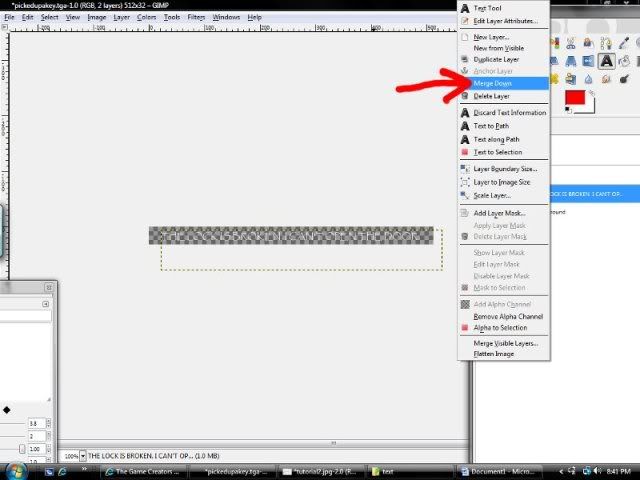
STEP #3
Once you centered your text, press CTRL + L to open the layers dialog. Here, you’re going to merge down your text layer with the background layer of your image. Right-click on the text layer and select “Merge down”. Right-click one more time and select “Layer to Image Size”.
From this point, you can go to file > save as, and save your new HUD in the same file folder you got the template from.

C:/Program Files/TheGameCreators/FPS
CreatorFiles/languagebank/english/gamecore/text

To make the HUD appear, just change the file path in the .fpi script of the object you want to show your new HUD. That’s it!


STEP #4

ADDING DETAIL – If you want to keep going with your HUD, you can add more to it in GIMP to make it more custom. As an example, press CTRL + L to open the layers dialog (if it’s not already open), and right click on your background layer. Choose, “New Layer” from the list.
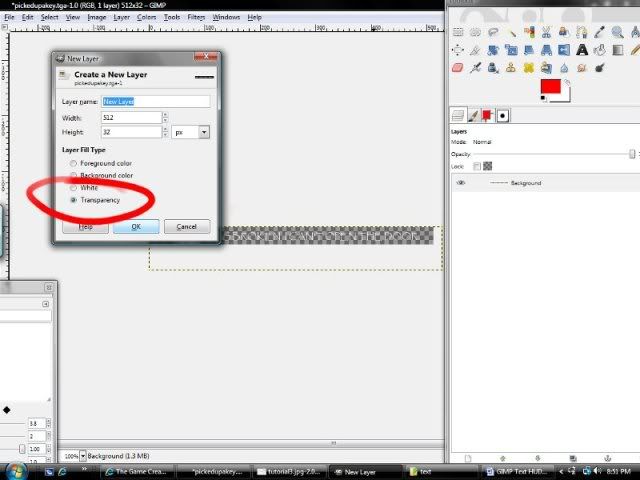


Now, left-click, and drag the new layer so it is underneath the background layer. Once you place it under the background layer, left-click on the new layer to select it (the selected layer will be highlighted blue).
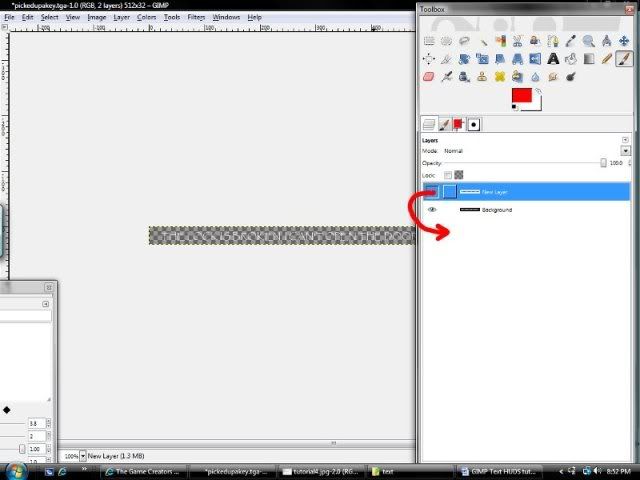


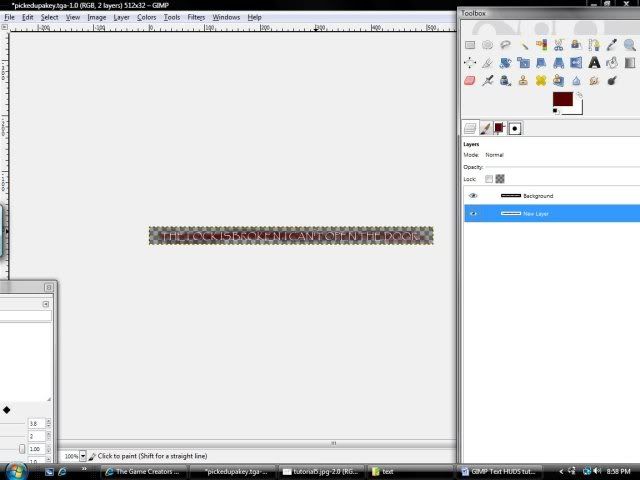
This new layer (since we placed it underneath the background layer) will appear behind our text. So anything we add to this layer will be drawn behind our current HUD. You can use the paintbrush tool to add a background to the text, or create a new text with a different color to add a shadow to the text display. Whatever you choose to add, when you’re finished, make sure to right-click on the top layer, and “Merge Down” the image. Right-click on the image again, and select “Layer to Image Size”. Save your work, and you’re done!


-Kravenwolf

Success is not final--failure is not eternal.
dark peanut
15
Years of Service
User Offline
Joined: 31st Dec 2008
Location: USA
Posted: 4th May 2009 04:17
Great tutorial, thanks for the contribution!

It is common sense to take a method and try it. If it fails, admit it frankly and try another. But above all, try something. ~Franklin Delano Roosevelt
Bendak11
15
Years of Service
User Offline
Joined: 2nd Aug 2008
Location: The bush in your front yard.
Posted: 4th May 2009 04:28
Excellent guide Kraven! This belongs in the Ultimate Community Guide. I think someone is making one of those lol.
Kravenwolf
15
Years of Service
User Offline
Joined: 14th Apr 2009
Location: Silent Hill
Posted: 5th May 2009 01:22
Glad you guys like it, hopefully it will come in handy.

-Kravenwolf

Success is not final--failure is not eternal.
Bejasc3D
15
Years of Service
User Offline
Joined: 17th Aug 2008
Location: Down Under
Posted: 5th May 2009 01:45
I think it will

You might even get a mesage from xplosys soon...

~ Benny Boy 2321 ~ Raw Sandvich ~
henrypan321
15
Years of Service
User Offline
Joined: 10th Mar 2009
Location:
Posted: 6th May 2009 08:44 Edited at: 7th May 2009 05:37
YES!

I was looking for something like this, now I found it!
But...

How do I make the HUD show then disappear like in Beyond Life?
Kravenwolf
15
Years of Service
User Offline
Joined: 14th Apr 2009
Location: Silent Hill
Posted: 12th May 2009 08:10 Edited at: 12th May 2009 08:12
The HUD appears when you're within x distance from the object it's 'attached' to. It disappears when you step out of that range. If you want it to disappear after x amount of time, you would have to go into the main script of the object and 'tell' the HUD from there to fade out after x amount of time.


-Kravenwolf

Success is not final--failure is not eternal.
TZap
18
Years of Service
User Offline
Joined: 29th Aug 2005
Location:
Posted: 12th May 2009 22:08
Nice one mate. It took me ages to work out how to do it...and I've forgotten again! This reminder will save me time for my next game.
Sandante
15
Years of Service
User Offline
Joined: 9th Sep 2008
Location: Dark World
Posted: 13th May 2009 02:05
Thank you Kravenwolf this is realy great!!
Kravenwolf
15
Years of Service
User Offline
Joined: 14th Apr 2009
Location: Silent Hill
Posted: 14th May 2009 19:04
Glad to help out


-Kravenwolf

Success is not final--failure is not eternal.
Travis Gatlin
14
Years of Service
User Offline
Joined: 14th May 2009
Location: Oxford, Alabama
Posted: 25th May 2009 03:08
wow could be very useful for making different styles of games! thx 4 showing me that!
Game Creator 3000
14
Years of Service
User Offline
Joined: 27th Apr 2009
Location:
Posted: 31st May 2009 13:45
Hey Kravenwolf, fistly I want to thank you for this tutorial and secondly I´ve got a question:

If I change it, it doesn´t be shown in the game.
I can change the tga datas, but with gimp I can´t open the dds datas.
I changed now some of the files, but it doesn´t works.
Can you help me please?
It´s very important...
for me

thanks for all answers.

I´m everywhere...
everytime...
look! I´m behind you!
Dar13
15
Years of Service
User Offline
Joined: 12th May 2008
Location: Microsoft VisualStudio 2010 Professional
Posted: 31st May 2009 15:24
Game Creator 3000:You have to get the .dds plugin from the gimp website(Here...) and install that, then you can open/save/edit/whatever to .dds files.

As for the it-doesn't-change-according-to-my-changes question, sometimes if you don't "refresh" the script(select it again for the entity's AI or trigger's AI) FPSC will detect no change and the changes made to the script and/or to the HUD will be ignored and the old copy will be used.

Game Creator 3000
14
Years of Service
User Offline
Joined: 27th Apr 2009
Location:
Posted: 31st May 2009 16:07
oh, ok, thank you for youre answer!

I´m everywhere...
everytime...
look! I´m behind you!

Login to post a reply

Server time is: 2024-04-20 11:32:59
Your offset time is: 2024-04-20 11:32:59