Ok maybe this isnt for newcomers but here it is anyway. I am not the best at memblock meshs but hopefully this could get some poeple on there way to learning about them
 Memblock Mesh Tutorial
Ok we will do a little setup to make sure we have a steady sync rate and the camera doesnt move
while we make new objects by using the sync and autocam commands
sync on
sync rate 60
autocam off
You may be wondering what are faces and vertices. Faces and vertices are what make the object and faces
can be any 2D shape. It can be a tri, quad, oct, ect. To make faces it has to have vertices and the vertices
connect to make a face. Simple isn't it.
We will start by making a plain. A plain has two sides and four corners so you think we only need 2 faces
that are quads. No because DBpro triangulates all models so it will have 4 faces instead. This will be the
same with a memblock mesh.
Have you ever seen the make memblock from mesh command and thought huh. Well the to put it as simple as
I can I'll write out.
fvf format -dword
fvf size -dword
vertices in mesh -dword
model's vertex position x -float
model's vertex position y -float
model's vertex position z -float
model's vertex normal x -float
model's vertex normal y -float
model's vertex normal z -float
vertex diffuse color -dword
u vertex data -float
v vertex data -float
If you don't know what a float is it is a number that can have decimals and takes up 4 bytes. A dword is almost the same as a float but can't have a decimal
This is the 338 fvf format so it will be different for other fvf formats such as 274 which doesnt have
vertex diffuse color dword. Now to explain what each one does. The fvf format is the format you have
to follow. Throughout the tutorial I will be using the 338 fvf format. The fvf size is how big the
format is and every dword and float is 4 bytes. To find out what it is you count how many bytes are
in the format excluding the first three dword becuase they only need to be in the memblock once at
the top. The verticies in mesh dword is how many vertices are in the mesh and since one vertex is
36 bytes we subtract the memblock size(using get memblock size()) by 12(first three dwords) then
divide it by three.
Now the vetex data. The Model's vertex positions x/y/z are the position in model space meanning
it is relative to the models position. So to get the 3D world space you add the vertexs position
by the objects position. The model's vertex normal x/y/z is how it is rendered although I have
no idea how to calculate it xD. Vertex Diffuse color is how the light affects the color of the
object. Just like the set object diffuse except on a vertex. UV vertex data is the position on
an image(I will explain more in the tutorial).
Now that I explained everything we will start by making a simple face. It would be extreamly long
If we wrote out everything so we will make a function called create_vertex. It has to include
everything in the format so we will make a skeleton as I like to call it.
function create_vertex()

   write memblock float
   write memblock float
   write memblock float
   write memblock dword
   write memblock float
   write memblock float

endfunction
It has to except input and we need to input the memblock number, vertex, vertex position, diffuse color, and uv data
Then we have to write it in the memblock so now it should look like this
function create_vertex(memnum,v,vposx#,vposy#,vposz#,color as dword,u#,v#)

   write memblock float memnum,v*36+12,vposx#
   write memblock float memnum,v*36+16,vposy#
   write memblock float memnum,v*36+20,vposz#
   write memblock dword memnum,v*36+40,color
   write memblock float memnum,v*36+44,u#
   write memblock float memnum,v*36+48,v#

endfunction
We have to put color as dword becuase the it will automaticaly be declared as an integer and
we dont want that.
Now we want to make a function that makes the correct kind of memblock for us. That can set
how many vertices we have, the memblock size, fvf format, and size
function create_memblockobject(memnum,v)

   make memblock memnum,12+(36*v)
   write memblock dword memnum,0,338
   write memblock dword memnum,4,36
   write memblock dword memnum,8,v

endfunction
The input is the memblock number and vertices in the object. This will be used with the
create_vertex() command. But there is one last thing how do we make a memblock into a
mesh. This is simple but to make it even simplier we will also create another function
for it. To create a memblock into an object we first have to make a mesh and make that
mesh into an object. So here it is
function make_object(objnum,meshnum,memnum,imgnum)

   make mesh from memblock meshnum,memnum
   make object objnum,meshnum,imgnum

endfunction
You can just set the imgnum to 0 for now thats only if you want an image for your object.
Although I have no idea how to set a normal we have to set it to something otherwise the
vertex diffuse wont work so we will make a new function.
function set_normal(memnum,v,normalx#,normaly#,normalz#)

   write memblock float memnum,v*36+24,normalx#
   write memblock float memnum,v*36+28,normaly#
   write memblock float memnum,v*36+32,normalz#

endfunction
Ok now to test what we made. First we need to use the create_memblockobject() function we made.
We will use memblock 1 and we will make a triangle with two sides so that means 6 vertices. Now
your thinking why 6 vertices why not 3? This is becuase you have to make a new vertex for each
face and since we are making two faces that would be 6 vertices. Next we need to create 6 vertices.
Now think like its on a grid. We want one vertex up a to create the tip and two for the sides. We
will also color each vertex a different color to tell which one is which. So you should have this.
create_vertex(1,0,0,5,0,rgb(0,120,0),0,0)
create_vertex(1,1,5,0,0,rgb(120,0,0),0,0)
create_vertex(1,2,-5,0,0,rgb(0,0,120),0,0)
As you can see we wont need the uv data so it has been set to 0 and the vericies start at 0. You can
change this in the function if you want doing something like inc v but we will leave it like this
for now.
We also have to make the backface but how. To make a face look at the direction you want them
all you have to do is either make them clockwise or counter clockwise. Clockwise is facing the
front and counter clockwise is facing the back so all we have to do is make the same verticies
but backwards. It should be this
create_vertex(1,3,0,5,0,rgb(0,120,0),0,0)
create_vertex(1,4,-5,0,0,rgb(0,0,120),0,0)
create_vertex(1,5,5,0,0,rgb(120,0,0),0,0)
Do you remember why we made the set_normal function so it was to make the diffuse vertex color to work.
So now we have to set the normal of the face. Since I have no idea how to calculate it which I said
multiple times we will just set it to a number between 0 and 1 like 0.2. So now you should have this
set_normal(1,0,0.2,0.2,0.2)
set_normal(1,1,0.2,0.2,0.2)
set_normal(1,2,0.2,0.2,0.2)
set_normal(1,3,0.2,0.2,0.2)
set_normal(1,4,0.2,0.2,0.2)
set_normal(1,5,0.2,0.2,0.2)
Now to make an object using our simple make_object() command. Which should be
something like make_object(1,1,1,0)
To see our newly created object we will position the camera out by 20 using position camera.
We will also use a loop to constantly view our object and let us rotate our object to view
all sides. Which should be along the lines of this
position camera 0,0,-20

do

if leftkey()=1 then yrotate object 1,wrapvalue(object angle Y(1)+1)
if rightkey()=1 then yrotate object 1,wrapvalue(object angle Y(1)-1)

sync
loop
Our final code should now be
`setup
sync on
sync rate 60
autocam off

create_memblockobject(1,6)

create_vertex(1,0,0,5,0,rgb(0,120,0),0,0)
create_vertex(1,1,5,0,0,rgb(120,0,0),0,0)
create_vertex(1,2,-5,0,0,rgb(0,0,120),0,0)
create_vertex(1,3,0,5,0,rgb(0,120,0),0,0)
create_vertex(1,4,-5,0,0,rgb(0,0,120),0,0)
create_vertex(1,5,5,0,0,rgb(120,0,0),0,0)
set_normal(1,0,0.2,0.2,0.2)
set_normal(1,1,0.2,0.2,0.2)
set_normal(1,2,0.2,0.2,0.2)
set_normal(1,3,0.2,0.2,0.2)
set_normal(1,4,0.2,0.2,0.2)
set_normal(1,5,0.2,0.2,0.2)

make_object(1,1,1,0)

position camera 0,0,-20

do

if leftkey()=1 then yrotate object 1,wrapvalue(object angle Y(1)+1)
if rightkey()=1 then yrotate object 1,wrapvalue(object angle Y(1)-1)

sync
loop

```````````````````
`````Functions`````
```````````````````

function create_memblockobject(memnum,v)

   make memblock memnum,12+(36*v)
   write memblock dword memnum,0,338
   write memblock dword memnum,4,36
   write memblock dword memnum,8,v

endfunction

function create_vertex(memnum,v,vposx#,vposy#,vposz#,color as dword,u#,v#)

   write memblock float memnum,v*36+12,vposx#
   write memblock float memnum,v*36+16,vposy#
   write memblock float memnum,v*36+20,vposz#
   write memblock dword memnum,v*36+36,color
   write memblock float memnum,v*36+40,u#
   write memblock float memnum,v*36+44,v#

endfunction

function set_normal(memnum,v,normalx#,normaly#,normalz#)

   write memblock float memnum,v*36+24,normalx#
   write memblock float memnum,v*36+28,normaly#
   write memblock float memnum,v*36+32,normalz#

endfunction

function make_object(objnum,meshnum,memnum,imgnum)

   make mesh from memblock meshnum,memnum
   make object objnum,meshnum,imgnum

endfunction
Here is what you will get in the end
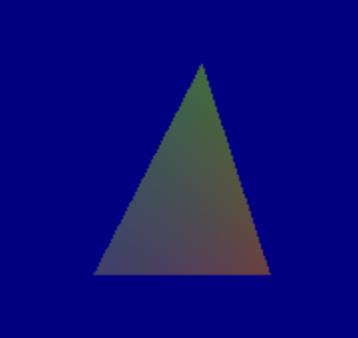
Test it out and see what you can make!
Hope this is of any use to anyone and if you want me to add something tell me. Oh and if anyone knows how to calculate an angle tell me that too because I have no idea how.
Naruto is the ninja...not really

