Sorry your browser is not supported!

You are using an outdated browser that does not support modern web technologies, in order to use this site please update to a new browser.

Browsers supported include Chrome, FireFox, Safari, Opera, Internet Explorer 10+ or Microsoft Edge.

3 Dimensional Chat / [20-Step-Tutorial] Rigging a model in Milkshape 3D

Author
Message
Xenocythe
19
Years of Service
User Offline
Joined: 26th May 2005
Location: You Essay.
Posted: 7th Apr 2007 20:24 Edited at: 8th Apr 2007 06:21
I wrote a 20-step tutorial on how to rig a model in Milkshape 3D.
This tutporial is based on humans, but can also be applied to animals, monsters, etc.

I'll make more tutorials in milkshape later. Some will be for modelling, some will be for animating.


1.Open milkshape.

2.Load your model.

3.Click on the 'joint' tool.

4.Creat a joint at the middle of the pelvis (hip).
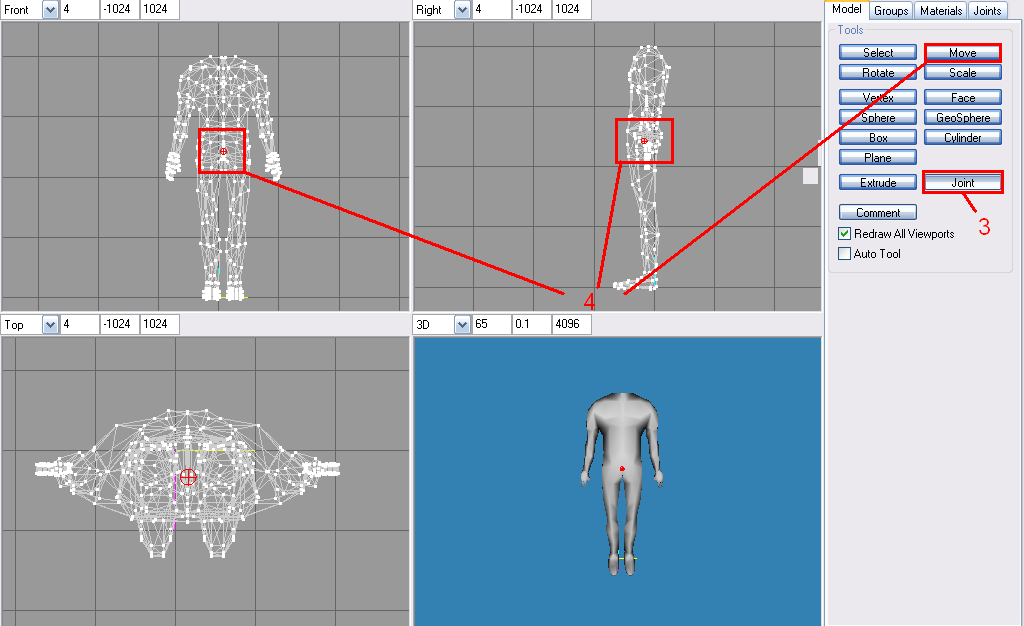


5.Move it around in different perpectives to get it in the middle using the 'move' tool.

6.Now make sure that joint is selected. Click on the 'joint' tool again.

7.Make a joint at the top of the left leg. Make a joint on the knee of the left leg. Move both around in different perspectives to make it perfect.
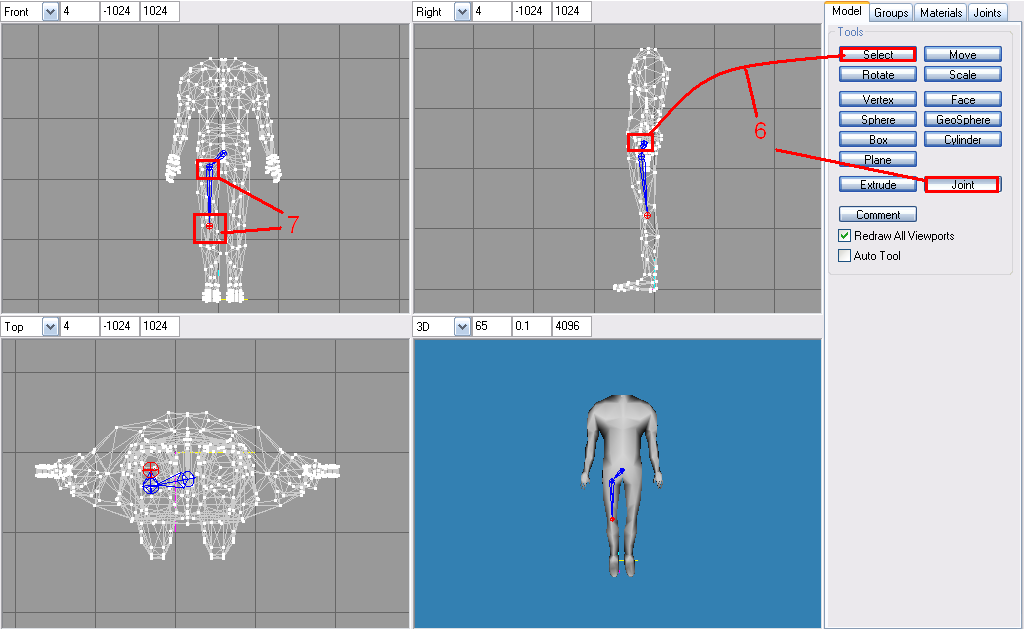


8.Make a joint at the foot of the left leg. Move it around in different perspectives to make it perfect.

The process that we are going through is called 'rigging'. Rigging is setting up a 'skeleton' with these joints. This skeleton is used for animation.

9. We aren't done rigging though. At the top right of the program, right below the 'X' button, there is a tab for 'Joints'. Click on that tab.

10.There you should see the 4 joints that you created in order. The first is the joint of the pelvis, second of the leg, third of the knee, and fourth of the foot.

11.Click on the first joint, and you will see that the skeleton is selected. Do not click anything.
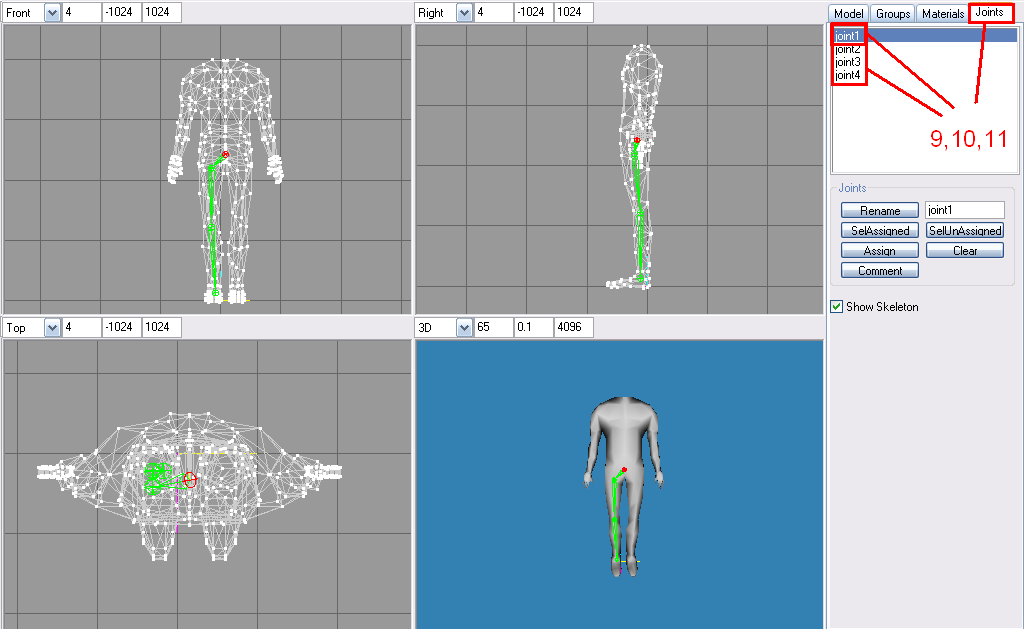


12.On your keyboard, press 'Ctrl' and 'A' at the same time. This selects everything.

13.Now in the Joints tab, click the button that says 'Assign'. What this does is assign all of the vertices on your model to that pelvis joint. You want to do this with most models. The pelvis joint connects the top and bottom of your model. This will be what is called the 'root' joint. That is the main joint of your model.

14.Now click on the second joint, which should be at the top of the leg of the model. You will see that it selects the entire leg of the skeleton.

15.In the tabs where you chose the 'Joint' tab, go back to the 'Model' tab. Click on 'Select'. Down at 'select options', make sure you have 'vertex' selected. Also make sure that the check-box 'Ignore backfaces' is NOT selected.

16.Select all the vertexes of that leg while holding down shift. This way, you still have the joint selected. If you want to de-select, use the right mouse button instead of the left.

17.Go back to the 'Joints' tab and hit 'assign'. Now, you have the vertexes of the leg assigned to the leg joint.

18.Do the same process for the knee. Select its joint, select the vertexes from the knee and down, and hit assign. once you have done this for the leg, knee, and foot, you are done the process of rigging.

19. Save your model by going to 'File/save'. Now, in the 'Models' tab, click on 'Select' and make sure in 'select options' you have 'joint' selected.

20. At the very bottom right, click on the button that says 'Anim'. Now select any one of your joints. Use the move and rotate buttons. You will see that the vertexes that you added to the joint are being manipulated. Click 'Animate/Set Keyframe' to set that keyframe. Play with the max animation frames and which frame you are on at the bottom. Good luck

indi
22
Years of Service
User Offline
Joined: 26th Aug 2002
Location: Earth, Brisbane, Australia
Posted: 8th Apr 2007 04:09
you forgot to add a joint from the pelvis to the floor.
this allows you to animate the character off the ground for walking, jogging and jumping.
It also applies to 4 legged creatures, when they need to be completely in the air for galloping and bucking.

Xenocythe
19
Years of Service
User Offline
Joined: 26th May 2005
Location: You Essay.
Posted: 8th Apr 2007 05:06
Indi, actually, I never even did that before. I just use my sense of height from the axis and grid that is displayed, and the position in the previous frames.

But what do you think of the tutorial on a scale of 1-10, ten being amazing?

5Louiz
18
Years of Service
User Offline
Joined: 15th Nov 2006
Location: Brasil
Posted: 8th Apr 2007 05:27 Edited at: 8th Apr 2007 05:29
Well done. I do not use MilkShape - I used it, but this tutorial looks really nice. It does deserve a 9 Actually, some illustrative images would delight even more people.


Xenocythe
19
Years of Service
User Offline
Joined: 26th May 2005
Location: You Essay.
Posted: 8th Apr 2007 05:34
Thanks

Sure, I'll add some images for the steps.

Xenocythe
19
Years of Service
User Offline
Joined: 26th May 2005
Location: You Essay.
Posted: 8th Apr 2007 06:22
I rushed those images and I'll add the rest later tomorrow.

indi
22
Years of Service
User Offline
Joined: 26th Aug 2002
Location: Earth, Brisbane, Australia
Posted: 8th Apr 2007 06:57
I think its a good start but there is already an in depth tutorial based website dedicated to these results.

http://www.josh.ch/joshch/tutorials/milkshape,welcome.html

The information has been at this site for months.

6.5 for giving it a go.
3.5 for not exploring whats already out there.

Seppuku Arts
Moderator
20
Years of Service
User Offline
Joined: 18th Aug 2004
Location: Cambridgeshire, England
Posted: 8th Apr 2007 15:38
Very Good, mind if I link this one on my site? (Saying that, I still need to link moondog's tutorial)

Did The Buddha have a Zen micro?
Xenocythe
19
Years of Service
User Offline
Joined: 26th May 2005
Location: You Essay.
Posted: 8th Apr 2007 19:00
Thanks indi I'm glad I at least got a rating of 6, as this is one of the simpler tutorials and there are many of these out there.

I'm hoping my Modelling 20-Step-Tutorials get more credit though


Sep- You sure can! But eventually, I will be moving my tutorials to my website, so I'll post in the threads when they have been moved.


I'll put up more images later today.

Login to post a reply

Server time is: 2024-11-26 10:41:54
Your offset time is: 2024-11-26 10:41:54