Sorry your browser is not supported!

You are using an outdated browser that does not support modern web technologies, in order to use this site please update to a new browser.

Browsers supported include Chrome, FireFox, Safari, Opera, Internet Explorer 10+ or Microsoft Edge.

FPSC Classic Product Chat / Inspire's Grunge Texturing Tutorial

Author
Message
Inspire
17
Years of Service
User Offline
Joined: 23rd Dec 2006
Location: Rochester, NY
Posted: 12th Jun 2007 23:00 Edited at: 13th Jun 2007 00:06
Inspire's Grunge Texturing Tutorial

Found at Inspire! Media.

***Part One: Concrete***

Note: This tutorial is aimed at people with almost no Photoshop experience at all, so even the inexperienced can learn.

You can also find this tutorial on my site under the "Tutorials" Section, located here.

Ever wonder on how to create realistic cement-like textures, without using a digital camera? After seeing many complaints, I created the following tutorial.

Create a new image by clicking File > New. I would set the width and height to 1024 x 1024, because it's always best to start big.

Using the paint bucket tool, color the background the color of your choice. For this example, I used RGB (8D8D8D).

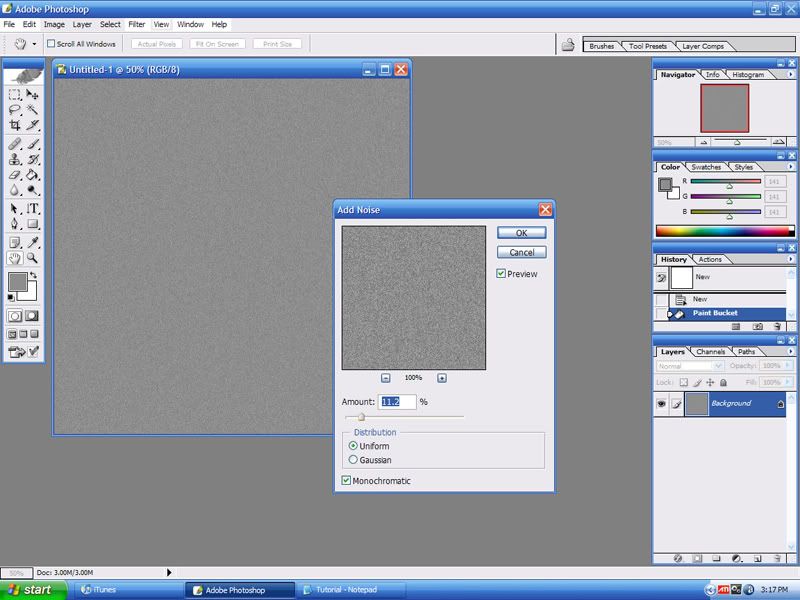
Add noise. This is the best way to add a light sense of wear and tear, without making it obvious. Click Filter > Noise > Add Noise. Check "Uniform" and Monochromatic, and then play with the amount of noise until you are happy. I would pick anything from around 6.0 to 25.00. For this, I chose "11.2".


Make sure you have some good, grunge brushes. It is very easy to get some, just search "Download grunge Photoshop brushes" in Google. After you download these files "they should be in the ".ABR" format), install them into Photoshop by placing them into the following folder: [Photoshop Directory]/Presets/Brushes.

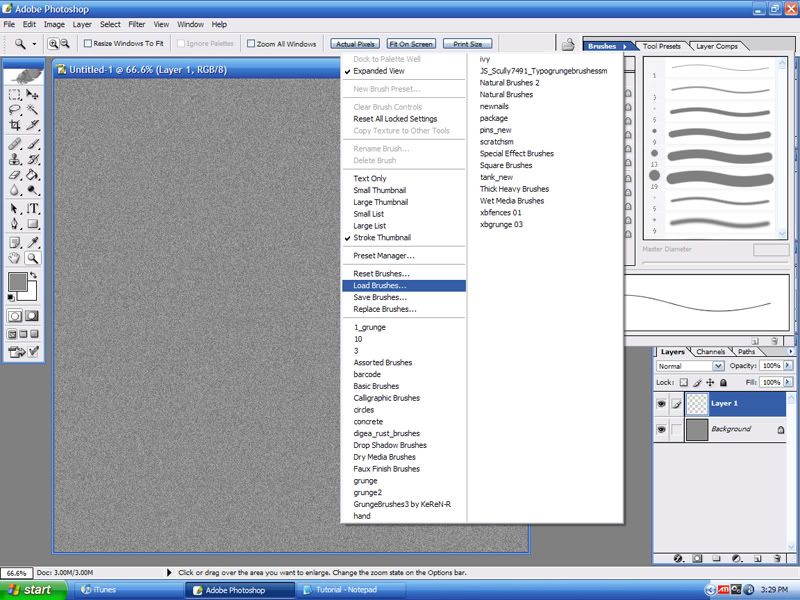
Now, create a new layer by clicking Layer > New > Layer, or by pressing "Shift+Ctrl+N". Once your new layer has been created, select your new brushes by clicking the "Brushes" tab in the top right-hand corner of Photoshop, or if you have it as a palette, select that. Click the little arrow to bring down the menu, and select "Load Brushes". This will open an Explorer window in which you select the brushes of your choice. These brushes should now be available in the Brush Select Menu in the top-left corner. To switch quickly between brushes, you can choose brushes that you have already loaded at the bottom of the Brushes tab.


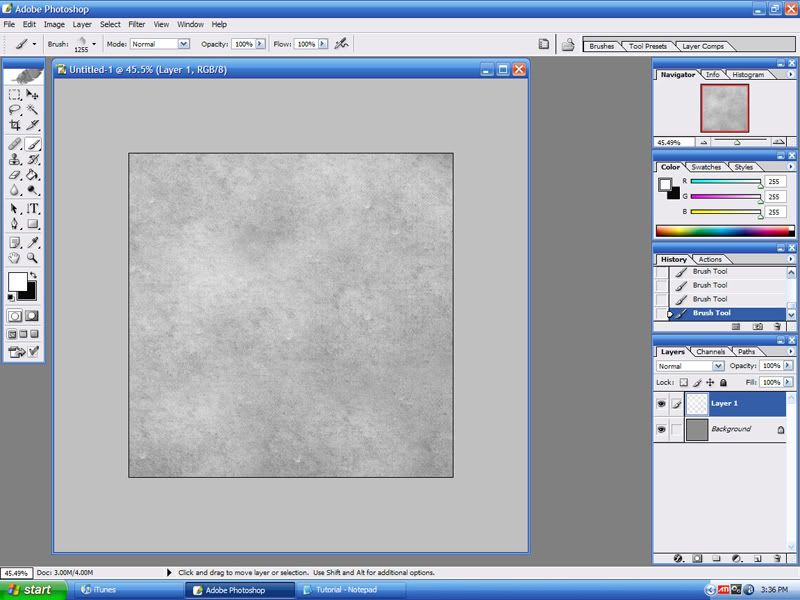
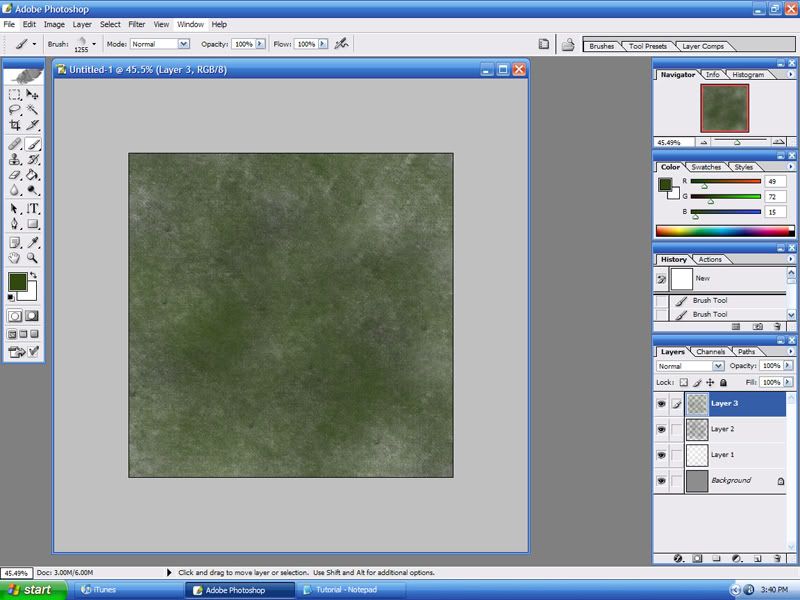
After selecting your brush of choice (I would choose a large, cloud-like dirt brush), change your colors to white and black, if they aren't already. Select your new layer and cover it entirely with this brush, like in the screenshot below. Make sure your brush is fairly large enough to do this by adjusting it's diameter in the Brush Select Menu.


Create another new layer, and do the same, except with black. This will probably look pretty bad at this point, but don't worry, it isn't finished. Repeat this process again with different colors, maybe a dark green or a rusty orange. I used dark green in this example. This is what mine looked like after three layers and three different colors:


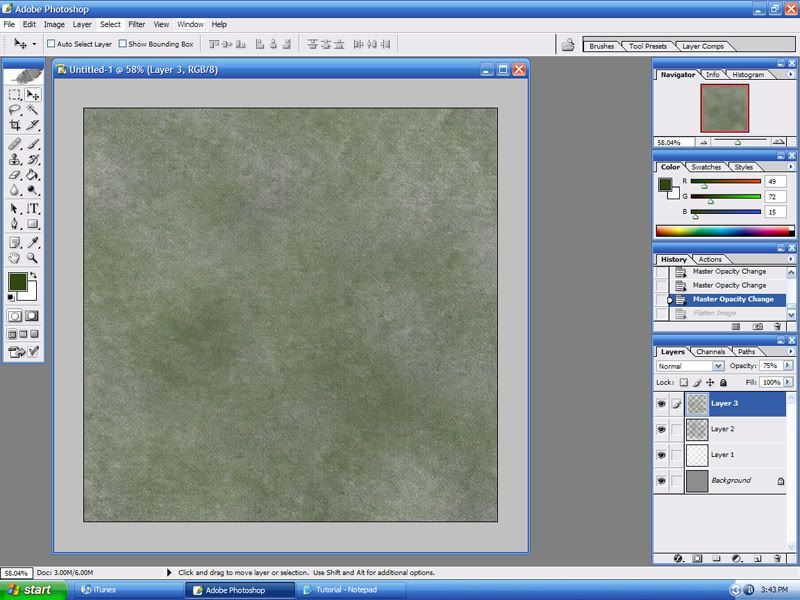
Adjust the opacity of each layer until they blend together well, none of them being dominant over the other ones. Save often while making textures, because a sudden computer freeze or an accident could cause something getting broken.


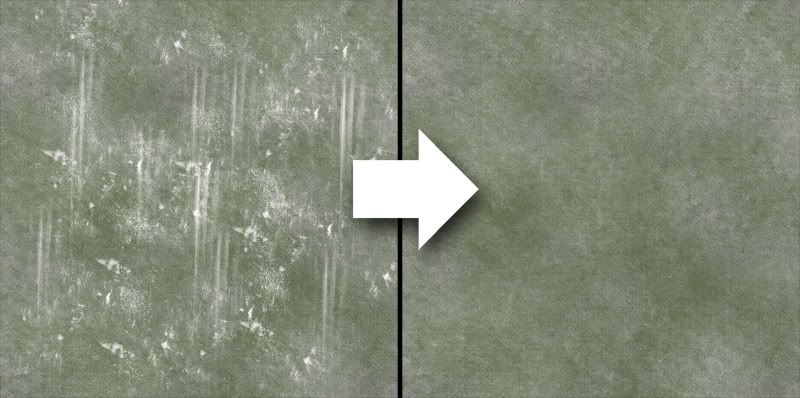
This next part is optional. If you have small, scratch-like brushes, load them up. Create a new layer, and change your color to white. Randomly spread a single brush over a layer. Do this again with different scratch brushes and new layers. For a nice set of scratch brushes, check this out (download). Again, this will look stupid at first, but adjust the opacity until it is barely noticable, and you're good to go. Depending on the brightness of your texture, this opacity might even get down below 5%. For my three layers, I got 8%, 10%, and 14%. It's okay if you can barely notice these layers, because they will show up in the next step. Save your texture as a .PSD file at this point.


After making sure everything looks just right, flatten your image by clicking Layer > Flatten Image. Now, click Filter > Other > Custom. Make sure that the settings look like the ones in the following screenshot:


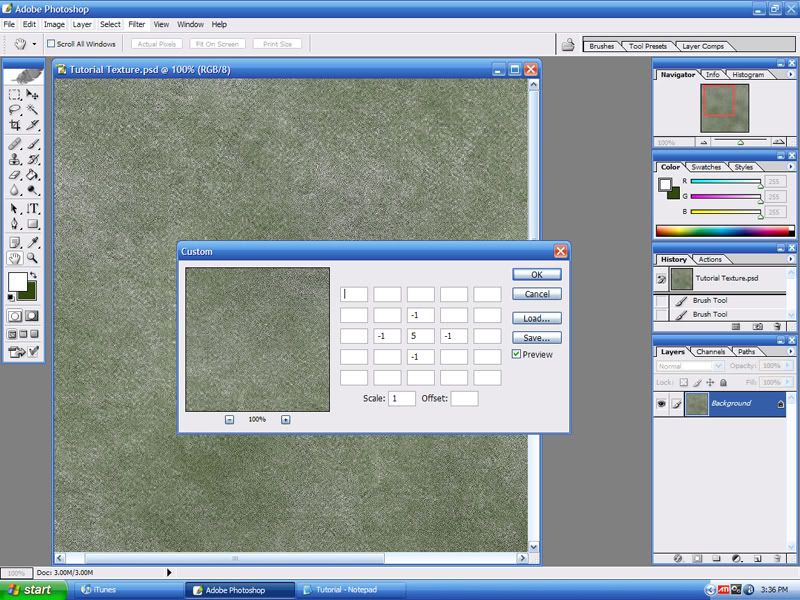
If your settings look like this, the filter should sharpen your image. If you want, play with the color / brightness / contrast settings, and then save as your desired file type. I recommend not saving over the .PSD file you just saved, so you can go back and edit the texture in the future, if you need to.

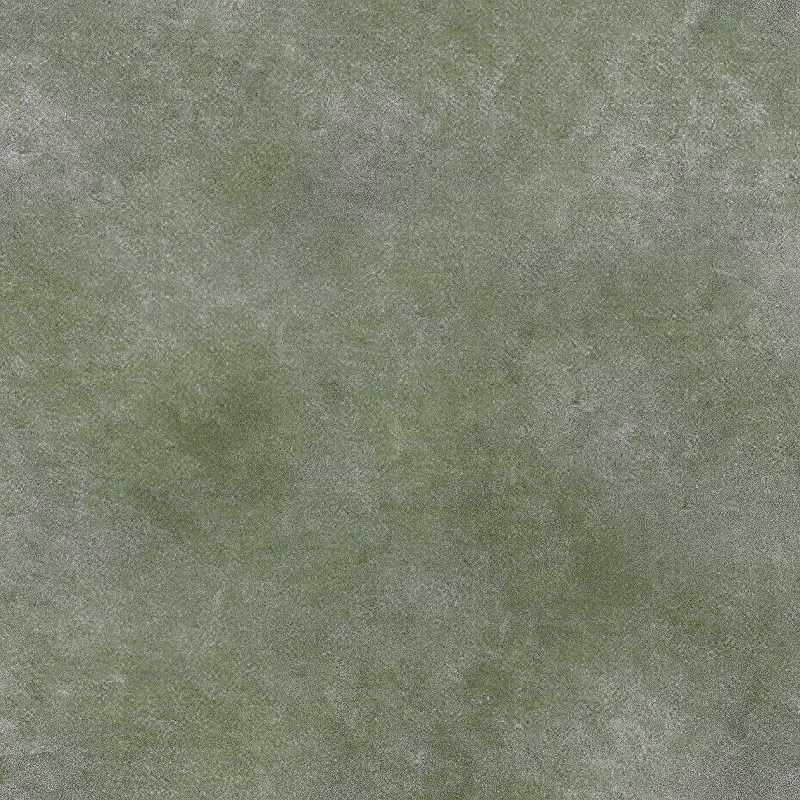
Here is my finished texture. You may save it and use it however you want, as long as you credit Inspire! Media.


Inspire
17
Years of Service
User Offline
Joined: 23rd Dec 2006
Location: Rochester, NY
Posted: 12th Jun 2007 23:03
Does anybody have any idea why my images aren't showing up? The code is all correct, and the images are definitely on my server.

X Games
17
Years of Service
User Offline
Joined: 8th May 2007
Location: World Wide Web
Posted: 12th Jun 2007 23:07
Quote: "Does anybody have any idea why my images aren't showing up? The code is all correct, and the images are definitely on my server."


It may be the space (Screenshot 4) group it (Screenshot4)

FPSCreator content, information and resources.

http://x-games.mdhost.info/index.htm
Stoopid
18
Years of Service
User Offline
Joined: 8th Jul 2006
Location: Outside your window with a laptop.
Posted: 12th Jun 2007 23:07 Edited at: 12th Jun 2007 23:08
img] and [/img

"Use Thy Holy Hand-grenade!"
Inspire
17
Years of Service
User Offline
Joined: 23rd Dec 2006
Location: Rochester, NY
Posted: 12th Jun 2007 23:12
Yeah, i know the code, Stoopid. (haha)

Quote: "It may be the space (Screenshot 4) group it (Screenshot4)"


Might be, or might just be that Apollo hates my server. lol

Got it all working, thanks to Photobucket.

Shadow heart
17
Years of Service
User Offline
Joined: 2nd Dec 2006
Location: US
Posted: 12th Jun 2007 23:20
haha cool

to the ones thats trapped inside of you, this is it!!
Nickydude
Retired Moderator
17
Years of Service
User Offline
Joined: 4th Nov 2006
Location: Look outside...
Posted: 12th Jun 2007 23:25
That's great Inspire! Could I possibly add it to my guide?


Search for "HellHouse" in Showcase.
Inspire
17
Years of Service
User Offline
Joined: 23rd Dec 2006
Location: Rochester, NY
Posted: 12th Jun 2007 23:33
Quote: "That's great Inspire! Could I possibly add it to my guide?"


Of course, Nickydude. But you're making that into a .PDF though!

In your guide, when you say that the tutorial was written by Inspire, can you have a link to my website, please?

Roger Wilco
19
Years of Service
User Offline
Joined: 6th Jul 2005
Location: In the Shadow of Chernobyl
Posted: 12th Jun 2007 23:41
Thanks man, most useful. Now, I just need to afford to buy licenses for using Alice in Chains and Nirvana music in my game, and we're off the grunge road.

"Or perhaps we're just one of god's little jokes?"
Inspire
17
Years of Service
User Offline
Joined: 23rd Dec 2006
Location: Rochester, NY
Posted: 13th Jun 2007 00:07
Thanks Roger.

Just added the tutorial to our website, find the link in the first post.

X Games
17
Years of Service
User Offline
Joined: 8th May 2007
Location: World Wide Web
Posted: 13th Jun 2007 00:10
Nice tut very useful to me.

Thanks man

FPSCreator content, information and resources.

http://x-games.mdhost.info/index.htm
Nickydude
Retired Moderator
17
Years of Service
User Offline
Joined: 4th Nov 2006
Location: Look outside...
Posted: 13th Jun 2007 00:15
Quote: "Of course, Nickydude. But you're making that into a .PDF though!"


I'm slightly confused by the phrase "you're making that into a .PDF though!". Are you saying I can't make a pdf if I add it?

Quote: "In your guide, when you say that the tutorial was written by Inspire, can you have a link to my website, please?"


Not a problem


Search for "HellHouse" in Showcase.
Inspire
17
Years of Service
User Offline
Joined: 23rd Dec 2006
Location: Rochester, NY
Posted: 13th Jun 2007 00:22
No, I'm saying that I'm not gonna' do it, and you are. lol

Nickydude
Retired Moderator
17
Years of Service
User Offline
Joined: 4th Nov 2006
Location: Look outside...
Posted: 13th Jun 2007 00:35
Right I've done it with all the other tutorials on here, so why not yours! lol.


Search for "HellHouse" in Showcase.
Nickydude
Retired Moderator
17
Years of Service
User Offline
Joined: 4th Nov 2006
Location: Look outside...
Posted: 13th Jun 2007 00:58
Done


Search for "HellHouse" in Showcase.
Luke314pi
18
Years of Service
User Offline
Joined: 11th Apr 2006
Location: Minneapolis, MN
Posted: 13th Jun 2007 14:55
Very nice

Airslide
19
Years of Service
User Offline
Joined: 18th Oct 2004
Location: California
Posted: 14th Jun 2007 00:25
Looks like a good tut Inspire, thanks

Nickydude - I looked through your guide (the first time the PDF didn't crash my browser ) And found you gave xplosys credit for my keypad script (Door Pin #2 or something like that). I'd appreciate it if you'd fix that


Vote today and play the games!
Nickydude
Retired Moderator
17
Years of Service
User Offline
Joined: 4th Nov 2006
Location: Look outside...
Posted: 14th Jun 2007 02:56
Apologies for that, that is now corrected


Search for "HellHouse" in Showcase.

Login to post a reply

Server time is: 2024-10-09 15:19:56
Your offset time is: 2024-10-09 15:19:56