Sorry your browser is not supported!

You are using an outdated browser that does not support modern web technologies, in order to use this site please update to a new browser.

Browsers supported include Chrome, FireFox, Safari, Opera, Internet Explorer 10+ or Microsoft Edge.

3 Dimensional Chat / 3DS Max - UV Mapping - Set multiple verticies to average location?

Author
Message
RUCCUS
19
Years of Service
User Offline
Joined: 11th Dec 2004
Location: Canada
Posted: 4th Aug 2007 20:29
Anyone fairly good with Max's UV Mapper know how to do this? Basically I want to be able to grab a bunch of vertices's, and have them all be positioned at the average location between them all.

Cant find any information on the net about it.


Zergei
19
Years of Service
User Offline
Joined: 9th Feb 2005
Location: Everywhere
Posted: 5th Aug 2007 07:02
Quote: "have them all be positioned at the average location between them all."


I'm not quite sure what you mean by that, could you explain a bit further, and maybe an example?

Further on my stuff at...
TurboSquid.com
The3dStudio.com
RUCCUS
19
Years of Service
User Offline
Joined: 11th Dec 2004
Location: Canada
Posted: 5th Aug 2007 11:24
Well lets say I've just applied a planar map to 4 faces that I want to have the same texture on every single one. Instead of drawing the texture ontop of each face seperately, I would position every face in the UV editor ontop of each other, and now I only need to draw 1 texture that will be applied to all 4 faces. The problem is, its hard to get all 4 faces positioned at exactly the same location. The verts are always a tiny bit off from each other, like all of the top left verts might be a few pixels apart. I can always keep zooming in, moving the verts closer to each other, and repeating, but itd be easier if I could just select all of the top left corner verts, and have them all positioned at the midpoint between them all.

Here's a graphic to help explain:
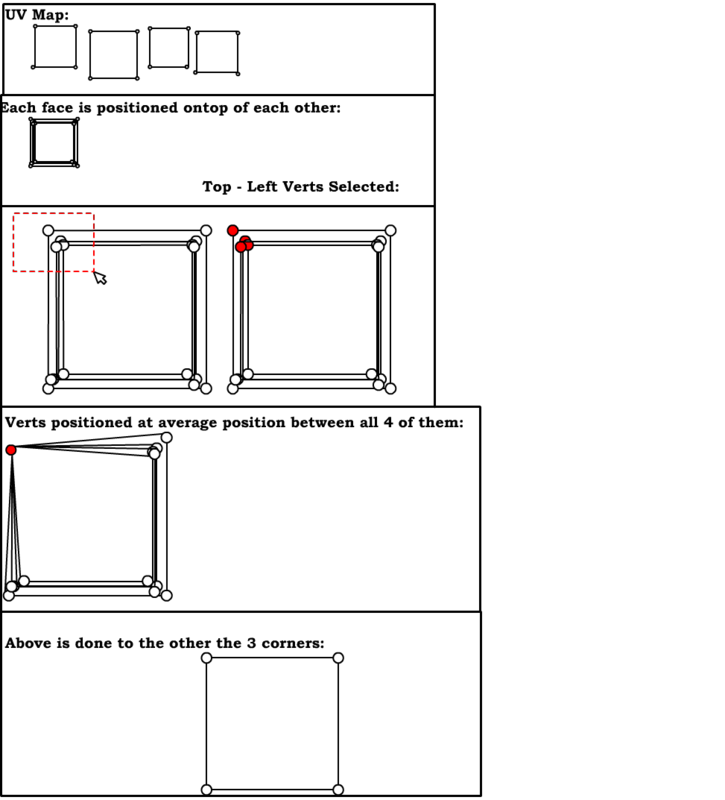


So after the above process, I now have 4 faces perfectly overlapping each other that I can texture ontop of, and have the texture applied to all 4 faces, without using 4 faces worth of space. This is what I usually do for crates, sections of buildings, and small objects, that have the same texture on all of their sides, or most of their sides.


dark coder
22
Years of Service
User Offline
Joined: 6th Oct 2002
Location: Japan
Posted: 5th Aug 2007 11:55
I always just select them and scale them to a point, AFAIK there is no such tool to flatten to the current viewport which is a shame. Selecting them and dragging the scale tool to the bottom left isn't that hard anyway :p.

RUCCUS
19
Years of Service
User Offline
Joined: 11th Dec 2004
Location: Canada
Posted: 5th Aug 2007 13:15
Yeah you can scale them / move them, thats what I do now, but you'll never get them exactly at the same position, they'll always be a few decimals off of each other. When you render a large uv map like 2048 x 2048 or larger, its sometimes noticable in the uv map, plus it means the texture isnt applied exactly the same to every face.

Im fine with scaling / moving the verts but I'd rather be able to flatten them. Ohwell, thanks for the info DC.


Zergei
19
Years of Service
User Offline
Joined: 9th Feb 2005
Location: Everywhere
Posted: 6th Aug 2007 01:53 Edited at: 6th Aug 2007 01:59
I merge the verts, using the "target weld" tool, that are supposed to start at the same position. If i need to detach them, i use the "detach edge verts" tool, thought it will detach all of them and one has to weld again those which need to be merged.

Further on my stuff at...
TurboSquid.com
The3dStudio.com
Manic
22
Years of Service
User Offline
Joined: 27th Aug 2002
Location: Completely off my face...
Posted: 6th Aug 2007 13:45
scale them all down as much as possible, then use the "weld selected" command, not the target weld. If you want to work faster, go to the options panel in the UVW modifier and up the weld threshold.

I think there's also a collapse command in there too, that'd do the same.

alternatively, if it's just simple polies like in your example picture, you could try face mapping.

I don't have a sig, live with it.
Zergei
19
Years of Service
User Offline
Joined: 9th Feb 2005
Location: Everywhere
Posted: 7th Aug 2007 00:26
Quote: " scale them all down as much as possible, then use the "weld selected" command, not the target weld. If you want to work faster, go to the options panel in the UVW modifier and up the weld threshold."


Just tried that out, and it works perfect. One always learns something new.

Further on my stuff at...
TurboSquid.com
The3dStudio.com
RUCCUS
19
Years of Service
User Offline
Joined: 11th Dec 2004
Location: Canada
Posted: 7th Aug 2007 00:46
Thanks for the help guys, I've got it now.


Login to post a reply

Server time is: 2024-11-26 06:38:09
Your offset time is: 2024-11-26 06:38:09