Sorry your browser is not supported!

You are using an outdated browser that does not support modern web technologies, in order to use this site please update to a new browser.

Browsers supported include Chrome, FireFox, Safari, Opera, Internet Explorer 10+ or Microsoft Edge.

3 Dimensional Chat / Beginner's guide to making a house in wings 3d

Author
Message
Jesusaurisrex
15
Years of Service
User Offline
Joined: 5th Aug 2008
Location: the heart and soul of all
Posted: 7th Oct 2008 05:43 Edited at: 7th Oct 2008 05:44
in this thread i will show you how to make a simple house in wings 3d.
if you do not already have it, download wings 3d from here:
http://www.wings3d.com/

the object we will be making is this:


this guide will have step by step instructions and pictures to help you.

note: I wrote the tutorial up in MS word first to have fast post time and prevent people from posting in between the tutorial, lets try to keep it that way.

Attachments

Login to view attachments
Jesusaurisrex
15
Years of Service
User Offline
Joined: 5th Aug 2008
Location: the heart and soul of all
Posted: 7th Oct 2008 05:45 Edited at: 7th Oct 2008 05:52
Step 1: make a cube
Open up Wings 3d and mess around. Play around with the controls (middle click to rotate screen, mouse wheel to zoom in and out, right click brings out menu, left click is select)
Once you are done messing around go to file > new

First you need to make a cube. This is easily done by right clicking anywhere on the screen, and go down to cube. A large cube should appear in the center of the grid.


Attachments

Login to view attachments
Jesusaurisrex
15
Years of Service
User Offline
Joined: 5th Aug 2008
Location: the heart and soul of all
Posted: 7th Oct 2008 05:45 Edited at: 7th Oct 2008 05:53
Step 2: stretch the cube
Now what I need you to do is click on the “select model” icon at the top of the screen. It should be an icon that shows a cube covered in red. Then click on the cube, so it is completely selected (covered in red) and right click > scale > z
This will stretch the object on the z axis to give it a more house like shape, since the house we are making is not a boring cube house.


Attachments

Login to view attachments
Jesusaurisrex
15
Years of Service
User Offline
Joined: 5th Aug 2008
Location: the heart and soul of all
Posted: 7th Oct 2008 05:46 Edited at: 7th Oct 2008 05:53
Step 3: make the roof part 1
Now we are going to make the roof. Click on the “select face” icon at the top of the screen. It should be an icon that shows a cube with one face red. Then, select the top face of the cube. After that right click > extrude
This will make the face you selected grow out. The second part of making the roof is giving it a triangular shape. To do this simply right click > scale > x
Scale it almost all the way, but not so much you cant select the face later.


Attachments

Login to view attachments
Jesusaurisrex
15
Years of Service
User Offline
Joined: 5th Aug 2008
Location: the heart and soul of all
Posted: 7th Oct 2008 05:47 Edited at: 7th Oct 2008 05:54
Step 4: make the roof part 2
No we have a roof shape. But it still needs to come out over the house. To do this select all three top faces and right click > Extrude region. We use extrude region here because with normal extrude, we would get 3 blocks coming out at the same angle as the faces. What we want is the whole roof to be extruded. After extruding the roof, select the sides of the roof and do the same thing.


Attachments

Login to view attachments
Jesusaurisrex
15
Years of Service
User Offline
Joined: 5th Aug 2008
Location: the heart and soul of all
Posted: 7th Oct 2008 05:48 Edited at: 7th Oct 2008 05:54
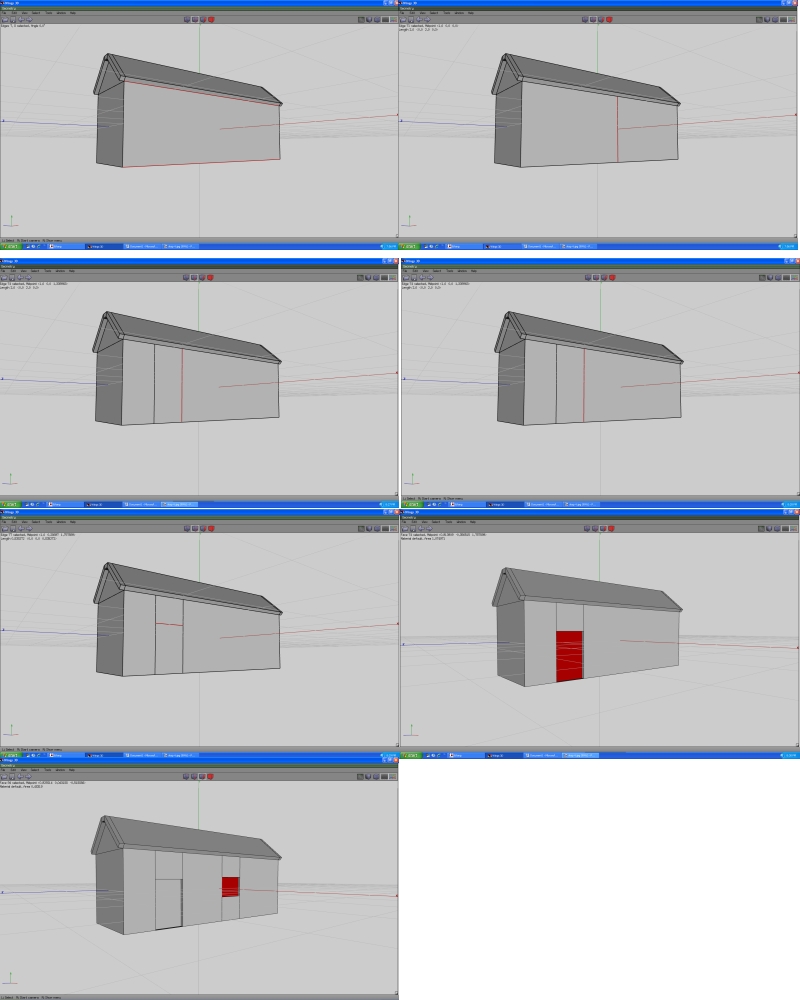
Step 5: doors and windows
To make a door you first need to click on the “select sides” icon. This will be an icon of a cube with one line selected. Now click on the top and bottom lines of the face you want the door to be. For this you have two options. You can right click > connect, or press the C key. They will both make a line in the center of your face. Now decide where you want your door to be. Once you decide, select the line, and right click > move > z (or x, depending on the face)
Now repeat the process, but move the line next to the other line. This will be the width of the door. now select both if the lines you made, and connect them. Use right click > move > y to make the height of the door.
Now all you need to do is make the door go in, by selecting you door face, and right click > extrude, and move the face in. the same method for making doors can be used for your windows.


Attachments

Login to view attachments
Jesusaurisrex
15
Years of Service
User Offline
Joined: 5th Aug 2008
Location: the heart and soul of all
Posted: 7th Oct 2008 05:49 Edited at: 7th Oct 2008 05:54
Step 6: you’re all done!

your final product should look like this:


please post comments and concerns or if you need help

Jesusaurisrex
15
Years of Service
User Offline
Joined: 5th Aug 2008
Location: the heart and soul of all
Posted: 10th Oct 2008 00:22
Any thoughts?

Mnemonix
21
Years of Service
User Offline
Joined: 2nd Dec 2002
Location: Skaro
Posted: 10th Oct 2008 00:25
Nice tutorial. Wings3d is the only editor I feel comfortable using and I find it very intuitive once you get used to it and learn all the shortcuts. I wish they would put in CSG operations though, then I would be a very happy person

TheSturgeon(playing me at chess) : I will use my powers of the horse and pwnzor you.
Jesusaurisrex
15
Years of Service
User Offline
Joined: 5th Aug 2008
Location: the heart and soul of all
Posted: 10th Oct 2008 02:10 Edited at: 10th Oct 2008 02:13
Quote: "Wings3d is the only editor I feel comfortable using and I find it very intuitive once you get used to it and learn all the shortcuts"

me too. the others are to complex or to basic. however sometimes new beginners who try wings 3d dont see the big colorful buttons and easy interface and get scared. that why i made the tutorial, because i used to use GS light before i figured out how horrible it is, and found it a tough brige to cross. of course it can also help the complete beginner with no modeling experience, hence:
Quote: "“select face” icon at the top of the screen. It should be an icon that shows a cube with one face red"

and press the file button, its the one that says file on it.


Hunter H111
16
Years of Service
User Offline
Joined: 29th Jun 2007
Location: United States
Posted: 13th Oct 2008 01:09
I think this tutorial is good. this is the best way to a house that I have seen. If only it was around when I first got Wings3d because it took me a while to figure it out.
Sid Sinister
18
Years of Service
User Offline
Joined: 10th Jul 2005
Location:
Posted: 13th Oct 2008 06:17
Dare you to make it so you can walk inside the house

Hint: Extrude the bottom into the house.

"If I have seen a little further it is by standing on the shoulders of Giants" - Isaac Newton
-Computer Animation Major @Baker.edu-
Jesusaurisrex
15
Years of Service
User Offline
Joined: 5th Aug 2008
Location: the heart and soul of all
Posted: 15th Oct 2008 03:16
@ sid sinister: lol

@ Hunterh111: thanks for the feedback. mabey ill right a more complex tutorial later to help more advanced users (although after seeing your m16 thread i dont think i could help you)

Login to post a reply

Server time is: 2024-04-26 10:23:45
Your offset time is: 2024-04-26 10:23:45