Sorry your browser is not supported!

You are using an outdated browser that does not support modern web technologies, in order to use this site please update to a new browser.

Browsers supported include Chrome, FireFox, Safari, Opera, Internet Explorer 10+ or Microsoft Edge.

3 Dimensional Chat / Low Poly 'Human' Modeling Tutorial

Author
Message
JLMoondog
Moderator
15
Years of Service
User Offline
Joined: 18th Jan 2009
Location: Paradox
Posted: 18th Apr 2009 03:47 Edited at: 20th Apr 2009 01:06
Low Poly Human Modeling Tutorial
Low poly isn't dead, just overlooked.


I couldn't think of a proper opening statement for this lengthy tutorial, so a quote will have to do. Over the next several days I'll be compiling a series of tutorials in order to show the process of modeling, unwraping, textureing, animating and exporting a low poly humanoid model using Truespace 7.6. I hope it's informative and helpful to any and all who read it.

Items you will need to complete this tutorial:
-reference image (provided)
-Truespace 7.6 (free powerful 3d app)
-at least 2 cans of soda(beer, which ever you prefer)
-bag of your favorite salty snack

Reference Image:http://i428.photobucket.com/albums/qq8/MooneyGameDev/lph_reference.jpg
Currently Finished Tutorial Model:https://forumfiles.thegamecreators.com/download/1736723

Part I: Setup
I: Startup Truespace 7.6. Your screen should look something like this:

II: Click on the Truespace 6 tab at the very top of the screen. Next create a plain object and give it the settings shown:

III: Open up the image browser, locate the reference image and apply to a clear material in the material editor. Then drag the material onto the plain object:

IV: If the reference image appears blurry, open up the display options panel by going to: TS6 FilesDisplay Options. Click and hold your mouse on the Txt Res option and select the highest map. This will clear up the image:

V: Open your Light Library panel and select 'white':


Attachments

Login to view attachments
JLMoondog
Moderator
15
Years of Service
User Offline
Joined: 18th Jan 2009
Location: Paradox
Posted: 18th Apr 2009 03:49 Edited at: 18th Apr 2009 04:06
Part II: Modeling the Torso
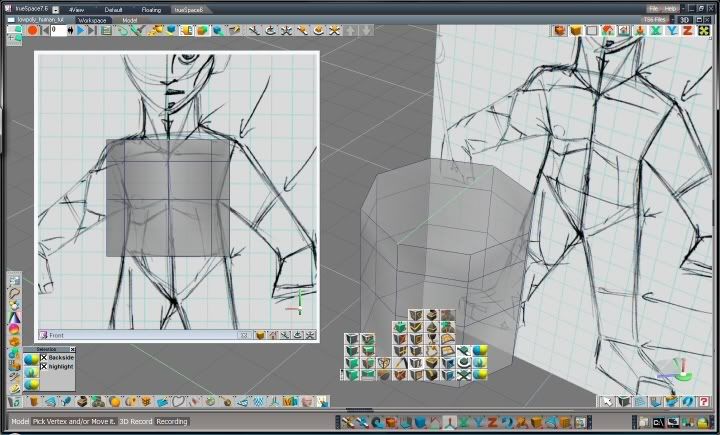
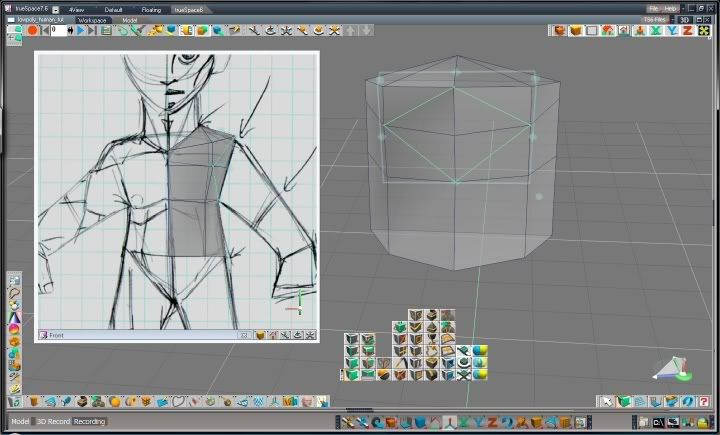
I: First start by creating a cylinder with the rotary longitude division set to 8, and size to 2x2x2:

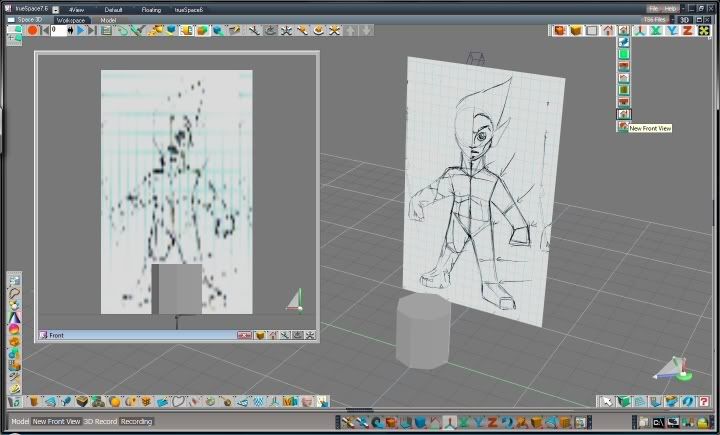
II: Next open up a floating window and set it to the front view:

III: You'll have to set the Txt Res once more to smooth out the reference. Then position the cylinder in the front view so it's more in line with the image:

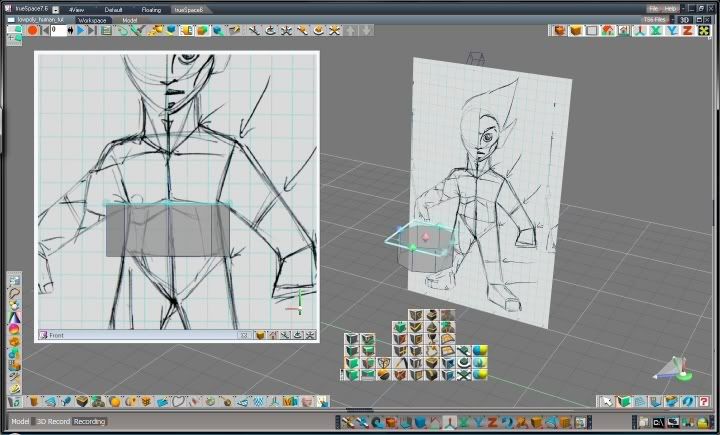
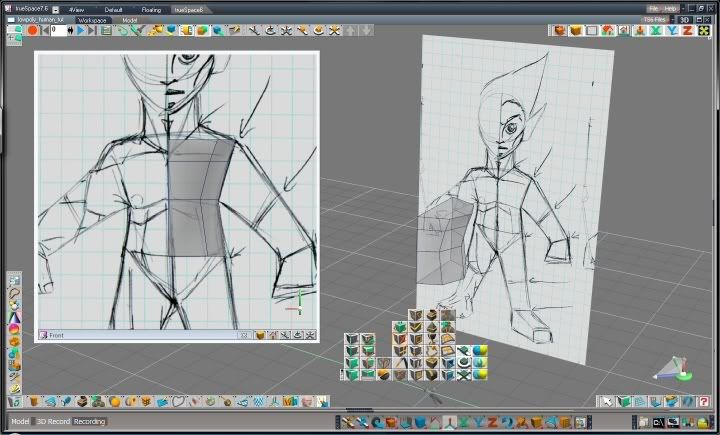
IV: Select the top face and bring it down until it's lined up with the bottom of the ribs:

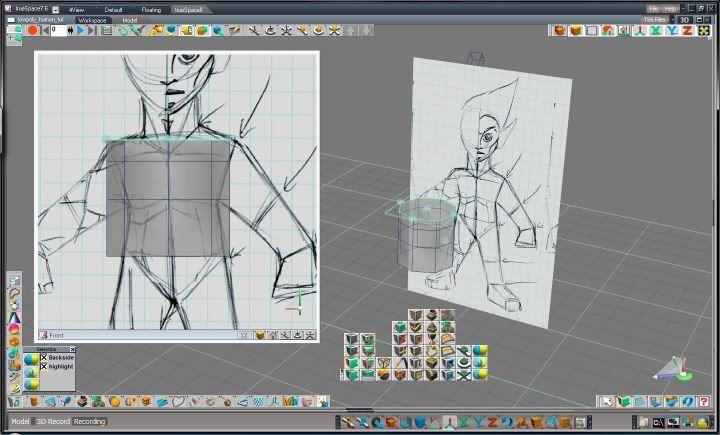
V: Sweep the face two times so that they line up with the center of the arm and the top of the arm:

VI: Using the Add Edge tool, create an edge across the top and bottom face so the object is properly split into two sections:


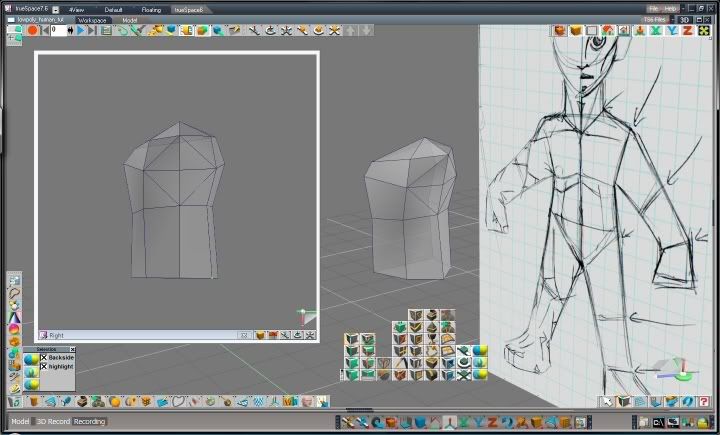
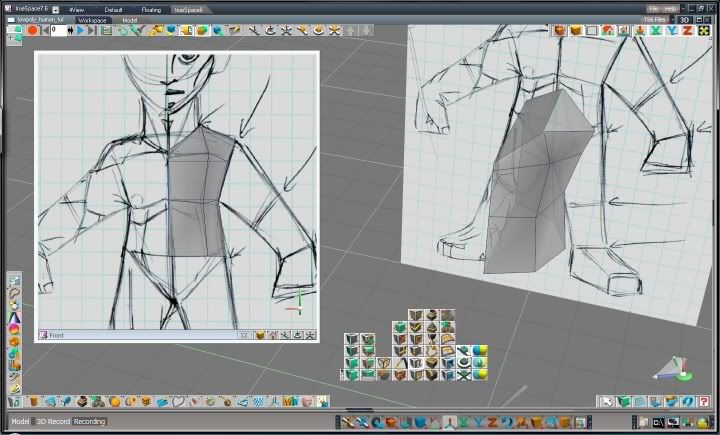
VII: Using the Delete Face tool, delete the left side of the model. Next start to select the outer vertices, and move them towards the center to form the main shape of the torso:

VIII: Select the top most vertices and move them up to shape the shoulders. Next use the Add Edge tool to add a new edge as shown:

IX: Turning your perspective view so your viewing the top, add edges to the model as shown to help create a junction for the neck:

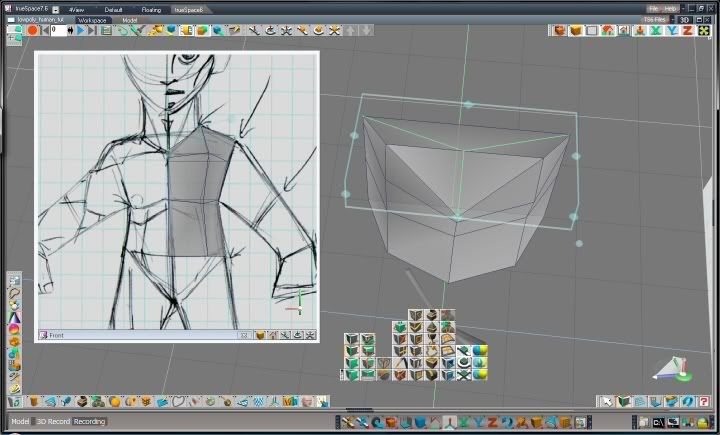
X: Turn the perspective so your viewing the side and add edges in a diamond shape to help create a junction for the arm:

XI: Start to tweak the torso by moving the vertices around to create a better shape:


JLMoondog
Moderator
15
Years of Service
User Offline
Joined: 18th Jan 2009
Location: Paradox
Posted: 18th Apr 2009 03:49 Edited at: 18th Apr 2009 04:14
Part III: Modeling the Arm
I: Selecting the faces forming the diamond shape we made before, sweep the selection out 3 times and adjust the vertices to form the shape of the arm:

II: Select the top edge for the forearm, and use the chamfer tool to create a new face. Before using this tool make sure to save because if you mess up you can't use the 'undo':

III: Add a new edge near the elbow to get rid of the illegal polygon:

IV: Scale the new face so it forms a better shape for the forearm:

V: Select the faces on the end of the arm and sweep down to create the hand. Weld the center vertice and two most bottom front side vertices to create a four sided poly. Last move the vertices around to create a better shape for hand:

VI: Last take the time to edit the arm and hand from the top view to create a better shape:


JLMoondog
Moderator
15
Years of Service
User Offline
Joined: 18th Jan 2009
Location: Paradox
Posted: 18th Apr 2009 03:49 Edited at: 18th Apr 2009 16:04
Part IV: Modeling the Legs
I: Select the bottom faces on the torso and sweep them down to form the waist. Move the vertices so they form an angle towards the inside. Next add edges around the inside in the shape of a diamond to form the junction for the leg:

II: Select the faces that make up the new diamond shape and sweep three times. Move the vertices around to create the form of the leg:

III: Using the same method as the forearm, create a new face using the chamfer tool on the back of the leg to form the calf:

IV: Selecting the bottom faces of the leg, sweep them downward to form the base of the foot:

V: Selecting the front faces of the foot, sweep them forward to form the foot. Weld the top center vert to the top inside vert and the bottom center vert to the bottom inside vert. Move the vertices around in the top and front views to better form the foot:


JLMoondog
Moderator
15
Years of Service
User Offline
Joined: 18th Jan 2009
Location: Paradox
Posted: 18th Apr 2009 04:23 Edited at: 18th Apr 2009 04:24
As of now we have a basic body mesh consisting of only 146 polygons:


UPDATE SOON...
Tomorrow's update will include modeling the neck head, and then editing the model to ease the transition for unwrapping and skinning to avoid stretching of UV data.

(bleh...this is hard work I need a 24 pack of soda next time.)

Quik
15
Years of Service
User Offline
Joined: 3rd Jul 2008
Location: Equestria!
Posted: 18th Apr 2009 05:35
i would prefer to put more detail to the hands =P otherwise, its a great tutorial cant wait to see the rest


[Q]uik, Quiker than most
Azunaki
15
Years of Service
User Offline
Joined: 11th Feb 2009
Location:
Posted: 18th Apr 2009 05:45
this is an interesting tutorial you have here. i would like to see how this ends.
BMacZero
18
Years of Service
User Offline
Joined: 30th Dec 2005
Location: E:/ NA / USA
Posted: 18th Apr 2009 05:46 Edited at: 18th Apr 2009 05:47
Hehe, this will help people not do what I did . Good job!

Edit: Wow, I really started something, didn't I?


Azunaki
15
Years of Service
User Offline
Joined: 11th Feb 2009
Location:
Posted: 18th Apr 2009 06:04
lol. its rather surprising how you didn't even get the shape down. (well... you got the basic shape...) and BMac i was wondering what you used to texture. cause ive been looking into textureing. (id rather not spend any money)
BMacZero
18
Years of Service
User Offline
Joined: 30th Dec 2005
Location: E:/ NA / USA
Posted: 18th Apr 2009 06:16
Well, I use Photoshop, but I've heard Gimp works just as well, and it's free.


Azunaki
15
Years of Service
User Offline
Joined: 11th Feb 2009
Location:
Posted: 18th Apr 2009 06:58
i mean for unwrapping it...
JLMoondog
Moderator
15
Years of Service
User Offline
Joined: 18th Jan 2009
Location: Paradox
Posted: 18th Apr 2009 07:13
Quik:
The hand doesn't need any more polys. The hand is meant to stay clenched, so there's no need to model separate limbs for the thumb and fingers. This tutorial is aimed at creating low poly meshes that will be used for games with a wide angle camera, or low end platform; DS, PSP, phone.

Azunaki:
Truespace has one of the best UV mappers you'll ever find. If you don't want to do much work, look into wings 3d, it's a little easier to use and unwrapping can take a few seconds, but it has less control then other 3d apps.

Azunaki
15
Years of Service
User Offline
Joined: 11th Feb 2009
Location:
Posted: 18th Apr 2009 07:21
i use Cinema 4D for modeling. im just looking for something to unwrap the meshes. i'll look into truespace thanks.
Cyborg ART
17
Years of Service
User Offline
Joined: 14th Jan 2007
Location: Sweden - Sthlm
Posted: 18th Apr 2009 10:53
Nice one! Thanks!

Game maker wannabe
17
Years of Service
User Offline
Joined: 30th Mar 2007
Location: Dorset, ooh arr!
Posted: 18th Apr 2009 14:46
Josh this is great! Thanks a lot.

<Insert Signature Here>
Quik
15
Years of Service
User Offline
Joined: 3rd Jul 2008
Location: Equestria!
Posted: 18th Apr 2009 14:48
Josh Mooney: oh, well, i would still be wanting fingers just to make it easier to animate, FPS games and a like, but now that ur saying it, that kinnda fist would be good for Fighting gaemes or perhaps RPGs, maybe some kind of FPS games, u thought me somethin new, thanks XD


[Q]uik, Quiker than most
nackidno
17
Years of Service
User Offline
Joined: 3rd Feb 2007
Location: Där solen aldrig skiner
Posted: 18th Apr 2009 15:08
Why not make the fingers yourself?

I think it looks cool Josh, keep it up!

"Ja, för det är jävligt manligt att ligga fosterställning i duschen och raka röven! Testa det! "
JLMoondog
Moderator
15
Years of Service
User Offline
Joined: 18th Jan 2009
Location: Paradox
Posted: 18th Apr 2009 15:49
Thanks for all the comments. I'll be updating this post later today. I have work in an hour, won't be home till 7pm. I'm shooting for a completion of this entire tutorial by the end of next week. *crosses fingers*

JLMoondog
Moderator
15
Years of Service
User Offline
Joined: 18th Jan 2009
Location: Paradox
Posted: 20th Apr 2009 00:40
Part V: Modeling the Neck
I: Sweep the diamond face on the top of the torso to create the neck.

II: Divide the face as shown and move the neck closer to the torso.

III: Select the top diamond face again and seep to create the neck. Move the vertices to better shape it.


JLMoondog
Moderator
15
Years of Service
User Offline
Joined: 18th Jan 2009
Location: Paradox
Posted: 20th Apr 2009 00:52
Part VI: Adding Edge Loops for Deformation
I: Using the polygon slice tool, create a new edge loop near the top of the leg.

II: Move the verts around to better shape the leg and butt.

III: Using the polygon slice tool once more, create a new edge loop in the stomach area.

IV: Move the verts towards the center to better shape the stomach and back arch.

V: Using the polygon slice tool, create a new edge loop at the top of the arm.

VI: Move the verts in to create a better shape for the arm and shoulder.

VII: Take the time to go over the mesh and edit the verts until your satisfied with the body's shape. Add edges to any illegal polygons and make sure there are no faces on the inside of the model. Last hit the mirror tool and select the create welded object option to complete your mesh. Your mesh is complete!


JLMoondog
Moderator
15
Years of Service
User Offline
Joined: 18th Jan 2009
Location: Paradox
Posted: 20th Apr 2009 00:55 Edited at: 20th Apr 2009 01:07
NEXT UPDATE
Modeling the head is coming up next! I'll get to this tomorrow. Sorry for posting this a day late. I was seriously tired after work and I had to be back at work at 4am this morning...bleh

I hope everyone is enjoying this tutorial. Any comments or suggestions to improve it are more the welcome.

P.S. Giant Hot Cheetos = ultimate modeling snack!

BMacZero
18
Years of Service
User Offline
Joined: 30th Dec 2005
Location: E:/ NA / USA
Posted: 20th Apr 2009 04:01
Quote: "i mean for unwrapping it... "


A bit late I guess, but I use Lithunwrap.


Azunaki
15
Years of Service
User Offline
Joined: 11th Feb 2009
Location:
Posted: 20th Apr 2009 06:12
...i feel really stupid now.. after actually looking more into my own program i found that it has a very capable UV mapper... (requires i little effort sadly more on getting the uv map itself then mapping it since it unwraps it for me (in a usable way too...)
Twu Kai
18
Years of Service
User Offline
Joined: 2nd Oct 2005
Location:
Posted: 4th May 2009 18:21
I know that the last post was 14 days ago, so sorry for this bump, but I found this tutorial today and I just wanted to say it is really helpful to me.
I've been modelling a humanoid in Blender (even though you made this in Truespace) according to your advice and I'm very pleased with the results so far. Thanks for creating this tutorial!

Quik
15
Years of Service
User Offline
Joined: 3rd Jul 2008
Location: Equestria!
Posted: 4th May 2009 18:37
so when is the head coming? ^^ just thought it would be too bad to let a tutorial as good as this go to waste, i also think this should be a sticky


[Q]uik, Quiker than most
Azunaki
15
Years of Service
User Offline
Joined: 11th Feb 2009
Location:
Posted: 5th May 2009 00:56
the head is actually what i really wanted out of this tutorial (i can never seem to get eye sockets and lips right and i was hoping this would cover thoughs areas.
JLMoondog
Moderator
15
Years of Service
User Offline
Joined: 18th Jan 2009
Location: Paradox
Posted: 5th May 2009 05:56 Edited at: 5th May 2009 05:58
Ah, sorry guys, I actually have most of the screens made, I just need to add some final touches. I've been sick with the flu and have been recovering from that. Even after a couple weeks I still don't feel very well. Don't worry, I plan on finishing this.

Azunaki:
This tutorial won't feature complex head modeling, but I can do that as a next tutorial if you like. It's actually not that hard. I think the one thing that flusters people from modeling complex organic objects is having insufficient reference images.

Quik
15
Years of Service
User Offline
Joined: 3rd Jul 2008
Location: Equestria!
Posted: 5th May 2009 06:32
Josh: dont hurry then, get well first ^^ and, i want some, non-complex tutorial for low poly, so this would be kinnda perfect then


[Q]uik, Quiker than most
Azunaki
15
Years of Service
User Offline
Joined: 11th Feb 2009
Location:
Posted: 5th May 2009 06:41
ok. (and yea get better first)
dab
19
Years of Service
User Offline
Joined: 22nd Sep 2004
Location: Your Temp Folder!
Posted: 7th May 2009 09:28
Hey, I really like this tutorial. Keep it up (finish it through. I'd be interested in learning this stuff )

Need a new hideout for all your conversations? Join dab-Media IRC. irc.dab-media.com:6667
Need PHP coding done? Contact me. Jobs done for as little as $15/hour! Email me for more information.
Sid Sinister
18
Years of Service
User Offline
Joined: 10th Jul 2005
Location:
Posted: 10th May 2009 23:13
I wonder how well this mesh keeps up with the wear and tear of animation. Has anyone rigged this?

"If I have seen a little further it is by standing on the shoulders of Giants" - Isaac Newton
Current Project: http://strewnfield.wordpress.com/ (Last updated 05/06/09)
Alucard94
16
Years of Service
User Offline
Joined: 9th Jul 2007
Location: Stockholm, Sweden.
Posted: 10th May 2009 23:31
I concur with Sid.


Alucard94, the member of the future of the past.
programing dude
15
Years of Service
User Offline
Joined: 22nd Jul 2008
Location:
Posted: 28th May 2009 03:42
Great tutorial - realy looking forward to it's completion and it'll work 100% (as an alternitive) if I can't get point edit mode to work

Hope you get better
Quantum Fusion
15
Years of Service
User Offline
Joined: 1st Aug 2008
Location: The Great White North
Posted: 28th May 2009 06:07
Quote: "I wonder how well this mesh keeps up with the wear and tear of animation. Has anyone rigged this?"


It probably wont hold up too well. Low poly modeling has become mainly important for hand-held game dev (or for engines that have low to moderate graphics abilities).

Most game characters can safely be in the 3500 - 5500 poly range (with Unreal Engine being able to handle more, around the 5000 - 10,000 range).

So low poly is okay for beginners trying to learn correct modeling methods, but otherwise it shouldnt be stressed too much.

Intel i7 @ 2.67GHz, 897MB nVidia GeForce GTX 260, 23" Wide screen HD LCD @ 40,000:1 Contrast, 12.0 GB DDR3 RAM
JLMoondog
Moderator
15
Years of Service
User Offline
Joined: 18th Jan 2009
Location: Paradox
Posted: 28th May 2009 07:09
Quantum Fusion:

That's a load With proper weighting, this model will deform just fine. I'm not sure why you are bringing up what the Unreal engine can handle...that has nothing to do with what I'm teaching, which is basic techniques in creating a low-poly mesh. Who gives a flip about the Unreal Engine

Phosphoer
16
Years of Service
User Offline
Joined: 8th Dec 2007
Location: Seattle
Posted: 28th May 2009 07:49
Great tutorial Josh

I'm definitely with you, low poly modeling is the best. Why use 10,000 poly's when you can use just a couple hundred! Thousands of poly's may be more realistic, but since when were games about the graphics?

And even if you are aiming to make a high detail model, being experienced in low poly modeling will definitely help you use only what is necessary.

Deathead
17
Years of Service
User Offline
Joined: 14th Oct 2006
Location:
Posted: 28th May 2009 16:35
These meshes plus well painted textures are awesome.. Just look at WoW.


Quik
15
Years of Service
User Offline
Joined: 3rd Jul 2008
Location: Equestria!
Posted: 30th May 2009 15:58
now, the head tutorial is what i look forward to^^ i love this tut!


[Q]uik, Quiker than most
JLMoondog
Moderator
15
Years of Service
User Offline
Joined: 18th Jan 2009
Location: Paradox
Posted: 30th May 2009 19:25 Edited at: 30th May 2009 19:25
This is part of my 100d/100m project, so don't worry, it'll be finished.

Quik
15
Years of Service
User Offline
Joined: 3rd Jul 2008
Location: Equestria!
Posted: 31st May 2009 14:40
AHAXD good :3


[Q]uik, Quiker than most
tatts
18
Years of Service
User Offline
Joined: 13th Jan 2006
Location: Ontario,Canada
Posted: 31st May 2009 23:54
With all due respect, instead of working on the 100 models in a 100 days. I think it would be more sencible to finish this tutorial before hand. I mean it has only been a month and a half when you started it and only have a very low poly head to go.... really should'nt take to long to finish it. I know you were sick and all but that was nerely a month ago. How you feeling now? Anyway no disrespect intended. I am just wondering when you are going to finish it.
JLMoondog
Moderator
15
Years of Service
User Offline
Joined: 18th Jan 2009
Location: Paradox
Posted: 1st Jun 2009 00:43
It is finished...but I'm still doing some editing, then I can post the updated tutorial. I was planning on setting everything up on Wednesday, I really don't have a lot of time to do stuff during work days. I'm off weds and thurs, so I can get a lot accomplished.

Twu Kai
18
Years of Service
User Offline
Joined: 2nd Oct 2005
Location:
Posted: 2nd Jun 2009 18:47
Nice, I can't wait for Wednesday then!

Azunaki
15
Years of Service
User Offline
Joined: 11th Feb 2009
Location:
Posted: 3rd Jun 2009 02:09
yea neither can i
tatts
18
Years of Service
User Offline
Joined: 13th Jan 2006
Location: Ontario,Canada
Posted: 7th Jun 2009 18:52
Yeah neither can I, Which Wednesday are we waiting for?
Azunaki
15
Years of Service
User Offline
Joined: 11th Feb 2009
Location:
Posted: 7th Jun 2009 20:11
lol
Quik
15
Years of Service
User Offline
Joined: 3rd Jul 2008
Location: Equestria!
Posted: 11th Jun 2009 07:45
hmm, a week ago u said "on wednesday" its bin 2 wednesday since... =P were waiting, patiently, but i atleast cant help but wonder: "has josh forgotten us?!"


[Q]uik, Quiker than most
Azunaki
15
Years of Service
User Offline
Joined: 11th Feb 2009
Location:
Posted: 11th Jun 2009 08:01
hes been busy with the goblin for the 100day 100 model thing(i would prefer he finish that before he finishes this...)

Login to post a reply

Server time is: 2024-04-26 16:24:44
Your offset time is: 2024-04-26 16:24:44