Sorry your browser is not supported!

You are using an outdated browser that does not support modern web technologies, in order to use this site please update to a new browser.

Browsers supported include Chrome, FireFox, Safari, Opera, Internet Explorer 10+ or Microsoft Edge.

3 Dimensional Chat / I need help with UVMapping curves...

Author
Message
SJHooks
15
Years of Service
User Offline
Joined: 13th Aug 2009
Location: Where you least expect me...
Posted: 23rd Feb 2010 02:41 Edited at: 23rd Feb 2010 02:44
Pretty much, I've come to find in any mesh where one part of a prism is larger somewhere, and then smaller in another, I have a lot of trouble making an accurate UVMap. So, I made this bottle model in like five minutes, and posted it here, and what I'm hoping is for someone to show me either how to UVMap the mesh or what the UVMap should look like. Here's a pic of the bottle, and the model itself (don't know why, but the top of the bottle is pitch black due to lighting...)
And: the model

Thanks -SJHooks (PS, I posted the model in .obj format because sometimes when I do other formats, the model doesn't import. And yeah, the model is a bit too highpoly for a simple bottle, but I wanted to use the model for UV Mapping and Normal Map baking practice).

Typos, they can't live without me.
David Gervais
Retired Moderator
19
Years of Service
User Offline
Joined: 28th Sep 2005
Location: Montreal, Canada
Posted: 23rd Feb 2010 04:02
Hi there,

first... the result of what I did..


Now to explain what I did..

first I imported your .obj model into Anim8or. converted the model to a mesh so I could work on it.

then the only thing I did was to view it from the side then select the front half of the model's faces and 'detatch faces'. this effectively creates a second 'object' I group this new 'cut' object with the remaining half of the bottle to ensure they stay 'glued together.

I then export the model as a .3ds

then in lithunwrap (the free version) I load the model and select group 1 and create a 'Decal' UV map viewed from the back on the 'z' axis) then select the second group and create a 'Decal' UV map viewed from the front on the 'z' axis.


I place group 1 on the left and group 2 on the right, then save the model as a .obj and also save the new UV map I created.

the next step is to import this new model back into anim8or and set the uv map bitmap (.bmp) I saved as the new diffuse map on the object. I then export the model again as a .3ds.

now I find a nice pic of an empty wine bottle on the net. Load and resize, (distorting the proportions if necessary) to have it fit the approximate size and shape of the outline found in the uv map.

Then it's just a matter of bluring out the edges to blend into the green background and adjusting the size of the uv map in lithunwrap to make the bottle texture fit the model.

as you see in the sample above it turns out not so bad,. only thing is the 'reflection is part of the texture and is not in the right spot according to the light source (look at the shadow) in my render. In spite of this it still manages to look like an empty wine bottle.

Attached is the new .x model and texture map in a zip. take a look and see if you can understand what I just described.

Cheers and have fun!

Attachments

Login to view attachments
SJHooks
15
Years of Service
User Offline
Joined: 13th Aug 2009
Location: Where you least expect me...
Posted: 23rd Feb 2010 23:12 Edited at: 23rd Feb 2010 23:13
I tried that method once, but I put both parts of the UVMap in the same place. But using your way or what I just mentioned, the texture is usually stretched out:

Thanks though, your way is better than mine because this way I can avoid having the same thing on both sides of the bottle, and also have the bottle without any seams.

Typos, they can't live without me.
RUCCUS
19
Years of Service
User Offline
Joined: 11th Dec 2004
Location: Canada
Posted: 23rd Feb 2010 23:44
What are you using, 3DS Max? I can tell you how to do proper UV maps in 3DS max if thats the case. For any kind of shape.
SJHooks
15
Years of Service
User Offline
Joined: 13th Aug 2009
Location: Where you least expect me...
Posted: 23rd Feb 2010 23:48
I use blender, but eitherway a UVMap is a UVMap. I'm not concerned much for how to do it for now, but what the UVM will look like. Thanks!

Typos, they can't live without me.
henry ham
17
Years of Service
User Offline
Joined: 3rd Aug 2007
Location: way way out there
Posted: 24th Feb 2010 00:14
did a very quick & dirty uv on it for you took about 30 seconds.

main body of the bottle is cylindercal mapped top & bottom planer mapped


you could spend a few mins moving a few verts about to sort the issues out if you wanted to.

model with uvs attached

cheers henry

Attachments

Login to view attachments
henry ham
17
Years of Service
User Offline
Joined: 3rd Aug 2007
Location: way way out there
Posted: 24th Feb 2010 01:38
a quick texture & render to show how it turns out


cheers henry

BMacZero
18
Years of Service
User Offline
Joined: 30th Dec 2005
Location: E:/ NA / USA
Posted: 24th Feb 2010 02:10
@David

Why not just use Lithunwrap's cylinder map? (Kind of like Henry did)

RUCCUS
19
Years of Service
User Offline
Joined: 11th Dec 2004
Location: Canada
Posted: 24th Feb 2010 03:02 Edited at: 24th Feb 2010 03:07
It does matter, because 3DS Max has very powerful tools in it that will generate proper UV maps with little work put into it.

Anyways, the method of UV mapping you're looking for is either cylindrical mapping (which I almost never use), or pelt mapping (one of the best methods for UV mapping).

The issue with cylindrically mapping your bottle like the above two posts suggest is the large amount of stretching you'll get as the bottle tapers, which is what you've described you want to get rid of.

Pelt mapping is great because it allows you to generate uv maps with little to no stretch whatsoever. You essentially tell 3ds max where you want the seams of the map to be placed by selecting edges. When you're done plotting the seams, the pelt mapper will stretch all of the selected faces out (like an animal pelt) cutting the pelt at the seams you drew, and then proceed to relax all of the polygon's into a shape that provides little to no stretching.

For something like your bottle, its very simple to set up a pelt map, you'd draw a seem on the bottom and top of the bottle, and one seem connecting these two rings.

The issue with pelt mapping is it makes life a little difficult when it comes time to draw your textures, if you want very crisp parallel lines on the textures. Because pelt mapping bends the uv map to ensure there is as little uv stretching as possible, its difficult to replicate a straight line on a pelt mapped surface.

Here is a picture of your bottle pelt mapped:
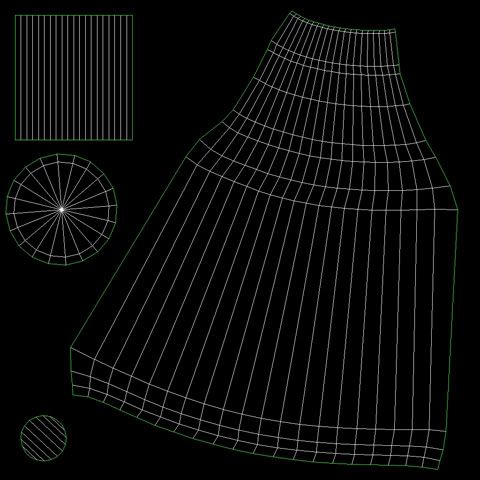


This is fine if you're able to follow the curves of the UV map for the texture. Generally though, pelt mapping is saved for things like the human body and other organic forms that require less clear straight edges in the textures, something your bottle will need assuming you want to place a label on it.

Another method is similar to David Gervais', using the decal or "planar" mapping system. Essentially, the issue with David's method is you're getting stretched UV's. David has segmented the mesh in half once. The more times you segment this mesh, the less stretch you'll get. By simply cutting the mesh into 4 decal maps instead of 2, you get something like this:
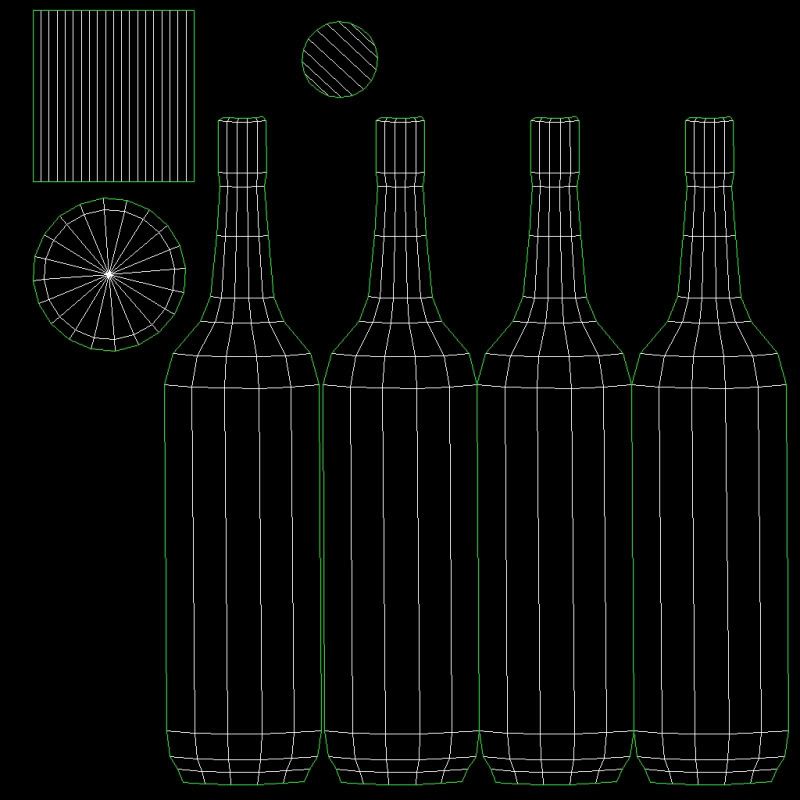


You'll still get some minor stretching at each seam here, but not nearly as much as before. Again, if you segmented the bottle 8 times instead of 4, the stretching would almost be unnoticiable to the human eye. Using the above UV map I threw together this quick texture:
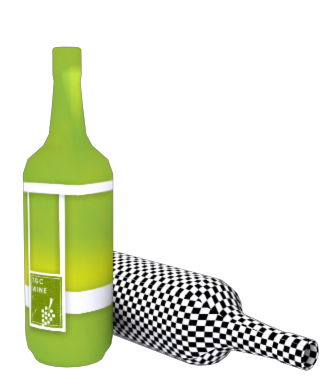


Really the only way to eliminate your seems alltogether for an object with curves, is to uv map each polygon separately. You'll never get it perfect, but close enough that nobody will notice.

Attached is a video of me pelt mapping the bottle for the first UV map, the model uv mapped to the second uv map, and a texture for it. The model is in .obj and .x formats.

Also something to keep in mind with normal maps: unless you understand how to create multiple UV channels for an object and apply textures to each UV channel of the object, stay away from overlapping polygons for objects you want normal mapped.

Attachments

Login to view attachments
David Gervais
Retired Moderator
19
Years of Service
User Offline
Joined: 28th Sep 2005
Location: Montreal, Canada
Posted: 24th Feb 2010 11:47
@BMacZero

My thoughts were that since most wine bottles have a label on one side only, it would make sense to do it this way. I can see that Henry hams way is the better way. I'm not above learning something new, thanks for the lesson.

The thing about UV mapping is it can get as simple or as complicated as you want. the trick is finding balance. and every object is different so half the 'fun' is finding the best method to fit your style.

there is no wrong way to UV map, but there sure are some 'Strange' ways LoL (I lean to the strange)

Cheers!

BMacZero
18
Years of Service
User Offline
Joined: 30th Dec 2005
Location: E:/ NA / USA
Posted: 24th Feb 2010 15:15
Quote: "there is no wrong way to UV map, but there sure are some 'Strange' ways LoL (I lean to the strange)"


SJHooks
15
Years of Service
User Offline
Joined: 13th Aug 2009
Location: Where you least expect me...
Posted: 25th Feb 2010 04:29
Wow, busy day ^^. Anyways, thanks for all the tips, gonna try em out when I have the time

Typos, they can't live without me.
Aaagreen
17
Years of Service
User Offline
Joined: 4th Sep 2007
Location: City 17
Posted: 25th Feb 2010 13:48
You should be fine if you make the top and bottom planar and the rest cylinder, as people have said. 3DS Max would pull this off nicely.

Jeku always gets drunk and tries to Moderate the ocean. Tirelessly slapping the waves as they roll in.
Asteric
16
Years of Service
User Offline
Joined: 1st Jan 2008
Location: Geordie Land
Posted: 25th Feb 2010 17:20
My best method would be to planar map both halves of the body, weld them and then relax, ill post a picture of the outcome in a bit.

JLMoondog
Moderator
15
Years of Service
User Offline
Joined: 18th Jan 2009
Location: Paradox
Posted: 25th Feb 2010 22:54 Edited at: 25th Feb 2010 22:55
Hmm, I disagree with all methods. Here is how I would do it(model/uvmap attached):


This way I kept the center all one piece to avoid stretching of the label, and the top and bottom parts separate so you can add little details if need be.


Attachments

Login to view attachments
Asteric
16
Years of Service
User Offline
Joined: 1st Jan 2008
Location: Geordie Land
Posted: 25th Feb 2010 23:30
Surely you could just keep it as one piece, and relax the face?

What i did(very quickly) was mapped out the main bottle, and because it is a low detail prop, mirrored the faces into one halve, and planar mapped the top and bottom, this meant that i could fit it into a 512x256 map to save uv space. (And i know i missed the bottom off before you say anything )


RUCCUS
19
Years of Service
User Offline
Joined: 11th Dec 2004
Location: Canada
Posted: 26th Feb 2010 01:48
As I described in my post, doing a single relaxed piece works, but makes it difficult when it comes to texturing and you want to create straight lines such as the label. You need to bend the lines in the texture to follow the contours of the UV map, and hope it ends up straight in the final output on the model.
SJHooks
15
Years of Service
User Offline
Joined: 13th Aug 2009
Location: Where you least expect me...
Posted: 26th Feb 2010 04:17
Quote: "You need to bend the lines in the texture to follow the contours of the UV map"
That's why I like the texture painting option in blender (after baking a flat AmbientOcclusion Map, because this way, I just use the "alt+b" hiding mode, select the wrapping area of the whine bottle (if I unwrapped like your way), and then just paint the whole thing some random color. This way I just use the magic want tool to specifiy what locations to texture what, but honestly this method doesn't work well for me unless it's an organic model, like a human (That's how I textured the bands of the "ninja!" in the thoasand textures project.

Typos, they can't live without me.
SJHooks
15
Years of Service
User Offline
Joined: 13th Aug 2009
Location: Where you least expect me...
Posted: 27th Feb 2010 02:26 Edited at: 27th Feb 2010 18:57
I'm just going to go down the list of tips: Here's the first style, which I used on an old knife model (the handle,+with every tip I'm going to try using a different model, for practice):
includes alpha mapping
And the texture (comes with norm and spec maps; 330 quads/642 tris, all 3 maps 1024x1024)
.RAR attatched (thanks for teaching me RUCCUS). EDIT: Suddenly felt like making an old snake texture for the thoasand textures project ...

Typos, can't live with em, but somehow I do

Attachments

Login to view attachments
RUCCUS
19
Years of Service
User Offline
Joined: 11th Dec 2004
Location: Canada
Posted: 27th Feb 2010 18:31
whats so hard about making a .rar or .zip? Go to download.com, search for WinRar. Download the free trial version. The trial version never expires, it works the same as the full version, the only difference is it gives you a little notification whenever you use it asking you to register now or later.

Once its installed, select any items you want to compress, right click them, and select "Add to archive" (or one of the other options, they all do the same). It'll open up a settings window, you can choose .rar or .zip or one of the other compression options, although .rar is generally the best. Click OK, and it'll compress all the items into a single archive and put it in the folder where the items exist.

Viewing archives is as simple as clicking an archive file. It'll open up winrar displaying all of the contents. To extract the items just right click the archive file and click "Extract Files Here" or "Extract Files To Location". Alternatively you can select individual files inside the archive and right click them to extract them on their own without the rest of the contents in the archive.
SJHooks
15
Years of Service
User Offline
Joined: 13th Aug 2009
Location: Where you least expect me...
Posted: 27th Feb 2010 18:54 Edited at: 27th Feb 2010 19:31
Thanks Ruccus Attatched .RAR, tell me if there's anything wrong. BTW, like the newbie I am, I didn't know that Blender's texture painting option can use a clone tool on the textured 3D model itself, so I'd probably say Henry's way of texturing is the best in this case, because I can remove seams easily after I texture the bottle.

Typos, can't live with em, but somehow I do

Login to post a reply

Server time is: 2024-11-24 16:02:18
Your offset time is: 2024-11-24 16:02:18