Sorry your browser is not supported!

You are using an outdated browser that does not support modern web technologies, in order to use this site please update to a new browser.

Browsers supported include Chrome, FireFox, Safari, Opera, Internet Explorer 10+ or Microsoft Edge.

3 Dimensional Chat / 3d Studio Max Help

Author
Message
Oolite
19
Years of Service
User Offline
Joined: 28th Sep 2005
Location: Middle of the West
Posted: 12th Apr 2010 04:00
So lately, I find myself browsing the forums, killing time but not really contributing to many things around here, I'd like to push out some model packs, but things a relatively busy over here that it's not a major priority for me right now. I also think it would help cut down on the amount of threads people put up with basic questions in max or modelling.

So what I'd like to do is give people a helping hand with any problems they may have concerning 3dsmax and the like. I can offer a solution to any problem you may have with max and general modelling rules for other applications.
The reason I'm concentrating on max is because I used to teach it professionally for a while, so I'm more than confident in my knowledge of it. I know there is quite a large user base here too.

Feel free to request tutorials as well and I'll let you know if I can do it. I know I've entitled this '3ds max help', but don't be afraid to keep your questions quite broad, I will do my best.

This should cure my endless browsing around but not contributing problem.

Cheers.

Bejasc3D
16
Years of Service
User Offline
Joined: 17th Aug 2008
Location: Down Under
Posted: 12th Apr 2010 09:09
Just a quick question ive got.
How would I go about exporting a model to a .x

~ Benny Boy 2321 ~ Raw Sandvich ~
Kira Vakaan
16
Years of Service
User Offline
Joined: 1st Dec 2008
Location: MI, United States
Posted: 12th Apr 2010 11:40
@TiTaniUm: I haven't used it, but I hear a lot of people talking about the Panda DirectX Exporter. Might want to check that out.

http://www.andytather.co.uk/Panda/directxmax_info.aspx
Hassan
16
Years of Service
User Offline
Joined: 4th May 2009
Location: <script> alert(1); </script>
Posted: 12th Apr 2010 14:55
it doesnt export animations with physique fine

lazerus
17
Years of Service
User Offline
Joined: 30th Apr 2008
Location:
Posted: 12th Apr 2010 17:54
Quote: "it doesnt export animations with physique fine"


physique is a ancient modifier that is very unstable and all work put in to its development stopped when the skin modifier was realesed. And in all ways the skin modifier is better. I had a similar run in a while back when i wanted specific polies to be lniked. I then found out that you can paint vertex weights and its makes life so much easier.

Hey thieres your first tut lol. Painting vertex weights ^_^"

Oolite
19
Years of Service
User Offline
Joined: 28th Sep 2005
Location: Middle of the West
Posted: 12th Apr 2010 18:15 Edited at: 12th Apr 2010 19:07
Quote: "it doesnt export animations with physique fine "

There is no reason why you should use physique over skin. If you do really need muscle bulging then just use the skin morph modifier, although I don't know if this works with .X yet. From what I remember from my experiments a while back, I could never get skin to work with a biped, but normal bones are fine. Are you rigging with a biped? Biped and physique are both natively character studio, so it seems like the best match.
If you don't mind Hassan, send me over your rig (email will be fine) and I will experiment with it to see if the problem lies in your mesh, or the exporter.

Writing something up quickly on properly exporting to DBpro with Max and Panda.

Right, i'm having no problems exporting a simple bone bend rig into Cash's Model Viewer with animations, using skin and physique. It seems it classes Skin Morph as a Morph modifier, which aren't supported in Panda.

Hassan
16
Years of Service
User Offline
Joined: 4th May 2009
Location: <script> alert(1); </script>
Posted: 12th Apr 2010 19:06
Quote: "physique is a ancient modifier that is very unstable and all work put in to its development stopped when the skin modifier was realesed."


thought physique was release after skin , thus i tried to get it working, i've got skin working after i lost hope with physique, as i thought it was newer

Bejasc3D
16
Years of Service
User Offline
Joined: 17th Aug 2008
Location: Down Under
Posted: 12th Apr 2010 19:44
is there any alternative to panda?

it doesnt work for me..

~ Benny Boy 2321 ~ Raw Sandvich ~
Oolite
19
Years of Service
User Offline
Joined: 28th Sep 2005
Location: Middle of the West
Posted: 12th Apr 2010 19:50
Not without external applications, what problems are you having with it?

Bejasc3D
16
Years of Service
User Offline
Joined: 17th Aug 2008
Location: Down Under
Posted: 13th Apr 2010 12:41
external programs would be fine.
I cant remember exactly, as i am on my laptop, and 3dsmax is on my pc.
But it popped up as soon as it was loaded and open, saying the dll title, and also about it not beaing readable or openable or something.

I should be able to find out and post it here later on tonight

Your signature has been erased by a mod - Please reduce it to 600x120 maximum size
Oolite
19
Years of Service
User Offline
Joined: 28th Sep 2005
Location: Middle of the West
Posted: 13th Apr 2010 19:47 Edited at: 13th Apr 2010 19:51
Is it this?

Make sure you have the correct version of the plug-in, if you're getting this error, it's definitely in the right place.
If it is not this, then post a shot up and I'll see if it is a max related problem.

Oolite
19
Years of Service
User Offline
Joined: 28th Sep 2005
Location: Middle of the West
Posted: 13th Apr 2010 20:22
Right, sorry for the double post but i've been experimenting with the correct settings for exporting to DBPro with DirectX. I don't have DBPro installed on this computer, but i've been using Cash's Model Viewer for this purpose.


Output Options
The only thing you need to worry about here is Inline, I'm not entirely sure what it does but it seems to create a lot of problems with rigged meshes, everything works fine with it turned off.
Mesh
Mesh normals - Should be on, obviously keeps the normals of the mesh as it appears in max.
Flip Normals - No idea why you would want to use this, but does what it says on the tin.
Use Custom Normals - Never experienced any kind of change in the export with this, even when I was changed the normals using modifiers and collapsing the stack.
Mapping Coordinates - If your model is Unwrapped, this needs to be on.
Vertex Colours - I don't expect anyone to be using this, but I get major problems with vertex colouring as it is, as I said, you'll never probably use it.
Optimize Mesh - Not noticed any changes to topology when using this, so probably best to keep it to non. As with most of these options, the exporter should be used to export the mesh you have created in max, not change it.
Animation
You can input your animations in here, but it won't be needed to reference them inside DBPro. Things to watch out for here are to make sure you are exporting Position, Scale & Rotation and not matrix.
Timeline should be set to Key Seq.
Textures & .fx files
Texture conversion should be none and turn off white diffuse override. You will be applying all previously made textures in DBPro and should have no need for this.
X File Settings
In here, just make sure that Left Handed Axis is ticked, DBPro and DirectX both run on the Left Handed Axis system.

Hope this helps.

Bejasc3D
16
Years of Service
User Offline
Joined: 17th Aug 2008
Location: Down Under
Posted: 16th Apr 2010 12:39
Im running 3DS max 2009 64-bit. screenshot of the error attatched

Your signature has been erased by a mod - Please reduce it to 600x120 maximum size
Oolite
19
Years of Service
User Offline
Joined: 28th Sep 2005
Location: Middle of the West
Posted: 16th Apr 2010 18:01
What a weird error, i'm not at the right pc at the moment to test this out, i'll get back to you later on tonight.
What i can theorize for now, is that .CUI files are user interface files, try moving (not deleting) your maxstartUI.cui or maxBackupUI.cui file to the desktop and then running it from there. Try them seperately and see if there are any changes.
If you still get the error then you might have to make a new Maxstart file.
This file handles the default UI settings of max when running so it might be best to create a new one.
Go to customize>Revert to startup layout and then customize>save custom UI settings and save it from there as MaxstartUI.cui.

I'll try and recreate the error later on and let you know, just a few questions. Does this only happen when the Panda Exporter is installed and does it still allow you to enter max after the error has occurred?

Asteric
17
Years of Service
User Offline
Joined: 1st Jan 2008
Location: Geordie Land
Posted: 16th Apr 2010 19:17
Why are they in the local app data folder anyway?

mike5424
16
Years of Service
User Offline
Joined: 30th Mar 2009
Location:
Posted: 16th Apr 2010 20:50
I have a question about animating a rigged character, When i move a bone it says "Keyframe cannot be set in - mode" (The - Is the mode i'm using, It doesn't matter which mode), How do i get it to allow me to animate my character?

---
Oolite
19
Years of Service
User Offline
Joined: 28th Sep 2005
Location: Middle of the West
Posted: 16th Apr 2010 21:47
Asteric: Max had a big turnaround in the way it kept it's settings in the 2009 release, it's harder to get into your actual settings than it was before, but you can still edit all of them. I believe they are kept in the local user data folders so each user can have control over the UI and shortcut settings. I did have it installed for two users on my current PC (both were mine, but the different users were to keep track of my freelance work and my own personal projects). I changed the Quad menu shortcuts in my personal work to have a lot of custom scripts and random scripts i was just testing out. I also layed out the UI a lot differently and started fiddling with colour settings, back over in my freelance copy of max, i saw none of these changes. So my best guess is that it's for that.

Mike: Take a look at the picture, you will get this error if you're in figure or motion flow mode, just turn them off like in the picture and you can animate like normal. Biped mode is just for editing your biped after you have created it, definately don't recommend doing this if it's already skinned to something. Motion flow mode is for loading or saving animation to MFE files. Hope this clears it all up, amongst a few other nice features.

mike5424
16
Years of Service
User Offline
Joined: 30th Mar 2009
Location:
Posted: 16th Apr 2010 23:53
Thanks! Well, That worked but now i get "Cannot create key while inactive foot steps exist", When i try to delete them it says i cannot delete all inactive footsteps :\

---
Oolite
19
Years of Service
User Offline
Joined: 28th Sep 2005
Location: Middle of the West
Posted: 17th Apr 2010 00:47
Have you by chance tried to create a walk cycle with your biped?
Try this for me, go into footstep mode and go down to the footstep operations rollout. Click create 'keys for inactive footsteps'. Now make sure you have footsteps on inside the Display options and select them all and delete them. Turn on Figure mode and then turn it back off, that should bring your biped back to the default pose.

Lemme know if it works, if it doesn't, post back with a step by step of what you have done since you started animating.

Bejasc3D
16
Years of Service
User Offline
Joined: 17th Aug 2008
Location: Down Under
Posted: 17th Apr 2010 01:44
Max and all of its features work fine after my error, and yes, it does only work with PANDA installed. I tried quite a few versions of it too, still the same message.

Your signature has been erased by a mod - Please reduce it to 600x120 maximum size
Oolite
19
Years of Service
User Offline
Joined: 28th Sep 2005
Location: Middle of the West
Posted: 17th Apr 2010 02:18 Edited at: 17th Apr 2010 02:36
Thats really weird and I actually have no idea why an external plugin would cause a UI error. Panda is obviously conflicting with the internal UI files and its not able to add it into the exporter drop down list. I'll try and recreate the error as best i can and get back to you.]

EDIT: Go to Customize>PlugIn Manager. Find PANDADIRECTXMAXEXPORTER_X64.DLE. Lemme know the status of the plugin, or post a screenshot. Right click and go to selected plugins>Load. Let me know if an error comes up. If there are any failed plugins aswell as Panda, let me know what these are, it might be conflicting with another.

I've made a tutorial
Turning a Biped into a Custom Rig
Part One turns a biped into a custom rig ready for animation. Part 2 will be completely optional but will add much greater control over the rig, including having controllers for the hands and feet, and adding constraints to the controllers so you can only move them in a way that won't ruin the deformation of your mesh. After that i'll make a tutorial about baking down the animation for use in DBPro or FPSC.

mike5424
16
Years of Service
User Offline
Joined: 30th Mar 2009
Location:
Posted: 17th Apr 2010 08:52
Thanks so much mate, You are awesome! Worked perfect

---
Quik
17
Years of Service
User Offline
Joined: 3rd Jul 2008
Location: Equestria!
Posted: 17th Apr 2010 09:42
i really thought tthta this was gonna be another "fail thread" but really, iam impressed, goodie =)


[Q]uik, Quiker than most
Bejasc3D
16
Years of Service
User Offline
Joined: 17th Aug 2008
Location: Down Under
Posted: 17th Apr 2010 11:07
Ok..
one step at a time.
Correct me if I am wrong, but the PANDA exporter goes in the plugins folder for 3ds max, no?

So then why is it not showing up in the plugins manager?

:S

Your signature has been erased by a mod - Please reduce it to 600x120 maximum size
Oolite
19
Years of Service
User Offline
Joined: 28th Sep 2005
Location: Middle of the West
Posted: 17th Apr 2010 19:33 Edited at: 17th Apr 2010 19:42
Mike: Glad to see it is all fixed, bipeds can be a pain in the arse when it comes to things like this, hence why I like to turn them into custom rigs. It cuts out a lot of the work when placing bones

Quik: Yeah, I'm glad it's kicked off aswell, it has still not stopped people posting random crap in the boards though, nevermind.

TiTaniUm: Are you on 64bit windows? If so make sure the plugin goes inside
Quote: "C:\Program Files\Autodesk\3ds Max 2010\plugins"

and not
Quote: "C:\Program Files(x86)\Autodesk\3ds Max 2010\plugins"


EDIT: Next we have a choice which i'd like some opinion on, i can put my time into creating part 2 of the tutorial, or I'll take a tutorial request from someone.

Bejasc3D
16
Years of Service
User Offline
Joined: 17th Aug 2008
Location: Down Under
Posted: 18th Apr 2010 05:19
Thanks, Oolite, All working now

Just quickly, could you recommend a UV mapping program?

Your signature has been erased by a mod - Please reduce it to 600x120 maximum size
Oolite
19
Years of Service
User Offline
Joined: 28th Sep 2005
Location: Middle of the West
Posted: 18th Apr 2010 14:10
I guess this gives me an opportunity to write a Unwrapping tutorial in max. It seriously does have some good tools for unwrapping. The only one i can think from the top of my head is lithUnwrap but it would probably be best to try it in max first, i'll get the tutorial up by the end of the week and see if that is any help.

Asteric
17
Years of Service
User Offline
Joined: 1st Jan 2008
Location: Geordie Land
Posted: 18th Apr 2010 15:11
I dont see why people have a problem with max's uv mapper to be honest, i think that once you get the basics, the toolset is superb.

Bejasc3D
16
Years of Service
User Offline
Joined: 17th Aug 2008
Location: Down Under
Posted: 18th Apr 2010 16:05
.... Wait...
MAX has a UV mapper?

There is so much i dont know about this program, i haven't even had it for a week yet

Your signature has been erased by a mod - Please reduce it to 600x120 maximum size
mike5424
16
Years of Service
User Offline
Joined: 30th Mar 2009
Location:
Posted: 18th Apr 2010 16:10 Edited at: 18th Apr 2010 16:11
Quote: ".... Wait...
MAX has a UV mapper?

There is so much i dont know about this program, i haven't even had it for a week yet"

Select the object -> Modifiers -> Unwrap UVW

Max is a big program, I'm still finding out new things and i've had it for 4 months XP

---
Bejasc3D
16
Years of Service
User Offline
Joined: 17th Aug 2008
Location: Down Under
Posted: 18th Apr 2010 16:11
I was going to say.. I felt a facepalm coming on.

Your signature has been erased by a mod - Please reduce it to 600x120 maximum size
Oolite
19
Years of Service
User Offline
Joined: 28th Sep 2005
Location: Middle of the West
Posted: 18th Apr 2010 19:30 Edited at: 18th Apr 2010 19:32
TiTaniUm: I'll give you a quick intro in getting started.
I'll talk you through the UV window itself first.
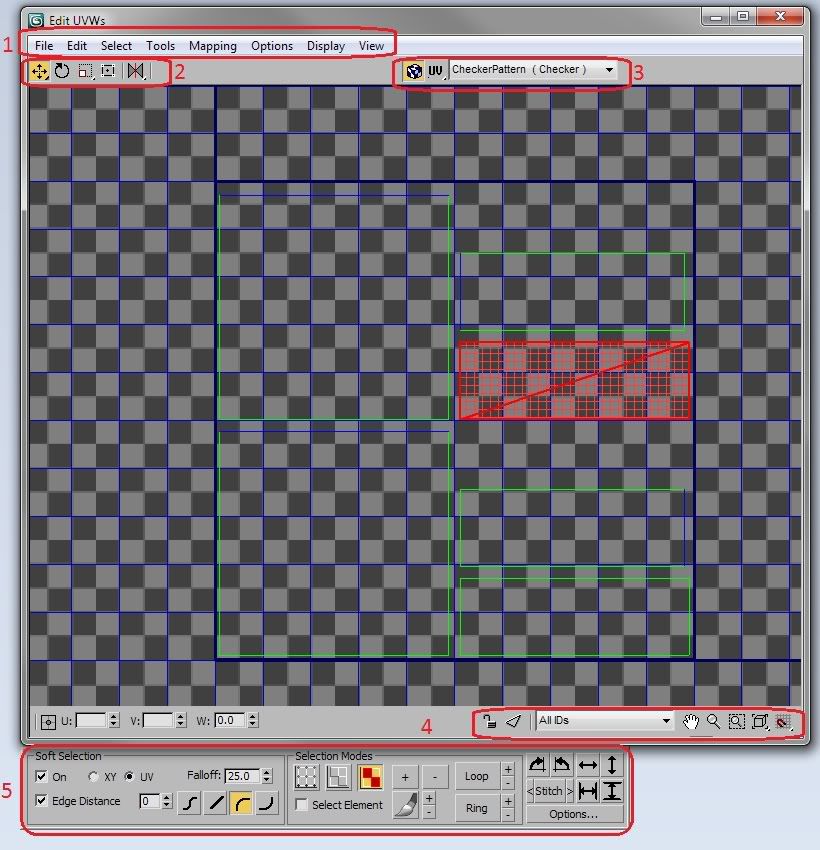
1
File: Hope these are self explanatory, you can save and load UV's here, if you want to transfer UV's between objects, the Vertex ID's have to be exact, else you'll get a lot of errors.
Edit: Same here, copy and past work differently, they allow you to copy the U, V and W properties and past them into another selection.
Select: The convert tools will convert your current selection to the same selection in another mode, ie, from polygon to edge or vertex to polygon. Kind of like holding down shift when switching between modes to keep your selection. Invert selection should be obvious. Keep this in mind when rendering out your flattened map, go to select>Select Overlapped faces. You usually don't want anything overlapped and this will help pinpoint if you have accidentally overlapped any polygons.
Tools: Most of these are self explanatory, so i'll just pick out some of the more important ones you'll be using.
Break will remove a polygon from anything else that it is welded to.
Pack UV's will attempt to reorder and move your unwrapped mesh to make the most of the space available, extremely useful tool but will ruin your UV's if you use Recursive Packing, make sure to use Linear Packing Instead
Render UVW Template renders out your unwrapped mesh into an image file so you can save it out and import it into another package, max users waited years for this feature so don't go back to screenshotting!
Mapping contains the different ways to flatten out your mesh, experiment around with them to see which you like best. The rest of the drop down menu should be self explanatory, ask away if you're unsure about anything.
2
From left to right
Move,rotate,scale,freeform mode (creates a box around your selection with the ability to move, rotate and scale without switching tools.) and Mirror tools(hold down to get more mirror and flip options).
3
The little blue square is to show the background mapping inside the UV window, it does not affect the max viewport.
UV button shows what coordinate system you are using, UV's, UW's or VW's.
The drop down menu allows you to choose a texture or apply it to the mesh inside the max viewport whilst the edit window is open.
4.
The U, V and W input boxes allow you to change the respective coordinates with keyboard input. The little Keypad is a lock selection button and the triangle next to it hides everything but what you have selected. The drop down menu allows you to filter what material ID you are viewing in the window. Next to that all of your different ways of navigating the viewport.
5.
These should all be self explanatory, there are your vertex, edge and polygon modes with soft selection to the left of them. What's interesting here is the rotate and align buttons on the right, they make it easier to rotate to 90 degrees without having to switch angle snap on and off all the time.
Any questions about anything a little more specific let me know.

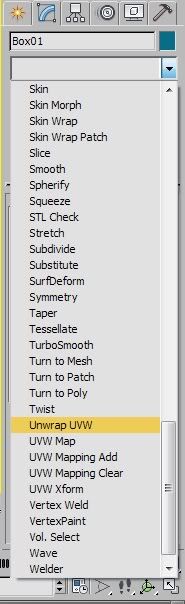
I've created a box for this, just to demonstrate.
Go down to your modifier list and select Unwrap UVW.

Then hit the edit button.

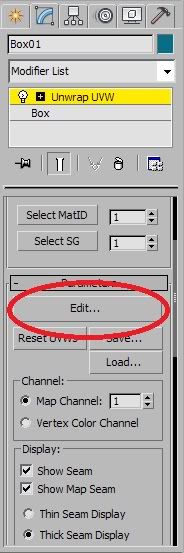
This should open up a new window with your UV's in. The mousewheel zooms in, click and drag the middle mouse button to pan around. Right click brings up your quad menu and left click selects.
For the purpose of these screens i've turned off the background image and the grid, if you want to do the same then go to view>show grid and view> show map(or click the cube next to the drop down menu in the top right)

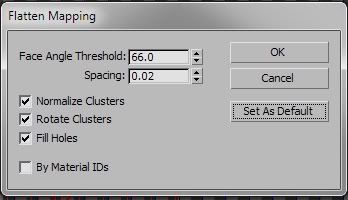
They're going to look terrible now, so the best starting place is to go to the bottom of the UV window and select polygons, then select them all with ctrl+A or just dragging a selection box around everything. Now go to Mapping>Flatten Mapping.

I usually find 60-70 is best but leaving it at 45 will usually suffice. Make sure normalize clusters is turned on, this will make sure it flattens the mapping inside the little blue square, which is a guide for when you render out a square texture for painting in another package. You can pretty much leave all the settings as they are though.

Now go to the bottom of the UV window and select edge mode, the one in the middle. Click select any edge. You'll notice that the one you have selected is coloured in red and the one it is attached to is coloured blue. Right click on the red edge and press stitch selected.

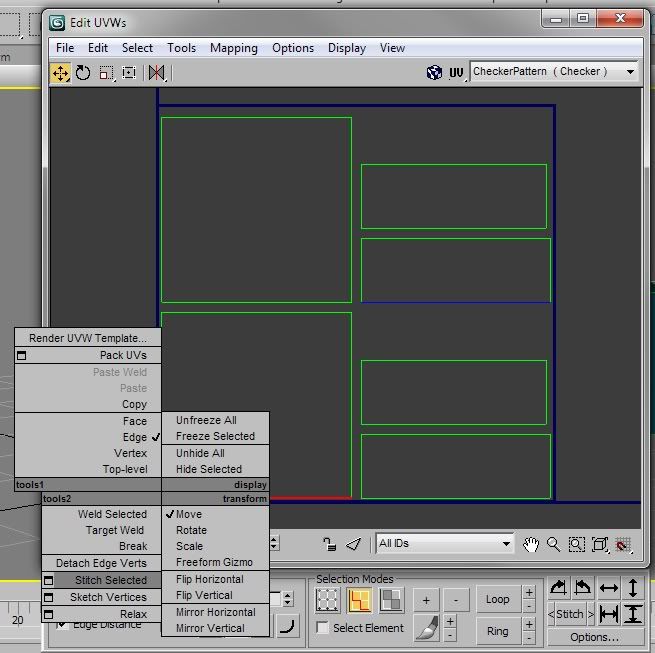
This will move the blue edge over the red edge and stitch them together. This is a great way to get things in their correct places before tweaking the vertices.
To view the checker pattern on your own model, click on the drop down menu and click again on checker pattern, your viewport will update with the checker pattern applied.

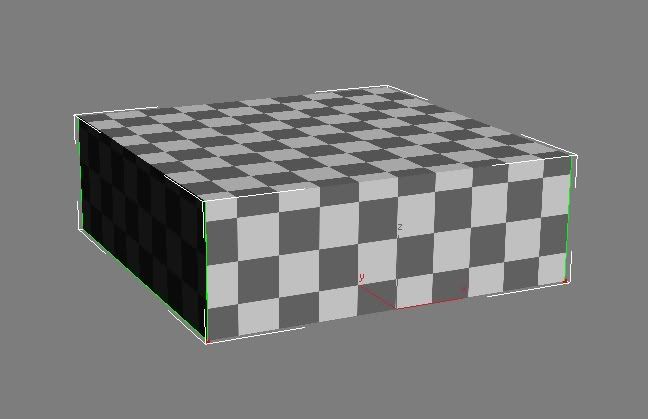
You can also select a texture you have already created in the same drop down box, but getting all the squares lined up perfectly means there will be no texture stretching or deformities when you come to texture.
Click pick texture and then select bitmap from the menu that comes up, if you want to select a bitmap that you have already loaded into 3dsmax then you have to click "Mtl Editor" from the left and this will show all images that have been loaded into the material editor.
Hope it helps to get you started, but i will go more in depth in the tutorial i'm writing at the moment.

RUCCUS
20
Years of Service
User Offline
Joined: 11th Dec 2004
Location: Canada
Posted: 19th Apr 2010 21:20
I've got a question;

Is it possible to apply a material in 3ds max while maintaining vertex colours? My guess is no but I thought Id ask. Basically I haven't uv mapped one of my models yet, Im just relying on vert colouring for the time being just to get an idea of how things will look. However, the vert colours have ended up giving me satisfactory renders without the need for any textures as everything would be flat colours in the texture anyways. What Id like to do, is create a Reflect/Refract map (already done this, got the cube map loaded up and whatnot, it works) and apply it ontop of my vert coloured mesh so that it maintains it's colours but still renders it's reflections.

Im solving the issue for the time being by doing two render passes, one for the vert colours, one for the reflections, then just compositing them together in After Effects, but it'd speed the process up a bit if I could skip that step and just render the reflections ontop of the vert colours to begin with.

Obviously I plan on mapping the model eventually, but Im using it in cnjunction with camera tracking software and right now my primary task is to make sure the camera is tracked properly and the model animates smoothly overtop of the footage, so Im still putting the mapping off (largely due to the complexity of the model, it has around 300 separate moving parts - its a transformer - that are going to take forever to map).
Oolite
19
Years of Service
User Offline
Joined: 28th Sep 2005
Location: Middle of the West
Posted: 20th Apr 2010 02:31
RUCCUS:
It is possible, but I'm going to throw wild speculation about how to do it at the moment because yet again, I'm at the wrong computer to test it out. I'll give it a bash later on when I get on there.
If I remember correctly, you can apply a "Vertex Colour" to the diffuse channel inside your material, just make sure the Map Channel is the same as the map channel you have chosen inside your vertex paint layer. You can then edit all of your material like normal. If you have multiple layers on your object then you'd need to create a composite material to handle and blend all of your different layers.
If you want to texture it quickly without unwrapping then you can just use the vertex colours to blend between two different materials in the editor, good way to get a good amount of detail without fully unwrapping and hand painting. I'll set this up later for you to show you how it's done if you're interested.

lazerus
17
Years of Service
User Offline
Joined: 30th Apr 2008
Location:
Posted: 20th Apr 2010 22:26
Thats actualy good timing.

Been using max for about year an a half and things like this still creep up on me.

Unwrapping a model the other day and i keyboard mashed while i was preoccupied. Now whenever i use a unwrap tool, planar, cylinder ect, the mesh is auotmatically rotated 90' off left. Its kinda irratating since i keep losing my ref point for the rest of the map. Any chance you know what function ive hit?

Oolite
19
Years of Service
User Offline
Joined: 28th Sep 2005
Location: Middle of the West
Posted: 20th Apr 2010 23:45
Quote: "Unwrapping a model the other day and i keyboard mashed while i was preoccupied. Now whenever i use a unwrap tool, planar, cylinder ect, the mesh is auotmatically rotated 90' off left. Its kinda irratating since i keep losing my ref point for the rest of the map. Any chance you know what function ive hit?"


Is it rotating the entire mesh, or just the selection that you are unwrapping? Which axis are you aligning it on, if at all, this can affect the rotation of the mesh.
I have no idea about any kind of function that will automatically rotate something 90' counter clockwise, seems a pointless but i'll look into it what it could be.
In the edit UVW's window, go to Options> Load Defaults.
It could also be one of those max bugs that pops up inside a max file. I've had a few of these. Best thing to try with that is to open your, then go to file > New >Keep objects and hierarchy and then just save over the original file. This tends to get rid of some of those annoying bugs that recur inside a single project file.
If it is unfixable, as soon as you use flatten it down, just click the "rotate 90'" button as I pointed out in figure 5 in the tutorial above, not ideal though.

RUCCUS
20
Years of Service
User Offline
Joined: 11th Dec 2004
Location: Canada
Posted: 21st Apr 2010 00:10
Thanks Oolite, but I was on my usual 2 hour train ride into school today and just sat down and re-assigned all of my vert colours as separate materials instead. Now I can modify the materials and set up each one with their own reflectivity properties and whatnot, so all is well.

Something I've never looked into that might help others as well is render passes. Essentially whenever I want to do multiple renders and composite them I end up rendering my scene manually each time with different settings applied, then compositing each video or image externally. Now, because I havent looked into it Im not even sure if max can do multiple render passes on a scene at once and composite them, but I figured Id throw it out there if you know the answer off the top of your head. So basically, is it possible to set up different render settings for a scene, and have max automatically render each setting and (somehow) composite them as well? Eg: An occlusion pass, a colour pass, a reflection pass, an environment effects pass, all done with one rendering and composited together. Obviously the only real use this would have is if you could specify what each pass would do eg; an occlusion pass would use a multiply blending mode similar to photoshop, a reflection pass would use an overlay blending mode, etc.

Again I dont know if / doubt that it is possible, but I figured Id throw it out there as it could speed things up for people. If you dont know or if its too complicated to get into its not a big deal as the way I currently do things isn't that bad anyways.
JLMoondog
Moderator
16
Years of Service
User Offline
Joined: 18th Jan 2009
Location: Paradox
Posted: 21st Apr 2010 00:30
RUCCUS:

I know max can do multiple render passes and compile them all in one avi in any order you want. Even multiple angle of the same series of frames. You don't use the rendering window, but a different one... honestly been too long for me to remember, so I'll let Oolite take over from here.

...yah, I wasn't much help, lol.


Oolite
19
Years of Service
User Offline
Joined: 28th Sep 2005
Location: Middle of the West
Posted: 21st Apr 2010 02:37 Edited at: 21st Apr 2010 02:46
RUCCUS:
It's been one hell of a day, so forgive me if I completely misinterpret what you have said(just covering my arse in case i cock it up). Multiple render passes are relatively easy in max, you need to go to the render setup tab (f10) and then into render elements.

Here you can add all the different types of render passes you want to do for a scene and save them into each individual files. Hit render and you'll render them out and all the other windows will pop up showing you the seperate passes.

It will still render the normal settings that you set inside the common tab, so this can be your "composited" video or image, but it'll stay that way. Max natively doesn't support compositing but there are options to export to combustion if you want. You'll still have to manually composite the different layers in after effects.
To really help with your rendering times and have a lot more freedom over the final look, I'd suggest using different layers for background objects and foreground objects, then rendering them out separately, all with their different passes into separate files. I'm not sure if you can render different layers out on the fly natively in max, but I'm sure a bit of scripting could get this sorted pretty quickly.

Let me know if you have any problems with it, or anything is unclear.

JLMoondog
Moderator
16
Years of Service
User Offline
Joined: 18th Jan 2009
Location: Paradox
Posted: 21st Apr 2010 15:53
I actually use to do all my compositing in Max, though that was in R3. Did they remove this feature?


Oolite
19
Years of Service
User Offline
Joined: 28th Sep 2005
Location: Middle of the West
Posted: 21st Apr 2010 19:45
I was dodging this like poo on a stick but...
You can composite render elements in Video post to an extent (Rendering>VideoPost), but it still requires you to render out the elements separately to input them into video post. It isn\'t that great and doesn\'t give that much control. I can write up a quick tutorial on doing this if anyone is interesting, but if you have access to After Effects then using video post is counter productive. You have to render out your scenes, then re-import them into video post, then render them out again. It\'s just as quick to do them in another compositing application.
2011 has some really nice features(as I have already pointed out across the forums) but the new composite feature will allow extensive control over all of your render outputs.

RUCCUS
20
Years of Service
User Offline
Joined: 11th Dec 2004
Location: Canada
Posted: 22nd Apr 2010 18:30
Thanks a bunch Oolite, now I know for the future.

One thing I found stupid was the fact that 3DSMax 64 Bit doesn't allow videos as a background image, yet 32 bit does. Weird stuff (not asking for help just stating my opinion ).
Oolite
19
Years of Service
User Offline
Joined: 28th Sep 2005
Location: Middle of the West
Posted: 22nd Apr 2010 22:19
No problem mate.
I never noticed that problem, it allows me to import the normal video file types as an Environment Map, they appear under the bitmap input. I'm on 2010 x64.

Still need some ideas for tutorials, hit a bit of a wall with ideas mainly because I don't want to do a tutorial that would be no help for anyone.

mike5424
16
Years of Service
User Offline
Joined: 30th Mar 2009
Location:
Posted: 23rd Apr 2010 00:16
Quote: "
Still need some ideas for tutorials, hit a bit of a wall with ideas mainly because I don't want to do a tutorial that would be no help for anyone."

How about a normal map baking tutorial? That's something many(including me) people struggle with

---
Asteric
17
Years of Service
User Offline
Joined: 1st Jan 2008
Location: Geordie Land
Posted: 23rd Apr 2010 00:56
I would do it, but i will let Oolite take this one, if he wants. Btw, mind if i email you soon OOlite?

Oolite
19
Years of Service
User Offline
Joined: 28th Sep 2005
Location: Middle of the West
Posted: 23rd Apr 2010 03:02 Edited at: 23rd Apr 2010 03:03
Go ahead, use the email from my website though, not sure what other email addresses are floating around but I only ever check that one lately.

Seeing as i'm doing a tutorial on baking down normals using projection and Render to texture, I'll include baking lighting into diffuse and specular etc. Basically an overview of what render to texture can do, but with the main focus still being on normal map generation.

mike5424
16
Years of Service
User Offline
Joined: 30th Mar 2009
Location:
Posted: 23rd May 2010 21:25
Mind if i revive this thread?

How do i open the little window for reference's? I saw it in a video, It stayed on top and provided a small space for some concepts to model from.

---
Oolite
19
Years of Service
User Offline
Joined: 28th Sep 2005
Location: Middle of the West
Posted: 23rd May 2010 23:55 Edited at: 23rd May 2010 23:56
I have no problems with you reviving this thread, i'm still available to help even though i'm busy lately.
You need to load up your map in the material editor, click utilites and then render map. By default they all stay on top of the max viewports but can hide behind windows such as the material editor and other render windows.

One reason I don't like this is because you have to manually put the size in yourself. There is possibly another way to do it but because i work on two monitors, its usually easier to have them open in a seperate application on the other screen.

lazerus
17
Years of Service
User Offline
Joined: 30th Apr 2008
Location:
Posted: 29th May 2010 23:15 Edited at: 29th May 2010 23:15
Quick question on auto welding//

Well ive came across a little snag, often when working in zbrush i seperate the mesh into sections making it less demanding when reimporting into max.

Thats good an all but depending on the mesh sub level, the final model needs to be rewelded back together. I'd normally do it by hand but there must be an easier way, so the question what function allows you to weld within a X amount range?

mike5424
16
Years of Service
User Offline
Joined: 30th Mar 2009
Location:
Posted: 29th May 2010 23:35 Edited at: 29th May 2010 23:36
Quote: "
Thats good an all but depending on the mesh sub level, the final model needs to be rewelded back together. I'd normally do it by hand but there must be an easier way, so the question what function allows you to weld within a X amount range?"

Don't you right click and select the little box by weld? Then change the thresh hold?

EDIT: @Oolite, Thanks mate! Perfect!

---

Login to post a reply

Server time is: 2025-08-08 20:06:47
Your offset time is: 2025-08-08 20:06:47