Sorry your browser is not supported!

You are using an outdated browser that does not support modern web technologies, in order to use this site please update to a new browser.

Browsers supported include Chrome, FireFox, Safari, Opera, Internet Explorer 10+ or Microsoft Edge.

3 Dimensional Chat / First Character model. Need help rigging

Author
Message
Travis Gatlin
14
Years of Service
User Offline
Joined: 14th May 2009
Location: Oxford, Alabama
Posted: 19th Mar 2012 04:32 Edited at: 19th Mar 2012 04:34
Hey, I have made a nice model of a soldier, around 7,500 polygons. I tried to rig it myself but I've been having some trouble making the correct parts rotate without the stretching of the mesh. I modeled it using more than one mesh, then joined them all together. If one of you wouldn't mind so much as to help me or rig it for me, it would be greatly appreciated and they would win a spot on my game's credits!
Preferably use Blender 3D 2.62 for the job though, but any other program would be fine as long as it exports to a format Blender supports (Which is just about anything).

The correct model is on the second layer, the first layer is the high poly version.

If you would like me to export it in any other format, tell me and I will do so.

Picture attached.
Model download link:
http://www.mediafire.com/?2tu19curcoqrg3u
Thanks in Advance!

http://www.talenthouse.com/travisgatlin
You can find my latest work here. Please comment on my work and tell me what you think!

Attachments

Login to view attachments
jrkirby
11
Years of Service
User Offline
Joined: 29th Apr 2012
Location:
Posted: 29th Apr 2012 10:25
http://cgcookie.com/blender/2011/12/12/blender-introduction-to-character-rigging/

Making rigs is actually not *that* hard. It just takes some practice. I recommend rigging it yourself just so that you get the practice, I'm sure you'll need to know how to rig things in the future.
Travis Gatlin
14
Years of Service
User Offline
Joined: 14th May 2009
Location: Oxford, Alabama
Posted: 29th Apr 2012 16:57
Thanks for the response! But I don't think that's what I need, that part of rigging I already know. I'm talking about rigging characters with clothes, the clothes stretch and the body mesh peeks through the clothes.

http://www.talenthouse.com/travisgatlin
You can find my latest work here. Please comment on my work and tell me what you think!
Ortu
DBPro Master
16
Years of Service
User Offline
Joined: 21st Nov 2007
Location: Austin, TX
Posted: 29th Apr 2012 21:40
will the clothes be interchangeable? like will the shirt ever be taken off or changed to a different shirt?

If not, then just delete the hidden parts of the body mesh underneath. It is useful to have a body to build clothes around, but once done, if you will never see the body it really just gets in the way.

stretching of clothes is handled the same as with a body or anything else: deformation areas like joints of elbows or knees need enough loops to properly support animation. This is an issue of the mesh rather than of the rig.

Travis Gatlin
14
Years of Service
User Offline
Joined: 14th May 2009
Location: Oxford, Alabama
Posted: 30th Apr 2012 03:27
Quote: "will the clothes be interchangeable?"

They won't. I suppose the mesh underneath will just be wasted polygons. And it's not a mesh issue. If you'd like, you can take a look at the model, which is available for download on the original post.

http://www.talenthouse.com/travisgatlin
You can find my latest work here. Please comment on my work and tell me what you think!
Ortu
DBPro Master
16
Years of Service
User Offline
Joined: 21st Nov 2007
Location: Austin, TX
Posted: 30th Apr 2012 07:38
I took a look and that mesh is definitely going to have issues animating. It looks like you ran a poly reducer on it right? They can be nice for static objects because they are pretty good at retaining the overall shape, but they really destroy the edge flow and cause problems for animations.

attached are a few quick examples. the right and bottom cubes are reasonable options for a simple bending joint like an elbow or a knee which help to minimize stretching and shrinking.

top is the absolute minimum necessary for a joint, but you can see it shrinks at the bend, it lacks the loops to support the deformation.

left is a poly reduced version with a triangulated mess of broken loops and poles similar to what you are working with. it gives rough, uneven deformation.

in my opinion, you will have a much easier time trying to rig this if you go back and work at cleaning up the mesh a bit first.

Attachments

Login to view attachments
Seppuku Arts
Moderator
19
Years of Service
User Offline
Joined: 18th Aug 2004
Location: Cambridgeshire, England
Posted: 30th Apr 2012 13:50 Edited at: 30th Apr 2012 13:51
That's a useful image. To represent that design in a character model:


Generally when you're modelling the joint areas you've got to think how the bones might bend it.

For the bending you've got to adjust how the points are weighted to the bones. Not sure how Blender does this though. I could probably do a demonstration in Carrara if you think it'd help.

Travis Gatlin
14
Years of Service
User Offline
Joined: 14th May 2009
Location: Oxford, Alabama
Posted: 1st May 2012 00:05
Quote: "left is a poly reduced version with a triangulated mess of broken loops and poles similar to what you are working with"

Yeah, the original mesh was well over 70,000 polygons, so I had to decimate it to around 7,000, as much as I hate what decimation does to the poly structure, it's sure quicker and pretty handy. Though, I might have to re-reduce it by hand.

http://www.talenthouse.com/travisgatlin
You can find my latest work here. Please comment on my work and tell me what you think!
Seppuku Arts
Moderator
19
Years of Service
User Offline
Joined: 18th Aug 2004
Location: Cambridgeshire, England
Posted: 1st May 2012 00:33 Edited at: 1st May 2012 01:26
How did you get 70k polies? Were you sculpting. What might be a good idea is to model a base mesh if you plan on sculpting on top. For being smooth you only need to apply subdivision, which in most programs you should be able to turn off. If Blender doesn't do that then that's rather odd.

Also, some feedback on the model, some of the anatomy is a bit off. There's a good character reference here and that ought to help you out.

As for polygon flow/topology, I love this guy's work and he offers some decent shots of his models to demonstrate the topology. Well they're all male references. Also the guy has worked on some pretty awesome film projects (Thor, Sucker Punch, Percy Jackson and others). You might find it a useful resource.

[edit]

If you've got a dual display (I'm using my laptop & HDTV) then it can help. This is the layout I work from. I'm about to use the reference on the right to turn the low poly model I built from the reference shown in the editor into something with more detail. So I did all of the building with the reference my 3D app can use and have 3 panes - the large on for 3D, one for side view and the other for front, so I can get a more accurate measurement of the reference I'm using.


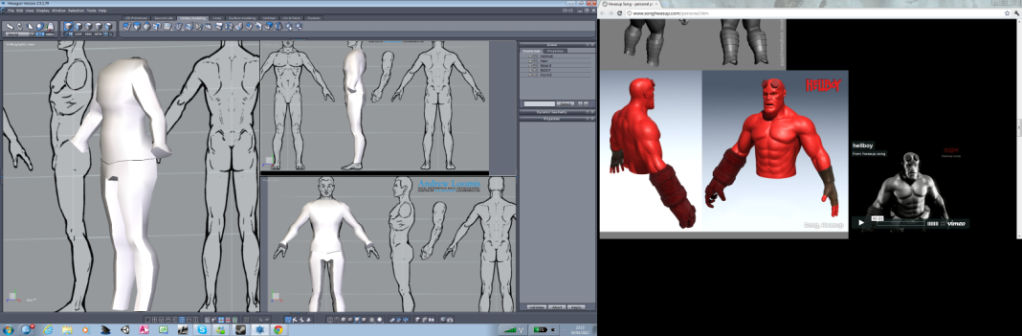
If you're not using a dual display, I'm sure you could work out something a little more comfortable. But ever since getting this HDTV, I like to appreciate all the extra space I get to do my work.


I know you asked about animation, but I hope this stuff is useful for you. Especially as things like polygon flow will effect how well you can animate an object and of course makes your model easier to modify without disfiguring the appearance of the mesh and also you make the best use of your polies meaning you can keep your polygon down as much as you can and still achieve a good enough looking result without even sculpting (in those high-poly moments).

Travis Gatlin
14
Years of Service
User Offline
Joined: 14th May 2009
Location: Oxford, Alabama
Posted: 1st May 2012 01:33
Thanks for the advice! I don't have dual monitors so I'll just use Windows 7's window-drop feature to split the windows

Quote: "Were you sculpting"

I was. I can't do the faces and fine details like that without it. Just can't box model that one! And I use the same base reference as you! It's a very good reference.

http://www.talenthouse.com/travisgatlin
You can find my latest work here. Please comment on my work and tell me what you think!
Quik
15
Years of Service
User Offline
Joined: 3rd Jul 2008
Location: Equestria!
Posted: 1st May 2012 02:07 Edited at: 1st May 2012 02:08
Quote: "I was. I can't do the faces and fine details like that without it. Just can't box model that one! And I use the same base reference as you! It's a very good reference."


Here is what i feel is nice to do, is make a base model, then just increase the polygon count by cutting edgeloops, bring it to sculpting program, sculpt those new edgeloops, back into modelling software, make new edgeloops, back to sculpting
etc

that makes it easy to keep track of polycount and giving a very nice controll of the mesh aswell

edit:


this was made using that very techique, its way too many polygons, but it isnt too hard to reduce by hand either, especially since i "watched it grow" by my own hand, making it even easier.


The result of origin.. Oh and ponies
Travis Gatlin
14
Years of Service
User Offline
Joined: 14th May 2009
Location: Oxford, Alabama
Posted: 1st May 2012 02:36
So you're saying, sculpt it, then use the sculpt as a 3D reference?

http://www.talenthouse.com/travisgatlin
You can find my latest work here. Please comment on my work and tell me what you think!
Seppuku Arts
Moderator
19
Years of Service
User Offline
Joined: 18th Aug 2004
Location: Cambridgeshire, England
Posted: 1st May 2012 03:14 Edited at: 1st May 2012 03:16
If you don't like box modelling, perhaps try poly modelling. I don't know how much organic modelling you've done, so apologies if I cover stuff you already know.

I try to mix box & poly modelling - box to get the basic shape and the poly modelling for the finer details. But poly modelling is a good solution on its own. All you really need is: Edge Extrude, Weld Points, cut/knife and Bridge. I tend not to use anything else. When you're doing it try and use as few polygons as possible, even if it's a bit edgey - subdivision can cure that. If you can edit your mesh with subdivision applied and you only need to worry about a control mesh, then even better.

I'll just give a break down on the tools I mainly use for organic modelling.


Bridge:


I'm still rusty at high poly stuff, so I'm not going to show what I'm working on at the moment to give an idea of how poly flow can be done, however, here's an old model I did when I was a little more practised and I've marked the poly flow on it.


It's not the whole body, but my back up drive is disorganised, it'd take me forever to hunt down the model. So I just took wires from my old thread.


I'm not sure if I've over whelmed you (as I say, I don't know how much organic modelling you've done). If I have, then here's something a lot more basic to get you started. From my old website:
http://seppuku-arts.66ghz.com/seppuku05/index.php?option=com_content&task=view&id=15&Itemid=1

The exact same method was used on my low poly mesh, which you've seen in my Ronin Media Thread.

Ortu
DBPro Master
16
Years of Service
User Offline
Joined: 21st Nov 2007
Location: Austin, TX
Posted: 1st May 2012 03:17
For poly-reducing by hand the "edge-slide" tool, ctrl+r, with auto-merge editing on is fantastic, assuming you have clean edge-loops.

I think he is saying to go back and forth between them in stages: add poly resolution with loop cuts, sculpt the new detail, add some more poly resolution, sculpt the new detail and so on...

if you are using Blender's internal sculpt mode, you can just stick a multi-resolution modifier on it and use that for non-destructive subdividing to add levels of detail. you can move up and down in the levels of resolution and changes/sculpting will propagate through the levels.

This is even nicer in the current Blender as you can still go back and cut/delete/add to the base mesh beneath the modifier. In the old 2.49 multi-res wasn't a modifier but a separate process and once put on a mesh, all you could really do was move verts around, you couldn't cut new loops or add new faces.

Travis Gatlin
14
Years of Service
User Offline
Joined: 14th May 2009
Location: Oxford, Alabama
Posted: 1st May 2012 04:13
@ Seppuku Arts
That's really helpful! I've never really used that technique before. As far as I've seen it, It's just not how my brain works, though seeing the good results that it yields, I gotta try it.

Quote: "For poly-reducing by hand the "edge-slide" tool, ctrl+r, with auto-merge editing on is fantastic"

I already use it, a lot. That's how I reduce by hand in the first place, really effective and good for poly structure!

http://www.talenthouse.com/travisgatlin
You can find my latest work here. Please comment on my work and tell me what you think!

Login to post a reply

Server time is: 2024-04-25 10:44:20
Your offset time is: 2024-04-25 10:44:20