Sorry your browser is not supported!

You are using an outdated browser that does not support modern web technologies, in order to use this site please update to a new browser.

Browsers supported include Chrome, FireFox, Safari, Opera, Internet Explorer 10+ or Microsoft Edge.

3 Dimensional Chat / Learning to sculpt

Author
Message
Jaeg
18
Years of Service
User Offline
Joined: 16th Mar 2006
Location: Indiana
Posted: 26th Jul 2013 18:18 Edited at: 26th Jul 2013 21:33
Hey everyone,

So I can get Autodesk products for free from my school (Student version so nothing commercial with it) and over the last couple of days I've been working on learning how to use the tool. This is my 4th sculpt and it started out as the basic blank head. I'm starting working on my anatomy which so far as proven to be my biggest challenge.

What do you all think?


Go ahead. Walk into Mordor.

Ball State University - Computer Science Major

Attachments

Login to view attachments
Ortu
DBPro Master
16
Years of Service
User Offline
Joined: 21st Nov 2007
Location: Austin, TX
Posted: 26th Jul 2013 21:42
It's a good start, but it looks like you are moving up in subdivisions too fast. This is a common mistake starting out and results in the lumpiness you see particularly in the cheeks. Stay at a lower level and build out the broad major forms before moving up to detailing the features. Think about how skin overlays muscle which overlays bone and spend some time on the forms of each layer in turn. Proportion reference is also helpful.

Shazam!
Jaeg
18
Years of Service
User Offline
Joined: 16th Mar 2006
Location: Indiana
Posted: 26th Jul 2013 22:28
This is actually only the second subdivision level. I actually purposely made the cheeks like that to make him look more rugged. It probably would help if they were placed a little better though.

Go ahead. Walk into Mordor.

Ball State University - Computer Science Major
Ortu
DBPro Master
16
Years of Service
User Offline
Joined: 21st Nov 2007
Location: Austin, TX
Posted: 27th Jul 2013 08:24 Edited at: 27th Jul 2013 08:38
I'm guessing that means basemesh + sub1 + sub2 = 3 levels of detail. I would still recommend spending more time in sub1 and even back on the basemesh. Even at this sub, running a wide area smoothing brush at a very low power will help polish things up a bit.

Don't get me wrong, for a 4th sculpt, you are doing great, and it takes a ton of practice, practice, reference, practice to get finesse into a human anatomical sculpt.

Now let's talk about ruggedness - it should come from the skin: wrinkles and folds, pock-mocks and pores, scars, stubble. dryness of material. Ruggedness is caused by exposure, and it is skin that gets exposed. Surface detail should only come much later, after the underlying forms have been laid down, and the texture maps will contribute a lot to it, beyond anything that goes into a sculpt.

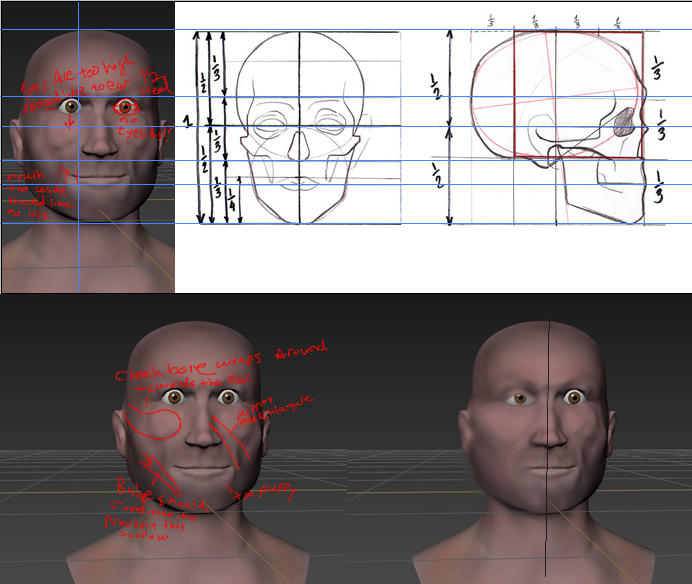
The shaping of your cheeks currently would mostly be due to bone, and that bone is misshapen. Only a few bits of bone really contribute to 'ruggedness': heavy brow/jaw, shape of the nose. To me, cheekbones really don't. More specific to your sculpt, the cheek bone should not be confined to the front of the face; it wraps around the face back towards the ear.

General proportion issues - The eyes are set too high, and should line up with the ears, also should have eyelids wrapping over them. The mouth is slightly too wide, the corners should line to the inner edge of the iris.

I've done a super quick paintover of some of the major issue points


I'd recommend looking for reference on 'anatomy for fine art', 'the planes of the face' traditional sculpting, painting and drawing skills can be applied to 3d sculpting and there is vast amounts of good information and reference out there. Look up Andrew Loomis for proportions in particular.

Shazam!

Attachments

Login to view attachments
Jaeg
18
Years of Service
User Offline
Joined: 16th Mar 2006
Location: Indiana
Posted: 27th Jul 2013 21:10
Thanks for the tips! I'll try reworking him to make him better. Anatomy does seem to be my biggest weak spot. I tried feeling my face while working but your paint over will help a lot more.

Go ahead. Walk into Mordor.

Ball State University - Computer Science Major
Quik
15
Years of Service
User Offline
Joined: 3rd Jul 2008
Location: Equestria!
Posted: 28th Jul 2013 20:35
Jaeg - looking up reference picture is a great way to learn too, just looking at faces - and also looking up "tutorials" about faces is a great way of going too


Whose eyes are those eyes?
Jaeg
18
Years of Service
User Offline
Joined: 16th Mar 2006
Location: Indiana
Posted: 29th Jul 2013 02:59
Made some anatomical corrections and smoothed some stuff out. Next I'm going to add some more skin like texturing to the mesh.

Go ahead. Walk into Mordor.

Ball State University - Computer Science Major

Attachments

Login to view attachments
Ortu
DBPro Master
16
Years of Service
User Offline
Joined: 21st Nov 2007
Location: Austin, TX
Posted: 29th Jul 2013 06:26
big improvement, nice work. keep practicing model after model and you will only get better.

Shazam!
Jaeg
18
Years of Service
User Offline
Joined: 16th Mar 2006
Location: Indiana
Posted: 29th Jul 2013 14:29
Thanks. I tried work on the eyelids but how I did the eye holes messed up the polys making it difficult to sculpt them well. He'd need some pretty hefty surgery to fix it.

Go ahead. Walk into Mordor.

Ball State University - Computer Science Major
Ortu
DBPro Master
16
Years of Service
User Offline
Joined: 21st Nov 2007
Location: Austin, TX
Posted: 29th Jul 2013 21:31
eyes are one of the most difficult features, think about what did and didnt work this time, and build on it, refining your workflow, so that you can alter your approach on the next one. this is how you improve

Shazam!
Quik
15
Years of Service
User Offline
Joined: 3rd Jul 2008
Location: Equestria!
Posted: 30th Jul 2013 08:57
ooooh yes, eyes are REALLLY difficult to pull off indeed - eyes and ears are my current biggest problems in the sculpting world


Whose eyes are those eyes?
Jaeg
18
Years of Service
User Offline
Joined: 16th Mar 2006
Location: Indiana
Posted: 30th Jul 2013 21:23 Edited at: 30th Jul 2013 21:23
Well I've been following a tutorial on Lynda about character modelling in 3ds Max. After that I tried making my own head mesh and then trying to sculpt onto that. I used a skull as a reference and messed around with that. There are no eyes or mouth yet though.


My biggest issue was getting rid of the problems Mudbox was having with my model (T junctions, etc).


Go ahead. Walk into Mordor.

Ball State University - Computer Science Major

Attachments

Login to view attachments
Ortu
DBPro Master
16
Years of Service
User Offline
Joined: 21st Nov 2007
Location: Austin, TX
Posted: 30th Jul 2013 23:11
yeah, when building a basemesh for sculpting you want to avoid poles like the plague, make every effort to use quads instead of triangles, keep them evenly sized and spaced. plan out your topology so that your edges flow with the lines of your sculpt, it is a lot harder than it needs to be if you end up sculpting 'against the grain'.

im not sure if mudbox has anything like this but zbrush has dynamesh and blender has dynamic topology, these modes work really well for cleaning up problem spots caused by triangles, poles, and uncooperative edge flows.

Shazam!

Login to post a reply

Server time is: 2024-04-24 12:12:33
Your offset time is: 2024-04-24 12:12:33