The Game Setup
DoG is a tower defence game with story line elements with open buildable world. I started my research with a good modern TD game called X-Morph

efense. The game has both air and ground units and central character ship. This ship is player controlled and can pick up debris to use as a resource to build more towers. I knew I wanted to implement a resource collection element into my game.
But first, there is the design work to do, so I started out creating turrets and some enemies.

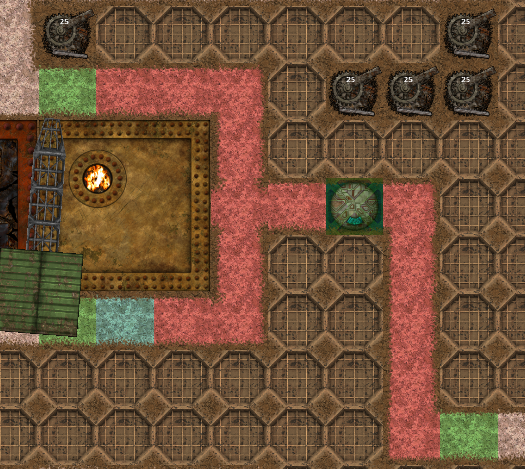
With these turret idea's and some notepad scribble's I imported the content into Studio and straight away animated them, choosing random angles and spinning at different speeds. The road was made from simple blocks of which there are nine elements to represent the connections. These were dragged and dropped by hand onto the map. I then created a grid element which is a three vector variable myGrid[1,x,y]. The one denotes level. The grid also has a type assigned to it which contains information like column and row, if there is a tower placed there etc. The grid I limited to 50x50. With the basic grid made it was time to add some enemies. This I drew up with textures and shapes generated in filter forge. I also clamped their size to the same size as a grid element (I chose 124x124). I then set to work on a way point following system.
Waypoint Following
I tried two types of wp system, one where by the enemy moves a sprite with position dependent on time and direction, the other system (the one which I chose for the game) I made from physics based movement using sprite velocity commands (shown here).
if thisEnemy.direction.X# < 0
		Hoz = 1

		SetSpriteAngle(thisEnemy.spriteID, 275)

		endif

	if thisEnemy.direction.X# > 0
		Hoz = -1
		SetSpriteAngle(thisEnemy.spriteID, 90)
		endif

	if thisEnemy.direction.Y# < 0
		Vert = 1
		SetSpriteAngle(thisEnemy.spriteID, 0)
		endif

	if thisEnemy.direction.Y# > 0
		Vert = -1
		SetSpriteAngle(thisEnemy.spriteID, 180)
		endif
if thisEnemy.mode$ = "FOLLOW" OR thisEnemy.mode$ = "START" OR thisEnemy.mode$ = "END"
				  SetSpritePhysicsVelocity(thisEnemy.spriteID, Hoz * thisEnemy.speed , Vert * thisEnemy.speed)
			Endif
With the first waypoint system I wanted to quickly add enemy routes. I started with a .scence parser which looked at each image in the scene and entered into myGrid[1,x,y].isPath what it found there. So if there was a road, the grid would get an integer isPath = 1. If it was an empty turret space it got myGrid[1,x,y].isTurretPlacement = 1. For the enemy wave point I would place a waypoint maker sprite so when the parser found it, the grid ref would be entered as waypoints into a waypoint list. It soon became apparent that this method created far too much work with a high degree of possibility of things going wrong. So I searched for a solution and found an algorithm called Dijkstra, which is suitable for all kinds of wp code, including basic grid square like in my game. I converted the pseudo code I had into AppGameKit Tier 1 and ran some tests. There were some, lets say, surprisingly funny results. Now I had a simple function which generates a list of way points for any object to follow.
 Path Finding
Dijkstra is in fact an early version of A*. The algorithm length is half that of A* and serves to work better with equal grids like in my game. You can find more about about Dijkstra here:
https://forum.thegamecreators.com/thread/228195
You can see the path-finding Dijkstra working in DoG by setting GAME_MODE to 1 and ROUTEFINDING_VISUALS to 1
This path-finding algorithm is good at finding point to point along a grid (we call this information a graph:a list of nodes which are possible travel routes). It is also good at finding the closest of multiple grid references. I use both these systems in the algorithm and added this into a single function which can receive a command as to which mode to use (point to point or point to closest).
function pathFinding(startNode as AIconnectionGraph , endNode as AIconnectionGraph, mode as string)
The mode string is just a conditional if looking for the type of node being searched. For example, for my collector to search for some junk (and not the foundry) the mode set is ‘Junk’ then Dijkstra will look for
if currentNode.graphIsJunkNode = 1 then exitfunction
Once the junk is collected, the collector needs to return to the foundry with it, so the mode is set to ‘Normal’ with start and end nodes as input.Dijkstra then looks for
if currentNode.graphID = endNode.graphID
As you can see, because Dijkstra is run for every trip, if the path layout changes (Player can build new roads) any new path layout taken into graph() will be valid, as long as myGrid[1,x,y] is kept up to date. Because the grid size is only 50x50 the graph update is relatively straightforward.
function createGraph()  // this makes the graph needed for the AI pathfinding function

local node as AIconnectionGraph
local gridNode as AIconnectionGraph

for i = 0 to 50
	for j = 0 to 50

	myGrid[1,i,j].pathConnections.length = -1

	if myGrid[1,i,j].isPath = 0
	//
	else
		myGrid[1, i , j].pathConnections.sort()
		if myGrid[1,i,j].isPath = 1

		gridNode.graphID = myGrid[1,i,j].gridID
		gridNode.thisNode.col = myGrid[1,i,j].col
		gridNode.thisNode.row = myGrid[1,i,j].row
		gridNode.fromNode.col = myGrid[1,i,j].col
		gridNode.fromNode.row = myGrid[1,i,j].row
		gridNode.nodeCost = myGrid[1,i,j].Cost
		gridNode.gridSpriteID = myGrid[1,i,j].pathSpriteID
		myGrid[1,i,j].AIthisGrid = gridNode
	endif
		if myGrid[1, i , j - 1].isPath = 1
	 		//add to connection list
			node.graphID = myGrid[1, i , j - 1].gridID
			node.fromNode.col = myGrid[1, i, j].col
			node.fromNode.row = myGrid[1, i, j].row
			node.nodeCost = myGrid[1,i,j].Cost
			node.toNode.col = i
			node.toNode.row = j - 1
			node.graphText = "2"
			node.graphIsJunkNode = myGrid[1,i,j - 1].JunkNodeOnPath
			//myGrid[1, i, j].pathConnections.insert(node)
			if myGrid[1, i , j].pathConnections.find(node.graphID) = -1
				myGrid[1, i, j].pathConnections.insert(node)
				myGrid[1, i, j].pathConnections.sort()
			else
			//debugText_1$ = "Node already exists 2"
			endif
		 	endif

		 	if myGrid[1, i - 1, j].isPath = 1
		 		//add to connection list

		 		node.graphID = myGrid[1, i - 1, j].gridID
		 		node.fromNode.col = myGrid[1, i, j].col
		 		node.fromNode.row = myGrid[1, i, j].row
		 		node.nodeCost = myGrid[1,i,j].Cost

		 		node.toNode.col = i - 1
		 		node.toNode.row = j
		 		node.graphText = "4"
				node.graphIsJunkNode = myGrid[1,i - 1,j].JunkNodeOnPath
				//myGrid[1, i, j].pathConnections.insert(node)
				if myGrid[1, i , j].pathConnections.find(node.graphID) = -1
					myGrid[1, i, j].pathConnections.insert(node)
					myGrid[1, i, j].pathConnections.sort()
				else
					//debugText_1$ = "Node already exists 4"
				endif
		 	endif

		 	if myGrid[1, i + 1, j].isPath = 1
		 		//add to connection list
		 		node.graphID = myGrid[1, i + 1, j].gridID
		 		node.fromNode.col = myGrid[1, i, j].col
		 		node.fromNode.row = myGrid[1, i, j].row
		 		node.nodeCost = myGrid[1,i,j].Cost

		 		node.toNode.col = i + 1
		 		node.toNode.row = j
		 		node.graphText = "5"
				node.graphIsJunkNode = myGrid[1,i + 1,j].JunkNodeOnPath
				//myGrid[1, i, j].pathConnections.insert(node)
				if myGrid[1, i , j].pathConnections.find(node.graphID) = -1
					myGrid[1, i, j].pathConnections.insert(node)
					myGrid[1, i, j].pathConnections.sort()
				else
				//debugText_1$ = "Node already exists 5"
				endif
		 	endif

		 	if myGrid[1, i , j + 1].isPath = 1
		 		//add to connection list

		 		node.graphID = myGrid[1, i, j + 1].gridID
		 		node.fromNode.col = myGrid[1, i, j].col
		 		node.fromNode.row = myGrid[1, i, j].row
		 		node.nodeCost = myGrid[1,i,j].Cost
		 		node.toNode.col = i
		 		node.toNode.row = j + 1
		 		node.graphText = "7"
		 		node.graphIsJunkNode = myGrid[1,i,j + 1].JunkNodeOnPath

				//myGrid[1, i, j].pathConnections.insert(node)
				if myGrid[1, i , j].pathConnections.find(node.graphID) = -1
					myGrid[1, i, j].pathConnections.insert(node)
					myGrid[1, i, j].pathConnections.sort()
				else
				//debugText_1$ = "Node already exists 7"
				endif
		 	endif
		 	if myGrid[1, i , j].pathConnections.length = -1
		 		//code
		 	else
		 		myGrid[1, i , j].pathConnections.sort()
		 		myGrid[1, i , j].connectionsLength = myGrid[1, i , j].pathConnections.length
		 	endif

		 	if myGrid[1, i , j].HasPOIsprtID = -1
		 		node.graphIsPOINode = -1
		 	else
		 		node.graphIsPOINode = 1
		 	Endif
		 endif
	next j
next i
Endfunction
Note how this function is looking for information in both the target node and the adjacent nodes. This is important information for both the AIroutefinding and for the path laying functions. I store this important information in type called ‘pathConnections’. This is the list of adjacent nodes which have a path and is saved inside each node. I also store here what type of path it is with node.graphText. This can then be printed on screen for bug hunting. As you can see, the determination for processing the node for list inclusion is the conditional
if myGrid[1, i , j + 1].isPath = 1
This is just one of many data types kept in myGrid and is found using a parser function.For example, to find an empty turret placement I use:
if spriteAtLocationImageID = Lvl1_images[EMPTY_TURRET_PLACEMENT_IMG]  /// Empty Turret Placement
myGrid[LevelID,i,j].isTurretPlacement = 1
Knowing what nodes are adjacent and if they are a path or not is useful information. The junk placed in locations can be on both a road or on the ground. I didn’t want the collectors to leave the road so I would need a way for the collector to get at the junk without leaving the road. This is now easy to do, because every node knows if adjacent nodes are a path or not. So I made a new type inside myGrid[] called JunkNode. So the conditional looks like this:
		if myGrid[1,i,j].Junk > 0  //update the junknodes
			myGrid[1,i,j].JunkNode = -1
			myGrid[1,i-1,j].JunkNode = 1
			myGrid[1,i-1,j].JunkNodeBelongsTo.col = i
			myGrid[1,i-1,j].JunkNodeBelongsTo.row = j

			myGrid[1,i+1,j].JunkNode = 1
			myGrid[1,i+1,j].JunkNodeBelongsTo.col = i
			myGrid[1,i+1,j].JunkNodeBelongsTo.row = j

			myGrid[1,i,j-1].JunkNode = 1
			myGrid[1,i,j-1].JunkNodeBelongsTo.col = i
			myGrid[1,i,j-1].JunkNodeBelongsTo.row = j

			myGrid[1,i,j+1].JunkNode = 1
			myGrid[1,i,j+1].JunkNodeBelongsTo.col = i
			myGrid[1,i,j+1].JunkNodeBelongsTo.row = j
		Endif
So, all I am doing here is finding grid nodes which have more than zero junk and setting every adjacent node (Horizontal, vertical only)to 1. But, because I want to know which of these junkNodes are on a path, I need to cross reference them with the isPath node data. I create a new type called junkNodeOnPath and run this very simple loop:
for s = 0 to 50
	for d = 0 to 50
		if myGrid[1,s,d].isPath = 1 AND myGrid[1,s,d].JunkNode = 1
			myGrid[1,s,d].JunkNodeOnPath = 1
		else
			myGrid[1,s,d].JunkNodeOnPath = -1
		endif
	next d
next s
Now, when the collector routefinding runs, and I want it to search for ‘Junk’ it looks for the conditional isGraphJunkNode = 1. This conditional stays where it is for as long as there is junk in the adjacent node. When the junk is deleted (after collection) then isGraphJunkNode = -1 and so gets ignored by the route finder.
When the collector needs to return with it’s loaded goods, it does a search with the route finding function like this:
AIcollectorPath = pathFinding(tempAIstart, tempAIend,"Normal") // returns the collector to the foundry
tempAIstart is the current collector position, tempAIend is the node inside the foundry where I want to deliver the load, and the mode ‘Normal’ says I want to find the end node and not go looking for junk nodes. Route finding for the enemy units is the same ‘Normal’ mode with their start at the screen edge and the foundry as the end node.
Collector Programming
The collector now can make it’s own way point list by calling the pathFinding() function. But what causes it to enter the correct mode? The collector has its own function I have called collectorProgram(). The collectors use a very simple state logic. A collector can be in one of many states which tell it what it should be doing. So when I create a collector I initialise like so:
tempCollector.programMode = "SEEK"
This is a static mode where the way point list is empty and the ‘Junk’ mode pathfinder is invoked. If the path finding is successful, the return list of way points from the route finder is entered into the collectors list and the collector changes state to:
myCollectorList[i].programMode = "SEEK_FOLLOW"
The collector stays in this mode, following it’s way point nodes contently checking to see where it is along the route. The condition it looks for is:
if myCollectorList[i].mode$ = "END_JUNK"
Where does this mode$ come form? When I create the path finding list, I not only add the nodes to this list, I also add information as to what this node is, then store it in .mode$ like so:
tempWaypoint.waypointType$ = "WP"
So the collector can look at this information at anytime to see what the waypointType$ is and take action accordingly. It’s like a coded trigger which gets fired when the conditional is met:
if thisCollector.CollectorWaypointList[thisCollector.currentWaypoint.ID].waypointType$ = "WP" then thisCollector.mode$ = "FOLLOW"
if thisCollector.CollectorWaypointList[thisCollector.currentWaypoint.ID].waypointType$ = "START" then thisCollector.mode$ = "START"
if thisCollector.CollectorWaypointList[thisCollector.currentWaypoint.ID].waypointType$ = "END" then thisCollector.mode$ = "END"
if thisCollector.CollectorWaypointList[thisCollector.currentWaypoint.ID].waypointType$ = "END_JUNK" then thisCollector.mode$ = "END_JUNK"
if thisCollector.CollectorWaypointList[thisCollector.currentWaypoint.ID].waypointType$ = "END_POI" then thisCollector.mode$ = "END_POI"
It’s useful have this separation of mode$ because I may want to use different information for different units should the game be expanded. I can just add to this list and make the collector ‘watch’ for the mode to appear. The collector is effectively reacting to the way point mode$ dependent on it’s state, in this case heading to a JunkNodeOnPath. Now the collector is next to a junkNode it can load up with materials and move on to the next state:
if myGrid[1,focTemp.col,focTemp.row].Junk > 0

	if myGrid[1,myCollectorList[i].junkNodeFocus.col,myCollectorList[i].junkNodeFocus.row].Junk > myEngine.collectorCarryLoad
		dec myGrid[1,myCollectorList[i].junkNodeFocus.col,myCollectorList[i].junkNodeFocus.row].Junk , myEngine.collectorCarryLoad
		IcanCarry = myEngine.collectorCarryLoad
	else
		IcanCarry = myGrid[1,myCollectorList[i].junkNodeFocus.col,myCollectorList[i].junkNodeFocus.row].Junk
		myGrid[1,myCollectorList[i].junkNodeFocus.col,myCollectorList[i].junkNodeFocus.row].Junk = 0
	endif

	if IcanCarry = 1 then myCollectorList[i].CollectorJunkSpriteID = CreateSprite(JunkPileImgSm_1)
	if IcanCarry = 2 then myCollectorList[i].CollectorJunkSpriteID = CreateSprite(JunkPileImgSm_2)
	if IcanCarry = 3 then myCollectorList[i].CollectorJunkSpriteID = CreateSprite(JunkPileImgSm_3)
	if IcanCarry = 4 then myCollectorList[i].CollectorJunkSpriteID = CreateSprite(JunkPileImgSm_4)
	if IcanCarry = 5 then myCollectorList[i].CollectorJunkSpriteID = CreateSprite(JunkPileImgSm_5)
	if GetSpriteExists(myCollectorList[i].CollectorJunkSpriteID) = 1
		SetSpriteDepth(myCollectorList[i].CollectorJunkSpriteID,COLLECTOR_DEPTH - 20)
	endif
		myCollectorList[i].programMode = "RETURN"
else
	myCollectorList[i].programMode = "SEEK"
Endif
You can see here, the collector has a decision to make. If there was another collector which was closer, it may have already picked everything up (called a race condition). Or it could have picked up nearly everything. Or maybe it is the first to arrive and the junk pile is full. So the next state for the collector is going to be determined by what it finds at the end of it’s way point list. It can not mind read other collectors, it has to go look!
Also, I do not want to look for the junkPile in the collector current position but in the node adjacent to the road (where the junk is physically located). I do this by using a node type call junkNodeFocus. This justs points to the node which has the junk so the collector program can delete from that node and not from the collectors current position (collecting adjacent rule).
In “RETURN” mode the collector now calls the path finder for a route back to the foundry. Once with the way point list inside the collector the state then changes to “RETURN_FOLLOW” and so returns back along the way point list until it gets to the foundry, unloads and changes state back to “SEEK”. So we see from this the collector states follow a very simple program pattern. “SEEK” “SEEK_FOLLOW” “RETURN or SEEK” “RETURN_FOLLOW or SEEK_FOLLOW”.
Before leaving the collector program let us look at two more collector states. One is invoked by the user, where by a button is pressed and all the collectors return to the foundry to hide from the enemy. We need to somehow interrupt the collectors routine and invoke a new state. The button code looks like this.

And the code for the button using a toggle
if GetSpriteHitTest(Hud_CollectorIcon, nowWorld.X#,nowWorld.Y#) = 1
		if myEngine.sendCollectorsToFoundry = 0
			myEngine.sendCollectorsToFoundry = 1
		else
			myEngine.sendCollectorsToFoundry = 0
		endif
		ps(13,0)
	endif
The programMode is changed by the scheduler like this:
if myEngine.sendCollectorsToFoundry = 1 AND not myCollectorList[i].programMode = "SEND_FOUNDRY_FOLLOW" AND not myCollectorList[i].programMode = "SLEEP"
	myCollectorList[i].programMode = "SEND_FOUNDRY"
Endif
Two things in this code are important to note. I have not directly manipulated the collector state. I have simply made the request by setting a flag in myEngine.sendCollectorToFoundry = 1. Why have I done this? If you take a look at what is going on, the request gets picked up by the collector and is processed immediately. But the “SEND_FOUNDRY” is only one of three states it needs to carry out this task. I want the collector to route find to the foundry “SEND_FOUNDRY” then “SEND_FOUNDRY_FOLLOW” where the collector follows it’s way point list back to the foundry, and then I want it to wait there “SLEEP”. So these three collector states are triggered by this single conditional myEngine.sendCollectorsToFoundry = 1.
The code to pole user button and change collector state is thus:
if myEngine.sendCollectorsToFoundry = 0 AND myCollectorList[i].programMode = "SLEEP"
	local roll as integer
		roll = random(0, 50)
	if roll = 1 then myCollectorList[i].programMode = "SEEK"
Endif
And the collector then carries on with it’s assigned roll. Using states for object control is easy and expandable. I was able to add a new state I called “WAIT_FOR_PROGRAM”. This was needed because during testing, if all the junk on the map had been collected, the collector program spammed the routeFinding function on each and every frame. With ten collectors doing the same, the game locked up (was very slow). This program mode was easy to implement with the following code.
if AIcollectorPath.length = -1
		myEnemyCollectorList[i].programMode = "WAIT_FOR_PROGRAM"
		debugText_3$ = "WAIT_FOR_PROGRAM"
	endif
The routeFinding() function is programmed to return -1 if a route cannot be found. The collector just checks this and switches mode depending the function return value. The “WAIT_FOR_PROGRAM” is simple enough. We just put the collector back in “SEEK” after a set time. If the collector finds some junk (The user may have added a new road) the collector goes back on its assigned “SEEK_FOLLOW”, if the result is again -1 then the collector stays in “WAIT_FOR_PROGRAM” waiting for the next “SEEK” state.
Linked Lists
I wanted to add a story into the game. For this I would use text and a character portrait.
I modified some code from AppGameKit to animate the letters. Inputing text in amongst code was ugly and awkward to work with. So the text strings were written in Scriverner, exported to a text.txt file and loaded into the game at runtime. Each text string I gave a number and the program called the character dialogue with a simple function call.

I also wanted to give the player some option choice as part of the function. This is invoked by adding a 1 for a simple ‘I’ve read that’ affordance with white buttons and the choice selection buttons which are red and green. The function then returns a value and this value is dependent on which choice the player made (Cselect).
case 73
			if myEngine.UpIconClicked = "MG3"
				myEngine.UpIconClicked = "RESET"
				Cselect = characterMessage(69,2)

			if Cselect = 1
				tempPlayBook.playBookID = 74
				tempPlayBook.commandFunctionSwitchID = 74
				tempPlayBook.PBname = "Researching MG turret 2"
				tempPlayBook.timeStamp = GetSeconds()
				myPlayBookListOpen.insert(tempPlayBook)
				SetUpgrade("MG3",2)
				myEngine.currentlyResearching = 1
				result = 1
			If Cselect = 2
				result = 0
			endif
		endif
	Endcase
This is working code example how I implemented the character text function. ‘Cselect = characterMessage(69,2)’ calls the function asking for text ID 69, which is the text talking about the MG3 upgrade. The code also passes the value 2 to tell the function it is expecting the user to make a choice and have the function make the buttons green and red. By colouring the buttons I am telling the user this is a choice message.

The code extract is held in a case select statement, case 73. This is part of the dialogue system I designed for DoG. The components parts to this system are:
1.A list of indexed character strings which is the text to display in an external text.txt file.
2.myPlayBookOpen list which provides information on where the case listing is connected to.
3.myPlayBookClosed a list with information on case listings which have been accessed during gameplay.
4.A time stamp feature to record when the listing is entered into the Openlist (Important for time based case statements.)
5.A setUpgrade(STRING,val) call to tell the game engine the state of the research icons in the foundry.
6.’Result’ from the case select statement so the calling function ‘PlayBookGateWay()’ knows what to do when the function returns. (default 0, nothing is done)
7.Access to the ‘broadcast’ system so game functions can talk to each other.
The way this system works is very simple, infact the code for the PlayBookGateWay() is very short.
function PlaybookGateWay()
debugText_12$ = str(myEngine.buildMode)
if myEngine.buildMode = 1 then exitfunction
if myPlaybookListOpen.length = -1
	//
else
	inc playBookIndex
	if playBookIndex > myPlaybookListOpen.length
		playBookIndex = 0
	endif
	if playBookEntryProgram(myPlaybookListOpen[playBookIndex]) = 1
		myPlayBookListClosed.insert(myPlaybookListOpen[playBookIndex])
		myPlaybookListOpen.remove(playBookIndex)
	endif
endif
Endfunction
All we are doing here is sending one item from myPlaybookListOpen to the playBookEntryProgram(). I programmed for the playBookId and the case statements to be the same. When PlayBookEntryProgram() finds a conditional in the select, it tests the condition, carries out the contents and then returns true or false. In some case statements there are new listings to be added to myPlayBookListOpen. So in this way listings can appear latter after other events have been triggered. Another type of conditional will look at the time stamp, compare it with the current time and if the condition time has passed it runs the case code.
The beauty of using linked lists is the conditionals only get tested when the contents are ready to run. In the same way as the route finding AI, linked lists need to have at minimum one entry in the open list. The first in my game is shown here.
tempPlayBook.playBookID = 2
tempPlayBook.commandFunctionSwitchID = 2
tempPlayBook.PBname = "Welcome Message"
tempPlayBook.timeStamp = GetSeconds()
myPlayBookListOpen.insert(tempPlayBook)
This open listing points to the select case = 2 via the commandFunctionSwitchID. Case 2 is a time Stamped conditional and looks like this:
case 2
		if timeDif > 5/ myEngine.researchTime
			characterMessage(10,1)
			tempPlayBook.playBookID = 27
			tempPlayBook.commandFunctionSwitchID = 27
			tempPlayBook.PBname = "Foundry Open"
			tempPlayBook.timeStamp = GetSeconds()
			myPlayBookListOpen.insert(tempPlayBook)
			result = 1
		endif
	Endcase
As you can see in the code this case statement is doing two things. The first is the character statement 10. The other thing it does is adds an new entry into the open list, linking these two lists together. When PlayBookEntryProgram() returns to the gateway, it returns a result = 1. The gateway then adds the listing it sent to the closed list then deletes this list from the open list. This case will no long be checked for conditionals. Removing a listing ensures we do not see the same message twice. Some conditionals are sticky. This is easily done by removing the result = 1 and the open listing remains. So to ensure the player can get the same message from the upgrade icons clicks we return result = 0 and the gateWay will keep this conditional on the open list.
The upgrade icons can be accessed too. Here I have the input function wait for a click on an icon with the following:
		if GetSpriteHitTest(Lvl1_MGUp3, nowWorld.X#,nowWorld.Y#) = 1
			ps(19,0)
			if GetSpriteColorGreen(Lvl1_MGUp3) = 190
				characterMessage(52,1)
			else
				debugText_12$ = "MG3 hit"
				myEngine.UpIconClicked = "MG3"
				setspriteColor(Lvl1_MGUp3, 0,200,200,255)
			endif
		Endif
If you look at the case 73 code shown above, you will see the conditional: if myEngine.UpIconClicked = "MG3". I’ve also done some cheating here. Icons can only be green after they have been researched. So if the icon clicked on is green then I display a message saying ‘you already have this’. If the icon isn’t green then I set myEngine.UpIconClicked = “MG3” and PlayBook will take over.
This system works well, but I found tracing conditionals took longer the bigger my game got. At the time of writing I have 152 message statements with 134 conditional statements in the playBookEntryProgram(). The bigger it gets, the longer the debug time (and mouse wheel scrolls). It can get horrendously knotted in places and there is no visual indication for open ends, broken links, links which have no entry point (logical lockout) links which get reinstated unintentionally and entries being run even when it is undesirable to do so. Clearly I have some work to do with this system, but the basic principles of the linked list works, just as long as there is no editing to do. Hopefully, by the time you read this I will have found a solution.
Turrets
A tower defence game needs something attacking and something defending. In my game, the turrets are defending the foundry and the enemy units try to get past the turrets. I would have different types of turrets. These also can be upgraded too. At the time of writing, there are only two turret types in the game. The Machine Gun turret, fast firing, small damage and the Cannon, slow firing and high damage.
How these turrets looked and how they moved was an early entry into the game. I tried different looks until I came up with the final designs. The graphics I made modular so the animations could be put together. To animate the turrets I used spriter Pro and gave them two animations mode. Static, which has no animation, and firing, a sequence where the animations show the gun firing and the shells reloading. In early version of the game I loaded in the turrets with .scon files. These worked well and looked good. Also I could make small changes in spriter and then instantly run the game with the new look.
In later editions of the game I moved the turret animations from .scon files to .png atlas files and animated using AGK’s sprite animations features. This is so easy to do I now wonder why I didn’t do this in the start. Spriter can output an atlas with parameters set for my target animations quality. The smallest animation is the level 1 MG turret with only 8 frames and atlas 244x524.

In early code experiments I had four bullet sprites placed onto one turret sprite which could all rotate. However, putting everything into one sprite atlas is better in work flow and in implementing code (sprites can have physics add, .scon files can’t). Offsets were easier to find and modifications could be done offline without having to alter any code.
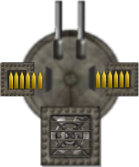
The MG turret with amobox and twin turrets came with an atlas 695x1038 and 35 frames. The byte size of this file is 262kb which isn’t very big by todays standards. I was also careful not to allow too much alpha pixels, especially if they didn’t and anything looks wise. I also had a sprite atlas for the turret mode when it wasn’t firing and the fan blade rotating. This added sprite sheet didn’t offer anything special to the game, and the turret looked cool when it fired so in the end I used just the one sprite sheet.
The double barrel cannon with mounted loader is the biggest sprite sheet in the game.

For the animations to look smooth it runs at 60 frames a second and runs for 100 frames. With the cannon set inside a sprite animation, I could now query the current frame and play the cannon firing sound in sync with the animation. Admittedly, I had so much fun with spriter it was a challenge to get back into the coding. In the image show, the sprites are assigned ‘bones’ and it is these bones which move relative to the parent bone. Also, the z-order determines the sprite depth so I ordered the shells to look like they were inside the box. Parts of the barrel is obscured by the turret mount proper and the disk on top rotates as the cannon reloads. All three animations from turret cannon level one to turret cannon level 3 are all in the one spriter file. If you use the .scone file, these animations are easily accessed using commands.
Targeting
I now had turrets and enemies. Time to put the two together to make a turret game. This was my first tryout with AGK’s excellent physics system and I found a command which makes a sprite a sensor, that is, this sprite is still part of the physics engine but it doesn’t react when things bump into it, but it does get registered as a collision. So above every turret I made a circle sprite, set it to invisible and a sensor and gave it a name. If I wanted to know if an enemy is inside this circle I call the physics engine to tell me. The overhead for checking this very small as the physics engine keeps a note of all the objects. The test for collision is only making a request to physics engine data. The first turret tracking system used a target list for each turret. It became apparent, the code I had written wasn’t very fast (passing list by reference is very slow and prone to me getting confused on where the list came from). The code I adopted doesn’t make a list. The targeting code locks on to the first enemy it finds within target rang and doesn’t look for a new target until the enemy leaves the target radius or is made dead. In a recent build, the turret is in such a hurry to kill the enemy it fires even before it is locked on.
Before the turret fires, it first needs to find the angle relative to the turret and the enemy. AppGameKit comes with a neat fast little function.
thisTurret.angleToTarget = ATanFull( targetedEnemy.currentPoss.X# - thisTurret.turretCenter.X#, targetedEnemy.currentPoss.Y# - thisTurret.turretCenter.Y#)
By entering the turret position and the enemy position in the x,y chords, the return is the angle in degrees to the target. I’m sure this function has something to do with trigonometry but I am a game writer not a mathematician so I have no idea how it works, it just does.
I have now two angles. One is the angle the turret is currently pointing, the other is the angle to the target. There are different techniques we can deploy here. I used the tween method initially. Later I had some code ‘donated’ to me based on curve calculations which quickly became my favourite method. All I do is enter in the numbers and I get a heading angle for the turret to point at. This is a very useful function.
//**********************************
//    Wrap Angle
//**********************************
//Returns a value that does not exceed the range of 0 to 360.
function WrapAngle(angle as float)
    angle = fmod(angle, 360.0)
    if angle < 0 then angle=angle+360
endfunction angle
//**********************************
//    Curve Angle
//**********************************
//This command will return an auto-interpolated angle based on a given speed.
function CurveAngle( destination as float, current as float,  speed as float)
    local diff as float
    if speed < 1.0 then speed = 1.0
    destination = WrapAngle( destination )
    current = WrapAngle( current )
    diff = destination - current
    if diff <- 180.0 then diff = ( destination + 360.0 ) - current
    if diff > 180.0 then diff = destination - ( current + 360.0 )
    current = current + ( diff / speed )
    current = WrapAngle( current )
endfunction current
The last part of the turret code needs to fire at the enemy. To do this I needed three things to happen. I need to set the fire animations going. I need to make a sprite appear for the muzzle flash(and make it disappear) and for the cannon I needed to eject a casing. To make the casing eject was real easy.
if thisOneTurret.turretClass = "Cannon"

		//SetSpriteVisible(thisOneTurret.flameSpriteID , 0)
		cartridge = CreateSprite(CannonCasingImage)

		SetSpritePosition(cartridge, thisOneTurret.turretPoss.X# + 62 , thisOneTurret.turretPoss.Y# + 62)
		SetSpritePhysicsOn(cartridge, 2)
		SetSpritePhysicsFriction(cartridge, 100)
		SetSpritePhysicsImpulse(cartridge, thisOneTurret.turretPoss.X# , thisOneTurret.turretPoss.Y# , cos(thisOneTurret.angleToTarget)*1000 , sin(thisOneTurret.angleToTarget)*1000 )
		SetSpritePhysicsRestitution(cartridge, 0)
		SetSpritePhysicsDamping(cartridge, 0.999)
		SetSpritePhysicsAngularDamping(cartridge, 0.9999)
		SetSpriteDepth(cartridge, TURRET_DEPTH - 10)
		thisOneTurret.emptyCasing.insert(cartridge)
		//thisOneTurret.emptyCasing.sort()
		Endif
This is code for make a physics object and then punch it real hard. I had real fun with this one, and left the funniest one in the game.
Muzzle Flash Animation
For the turrets to look more real when firing I added sprite animations which are played in the turrets rotation. The muzzle flash animations is also a sprite sheet and this time I used a new program called PixelPart (Steam download).
This program is simply awesome. By creating particles and combining them in different ways I can create a sprite sheet. At all times during the production I can preview how the final animation will look. Settings for example the sprite frame size is shown during the development stage. Additional particles can be added in and the settings change easily. At a frame rate of 60 and to a scale of 124 (my typical enemy size) the sprite animations look real enough. The explosions have four atlas sheets which are chosen at random and AGK’s excellent handling of sprite and animations make the process fast any easy. After establishing a simple work flow with sprite sheets (see turrets earlier) it was clear to me I wouldn’t be needing to add particles to a game like this. My coding time and processor allocation can then be pushed towards the AI side of things knowing the graphics are going to look great after the animation process is done. There will be times where a sprite sheet probably wouldn’t look good and particles will be necessary, but in practice, most people wouldn’t see the explosion as four different animations played over and over. The enemy shields, barriers, smoke and fire are all products created in pixelpart and I am delighted with the results and even more delighted with the minimal effort needed to get them into the game.
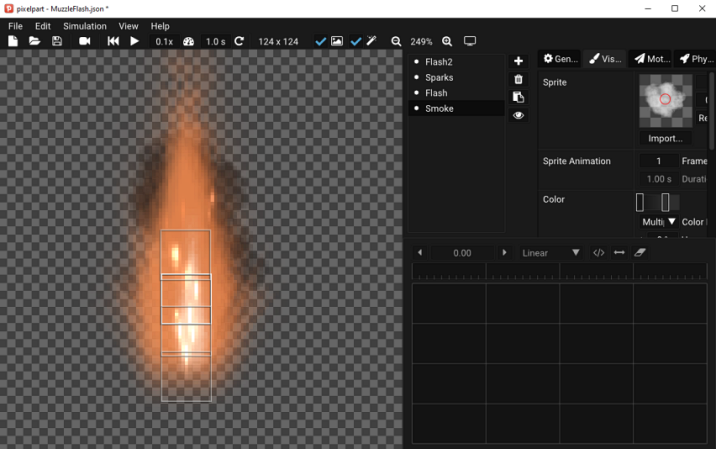
The image here shows four particle systems stacked on on top of another. Each particle element has force, motion colour and spawn settings which I tweeked until it looked good. This program would also be a great tool pixel games. This is anther program I needed to drag myself from as I would end up with a disk of sprites and no game.
I mentioned earlier one of the reasons I switched to sprites is the ease at which frames can be animated in sequence with sounds. A good example of this in use is the dual cannon firing. To sinc the sprite to the sound all that is needed is a few lines of code.
if GetSpriteCurrentFrame(thisTurret.spriteID) = 50
			if thisTurret.turretLvlStatic = "Static3"
				ps(random(8,10),0)
				SetSpriteAngle(thisTurret.flameSpriteID2, thisTurret.currentAngle)
				SetSpriteVisible(thisTurret.flameSpriteID2,1)
				PlaySprite(thisTurret.flameSpriteID2,60,0,1,29)
			endif
		Endif
I have so much more to write, but I am mindful this post is getting too long. So if you have read this far then well done!
DoG isn’t finished, Albertine Savary tells me her adventure has only just started so there is to be lots more content added as your journey across the desert unfolds. But for me, I’m going to get a coffee.
You can down load Desert Of Gold on itch.io here:
https://dewarinversion.itch.io/desert-of-gold
The full game release date is yet to be decided, all updates will go to itch.io. Please feel free to leave comments.
