Welcome to the last (at last!) section on how to make a FF type game.
Some notes before we begin.
First, you will find all the media (and compiled game exe) in a single zip that you can download at the end of this tutorial. I have put it on to a file hosting area, and not my daughters site, as she’s using it now for her own projects. If ANYONE has any difficulties in downloading the file, please email me or post on this thread and I will send it as a direct link.
Second, please note that this tutorial was originally (100s of years ago

) for DBC and not DBP. However, you can adjust the tutorial for DBP if you need to, and it will work.
Lastly, as I always say, enjoy the tutorial, rip the thing apart, add your own code, and basically just play about with everything. The best way to learn is to do, so feel free to experiment with the code and remember to add your own things to it and to have fun.
*Special Note to Tapewormz*
Sorry about the wait, but congratulations on the 7 kids.
Lets begin.
Fighting Arena
cls
sync on
sync rate 0
color backdrop 0
hide mouse
The first set of instructions (as usual) sets up the screen.
Cls clears the screen.
Sync on and sync rate 0 sets up the manual sync rate (0 being as fast as possible).
Color backdrop 0 sets the background to black.
Hide mouse hides the mouse pointer from view.
Ok, moving on.
We next set up the ink colour using the RGB setting, and again clear the screen.
`########################################
Co=RGB(219,240,251):ink 0,co:cls
`########################################
This colour is used for the sky in the game.
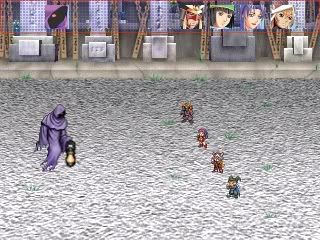
The sprites cover the whole screen in this tutorial, and you would not normally have to set the background to anything but black. But we use a summon monster magic in the tutorial, and the way we display the summons is similar to Final Fantasy Tactics Advance for the GBA.
The big green and nasty summons looks like this:
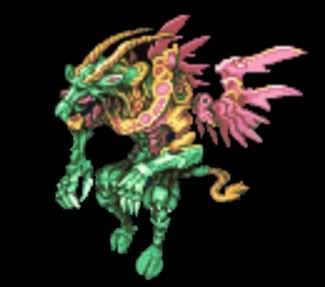
so I wanted to do something else than just "stick it" on to the play area.
Although you could do your summons totally differently and not move the game sprites to uncover the background---its up to you.
(If you rem out this bit, you will see that the sky remains black when you issue the summon command.)
We now load in the music in to bank 1 and then play the music forever (loop)
`########################################
LOAD MUSIC "ff4battl.mid",1
loop MUSIC 1
`########################################
Please use any music you want to. I just put this in because I think it suit’s the game and the fight arena. Remember if you change the music be sure that its format will be usable by the load music command.
Next we load in all the graphics we are using for the game. There is quite a lot of them but as normal, you should be able to change them to your own graphics quite easily.
`########################################
load image "tomb.bmp",65535
sprite 65535,0,0,65535
load image "topofloc.bmp",65534
sprite 65534,0,-160,65534
sprite 4000,200,100,3005
load image "topgrid.bmp",500
load image "smallloc2.bmp",499
load image "a1.bmp",1998
load image "a2.bmp",1999
load image "naddax.bmp",2000
load image "clddk.bmp",2001
load image "cldlt.bmp",2002
load image "0.bmp",2004
load image "1.bmp",2005
load image "2.bmp",2006
load image "3.bmp",2007
load image "4.bmp",2008
load image "5.bmp",2009
load image "6.bmp",2010
load image "7.bmp",2011
load image "8.bmp",2012
load image "downarrow.bmp",2013
`########################################
load image "ghost3.bmp",1000
load image "enemy.bmp",1001
`########################################
load image "garanaklg.bmp",1
load image "mag.bmp",2
load image "wom.bmp",3
load image "kyaccalg.bmp",4
load image "downarrow.bmp",3000
load image "bar1.bmp",3001
load image "bar2.bmp",3002
load image "bar3.bmp",3003
load image "bar4.bmp",3004
`########################################
load image "menu1.bmp",3005
load image "menu2.bmp",3006
load image "menu3.bmp",3007
load image "menu4.bmp",3008
load image "menu5.bmp",3009
load image "menuback.bmp",3010
load image "potionsprite.bmp",3011
load image "potionspritemp.bmp",3012
load image "lifepotion.bmp",3013
load image "menu2back.bmp",3014
load image "sumdrag.bmp",3015
load image "sumphx.bmp",3016
load image "special.bmp",3017
load image "mouse.bmp",3018
load image "riper.bmp",3019
`########################################
This next graphic is used in the damage of your characters/enemy. This could be a single red ‘splat’ or something that makes the character flash white and red etc. However, its an animation of a blood splat and I wanted to show newcomers to the language how to grab multiplex images off a single screen and store them, and this seemed as good a way as any.
So lets take a look at the routine that does this:
########################################
load bitmap "blood.bmp",1
SET CURRENT BITMAP 1
im=3020
x=0:y=0
for dp=1 to 4
for le=1 to 4
GET IMAGE im,x,y,x+128,y+128
inc im
inc x,128
next le
x=0:inc y,128
next dp
`########################################
The first line loads in a bitmap of the blood. Here is what it looks like:
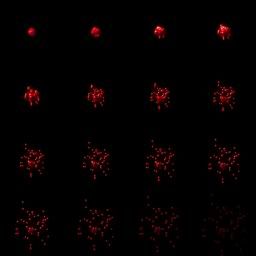
The next line sets the current bitmap to 1. The default is 0, but using this command you can direct all graphic commands to use the new (hidden) bitmap.
Now for the rest of it:
im=3020 ---This is the start number of the first image. Remember, just like storing sounds, music and other things in Dark Basic, you have to put images somewhere, so think of this number as an empty box that your going to put your first image in.
x=0:y=0 --- These are the x co-ord and y co-ord of the top left of the image area to grab.
for dp=1 to 4 --- This is the loop that sets how many lines down the routine grabs. (dp=Depth).
for le=1 to 4 ---This is the loop that sets how many images across the routine grabs. (le=length).
GET IMAGE im,x,y,x+128,y+128 ---Ok, this is saying the following:
Grab an image (get image) and store it in the empty box numbered whatever im is at this time. Start at the x co-ord and y co-ord which will be the top left of the area to grab, and, because each picture fits within a 128 pixel area, set the bottom right x and y co-ords to 128 more…Which forms the area to grab as a square (x,y,x+128,y+128).
inc im --- This just adds a 1 to whatever number im is. Its like the command im=im+1 and does exactly the same, only faster.
inc x,128 --- This adds not a 1 to x but 128 to x. Why? Because if you look at the picture you can see that each image is separated a little and that each picture of the blood fits in to a 128 area. So, after the computer grabs x,y,x+128,y+128 it then has to reset x from what we originally made it (0) to 128.
This effectively moves the x position of the top left co-ordinate 128 pixels to the right, ready for the grab image command to get the next picture on the bitmap.
next le --- loops the length loop. (try saying that quick after a drink!).
x=0:inc y,128 --- After the le loop ends, this line resets x back to 0 (far left of bitmap) and now adds 128 to y. That means that y now drops down 128 pixels. We do this for the same reason we moved x 128 pixels in the other loop.
next dp --- finally we loop the depth loop. This re-runs the le loop again and lets it grab the next set of pictures on the next line down.
The routine continues until dp comes to an end.
Not as hard as you thought eh? By using that routine and modifying the x and y you could grab anything from explosions to character animation, so its useful to know.
Of cause if you needed to grab lots of things and you could not fit them all on to one bitmap, you don’t want to just use a single screen loaded in and then immediately use a grab routine. No, if you did that then you would end up with a huge program because you would have to copy and paste in as many grab routines as there were bitmaps. So what you do is make the grab routine a subroutine that can be recalled time after time.
We use this method in the next bit of code when I wanted to load in separate bitmaps of animations for the player characters.
########################################
im=5
load bitmap "Garani.bmp",1
SET CURRENT BITMAP 1
gosub grabem
load bitmap "woman.bmp",1
gosub grabem
load bitmap "fighter.bmp",1
gosub grabem
load bitmap "magician.bmp",1
gosub grabem
SET CURRENT BITMAP 0
`#######################################
goto start
`#######################################
grabem:
x=0:y=0
for dp=1 to 6
for le=1 to 3
GET IMAGE im,x,y,x+48,y+48
inc im
inc x,48
next le
x=0:inc y,48
next dp
return
`#####################################
The above routine you have just seen before using the blood splat animation. The only difference is that there is a gosub command after each loaded bitmap screen, which jumps to the label “grabem”. Also the pictures on each bitmap will now fit within a 48 by 48 area and not a 128 by 128 area, so we changed the numbers at the end of the get image command to suit.
Each bitmap holds the animated players in a specific way, like this:
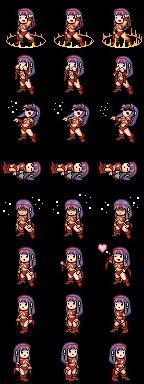
After the last bitmap is loaded we use a simple goto command to jump over “grabem” and go to the “start” label. We would not of cause need a goto command if we had put the “grabem” routine at the bottom of the program, but I did loose most of the code for this program and when I rewrote part of it I left the routine where it was.
Ok, now the main part of the game.
There are some REM statements (denoted by the ` sign) which you should read as they will help you later on.
######################################
start:
`#####################################
`this sets the amount of life everyone has...0=dead.
char1life=100:char2life=70:char3life=30:char4life=10:enemylife=200
`this sets the attack level of everyone.
char1hp=15:char2hp=10:char3hp=5:char4hp=10:enemyhp=20
`this sets the defence level of everyone.
char1def=10:char2def=10:char3def=10:char4def=10:enemydef=25
`########################################################
arx=360:ary=150
s1=8
s2=26
s3=44
s4=62
animflow=1
charplaying=1
lp=10
mp=10
hp=10
flag=0
The above sets up the variables needed for the game. Most of them are used within this program, but some are not. The s1 to a4 variables are used later on to denote which image the player sprites should use in their animations.
for t=1 to 5000
sprite t,0,0,0
next t
This bit sets up the sprite priority as DBC does not have a true sprite priority setting, unlike DBP.
Basically you just put the sprites (in whatever order you need) on screen (you can put them off screen to by using negative numbers) using a non-existent graphic which makes them invisible.
Its just one way to set the sprites up, and there are several others, much better ways, but you will have to experiment yourselves to find them.
`#######################
`un-rem for a blue menu bar
`sprite 500,0,0,500
sprite 104,50,10,1001 --- The menu bar at the top of the screen.
`#######################
sprite 5,300,10,1 --- All the icons for your characters.
sprite 6,380,10,2
sprite 7,460,10,3
sprite 8,540,10,4
`#######################
gosub HP --- A routine to display (depending on variables) your health/life.
`#######################
Ok, lets do the “do”
do
`sprite 1,350,200,s1
`sprite 2,380,250,s2
`sprite 3,410,300,s3
`sprite 4,440,350,s4
`sprite 1000,50,200,1000
mx=MOUSEX()
my=MOUSEY()
ucm=MOUSECLICK()
if ucm=1 then gosub menucheck
gosub waitanim
if flag<1 then gosub arrow
SPRITE 10000,mx,my,3018
wait 100
sync
loop
This you have seen before in the other tutorials. First off we set mx and my to the hidden mouse pointer position on the screen. We do that because we want to put a sprite at the same co-ords as the real mouse to give us a new pointer.
Next we set the variable ucm (User Clicks Mouse) and take a look to see if it =1. If it does then your clicking something and in that case we just have to jump to check the menu to see what you want to pick or not, as the case may be, so we use the gosub command.
We then slow everything down a tad by jumping to a routine that animates the players game sprites while you make your mind up what you want to do.
The line : if flag<1 then gosub arrow -- checks to see if it is your go (at the beginning of your game characters move) and if so, if jumps to a routine that makes an arrow appear above the head of the character to show who’s move it is next.
The Sprite command sets sprite 10000 to the co-ords of the hidden mouse (mx,my) and displays the graphic stored in 3018, which is the new mouse pointer.
Moving ever onwards:
menucheck:
wait 500
do
mx=MOUSEX()
my=MOUSEY()
SPRITE 10000,mx,my,3018
sprite 4000,200,100,3005
if mx>=226 and mx<=293 and my>=114 and my<=134 then SPRITE 4000,200,100,3006:mu=1
if mx>=221 and mx<=297 and my>=162 and my<=181 then SPRITE 4000,200,100,3007:mu=2
if mx>=228 and mx<=287 and my>=212 and my<=227 then SPRITE 4000,200,100,3008:mu=3
if mx>=237 and mx<=285 and my>=257 and my<=275 then SPRITE 4000,200,100,3009:mu=4
gosub waitanim
ucm=MOUSECLICK()
if ucm=1 then gosub menucheck2:exit
if ucm=2 then exit
wait 100
sync
loop
return
This is yet again very similar to the menu check in the second tutorial. It does the following:
wait 500 --- waits for half a second.
Do --- beginning of a do loop.
mx=MOUSEX() --- sets mx to the x co-ord of the hidden mouse pointer
my=MOUSEY() --- sets my to the y co-ord of the hidden mouse pointer
SPRITE 10000,mx,my,3018 --- puts the new sprite mouse pointer on the screen
sprite 4000,200,100,3005 --- this is the menu selection sprite that’s put on screen for you to pick an option from.
if mx>=226 and mx<=293 and my>=114 and my<=134 then SPRITE 4000,200,100,3006:mu=1
if mx>=221 and mx<=297 and my>=162 and my<=181 then SPRITE 4000,200,100,3007:mu=2
if mx>=228 and mx<=287 and my>=212 and my<=227 then SPRITE 4000,200,100,3008:mu=3
if mx>=237 and mx<=285 and my>=257 and my<=275 then SPRITE 4000,200,100,3009:mu=4
All the above 4 lines do is to check if the mouse sprite is within a set of coordinates and if so, then it highlights that option within the menu by changing the image of sprite 4000. It also sets the mu flag to either 1,2,3 or 4. The mu flag is used later to denote which option to display on the sub-menu, such as a list of potions, or an attack type or magic type etc.
gosub waitanim -- Jumps to the player character animation routine to keep things moving in the background.
ucm=MOUSECLICK() --- You should know this one by now!
if ucm=1 then gosub menucheck2:exit --- Click the mouse, jump to the second menu check, then exit the do loop routine.
if ucm=2 then delete sprite 4000:exit --- click the right mouse button and get rid of the menu sprite then just exit the do loop.
wait 100--- well, go on then, guess!
Sync --- refresh the screen
Loop--- loop the do
Return --- when the routine is all over with, return to the gosub.
menucheck2:
Delete sprite 4000--- get rid of the first menu sprite.
Now, depending on which of your characters is fighting......
` ATTACK
if charplaying=1 and mu=1 then sprite 4001,250,130,3017
This is saying, if the first character is fighting, and you have picked option 1 (mu=1) which is to attack, then put a sprite using image 3017 on screen. This is your special fight move, which for character 1 is blindside.
Just make a new gfx for each characters special fighting move and then change the end numbers to match the gfx image number. This for example is for character number 2:
if charplaying=2 and mu=1 then sprite 4001,250,130,3019
Etc.Etc. Just add the same for the other characters.
All the other options are done in the same way, so: ---
` DEFENCE
if charplaying=1 and mu=2 then char1def=char1def+5
` This is for character number 2:
` if charplaying=2 and mu=2 then char2def=char2def+5
` MAGIC
if charplaying=1 and mu=3 then sprite 4001,250,130,3015
` This is for character number 2:
` if charplaying=2 and mu=3 then sprite 4001,250,130,3016
` ITEMS
if charplaying=1 and mu=4 and lp>0 then sprite 4001,250,130,3011
if charplaying=1 and mu=4 and hp>0 then sprite 4002,250,150,3012
if charplaying=1 and mu=4 and mp>0 then sprite 4003,250,170,3013
` This is for character number 2:
` if charplaying=2 and mu=4 and lp>0 then sprite 4001,250,130,3011
` if charplaying=2 and mu=4 and hp>0 then sprite 4002,250,150,3012
` if charplaying=2 and mu=4 and mp>0 then sprite 4003,250,170,3013
` Etc.Etc. Just add the same for the other characters.
The only real difference in the above is the variables mp hp and lp. These denote if you have potions for magic, life or health. You could add your own variables for your own potions and just change the variables to display the new image.
gosub secondmenupick
return
Nope, not going to waste my time telling you what those two lines do.
secondmenupick:
REPEAT
mx=MOUSEX()
my=MOUSEY()
SPRITE 10000,mx,my,3018
`mhs=mouse hitting sprite
mhs=SPRITE COLLISION(10000,4001)
ucm=MOUSECLICK()
Now this second pick routine is a little different to the pick routine in the first menu. It uses a collision between the mouse and the second menu sprite to tell what the mouse is picking.
You can use a picker like the first menu if you must, but this is another way of doing it.
if mhs>0 and ucm=1 and mu=1 then gosub att
This line checks to make sure that the mouse and second menu sprite are hitting each other, AND that the user is clicking the mouse AND that the menu first picked was 1 (attack) and if all that’s correct it jumps to the attack routine.
The same thing applies for the other 3 menus chosen.
if mhs>0 and ucm=1 and mu=2 then gosub def
if mhs>0 and ucm=1 and mu=3 then gosub sum
if mhs>0 and ucm=1 and mu=4 then gosub itm
sync
UNTIL ucm=2 --- keeps doing it until you click the second mouse button.
return
Waitanim:
sprite 1,350,200,s1
sprite 2,380,250,s2
sprite 3,410,300,s3
sprite 4,440,350,s4
sprite 1000,50,200,1000
Put the game sprites on screen.
if animflow=1
inc s1:inc s2:inc s3:inc s4
endif
if animflow=2
dec s1:dec s2:dec s3:dec s4
endif
if s1>=10 then animflow=2
if s1<=8 then animflow=1
return
This routine adds 1 to the variables of s1,s2,s3,s4 (remember them from earlier on?) and then makes sure that the animation is not going over a set number. If it is, then it sets animflow to 2, which makes the routine cycle backwards through the 3 frames of animation, and when its at the correct number again, animflow is set to 1 (forwards) and the process starts all over.
arrow:
flag=1
show sprite 3000
for t=1 to 10
sprite 3000,arx,ary,3000
gosub waitanim
wait 100
sync
next t
hide sprite 3000
return
VERY easy. Just plonks a big arrow over the current character. Jumps to the animation routine, and then does that 10 times before returning to the gosub.
HP:
`character 1
if char1life>75 then char1s=3001
if char1life<75 and char1life>50 then char1s=3002
if char1life<50 and char1life>25 then char1s=3003
if char1life<=25 and char11life>0 then char1s=3004
`character 2
if char2life>75 then char2s=3001
if char2life<75 and char2life>50 then char2s=3002
if char2life<50 and char2life>25 then char2s=3003
if char2life<=25 and char2life>0 then char2s=3004
`character 3
if char3life>75 then char3s=3001
if char3life<75 and char3life>50 then char3s=3002
if char3life<50 and char3life>25 then char3s=3003
if char3life<=25 and char3life>0 then char3s=3004
`character 4
if char4life>75 then char4s=3001
if char4life<75 and char4life>50 then char4s=3002
if char4life<50 and char4life>25 then char4s=3003
if char4life<=25 and char4life>0 then char4s=3004
sprite 3001,300,10,char1s
sprite 3002,380,10,char2s
sprite 3003,460,10,char3s
sprite 3004,540,10,char4s
return
The HP routine looks large and complex but its not. It just checks what level of health you have (Charlife) and depending on what it is, it puts a sprite on top of the character icons on the top area of the screen that represents anything from full health down to danger. So the line :
if char1life>75 then char1s=3001 means if your health is over 75% your good to go so show the full green health bar.
If you’re a bit confused, take a look at the screen and you will see what I mean.
Remember that these routines should be duplicated for each of your characters.
att:
if charplaying=1
<ADD YOUR CODE HERE> ----See the end of this tutorial for more.
endif
return
def:
if charplaying=1
Char1def=char1def+20 --- come on you newcomers, you know this…yes you do!
endif
return
itm:
if charplaying=1
<ADD YOUR CODE HERE> ---Yep. This is something I am leaving YOU to do so you learn.
But to give you a clue: if it’s a health potion, that gives you 25 points of health back, just add 25 to your current health. If you don’t want the player to be MORE healthy than, say 100 points, then write a bit of code that checks the health is not greater than 100, and if it is it sets it to 100.
Im sure you get the idea.

endif
return
Ah finally the summons.
How this works is:
Remove all the sprites that’s on the screen leaving just the background and arena.
sum:
delete sprite 1
delete sprite 2
delete sprite 3
delete sprite 4
delete sprite 5
delete sprite 6
delete sprite 7
delete sprite 8
delete sprite 500
delete sprite 104
delete sprite 1000
delete sprite 3000
delete sprite 3001
delete sprite 3002
delete sprite 3003
delete sprite 3004
delete sprite 4000
delete sprite 4001
delete sprite 10000
Set up a monster and some clouds and a small representation of the arena.
sx=0:sy=0
for t=1 to 140
sprite 65534,sx,sy-160,65534
sprite 65535,sx,sy,65535
inc sy,5
sync
next t
cy1=-10
cy2=-200
cy3=-300
cy4=-75
cy5=-250
cy6=-40
cy7=-150
cy8=-400
cy9=550
After setting the y positions (cy1= bla bla bla), you move all the remaining sprites DOWNWARDS.
This gives an impression that the player is moving UPWARDS.
Also move the small arena upwards so that its flying behind the clouds and move the monster downwards so it enters the screen at the top.
for t=1 to 180
sprite 600,10,cy1,2001
sprite 601,200,cy2,2001
sprite 602,300,cy3,2001
sprite 603,250,cy4,2001
sprite 604,100,cy5,2002
sprite 605,670,cy6,2002
sprite 606,660,cy7,2002
sprite 607,410,cy8,2002
sprite 499,40,cy9,499
inc cy1,5
inc cy2,5
inc cy3,5
inc cy4,5
inc cy5,5
inc cy6,5
inc cy7,5
inc cy8,5
if cy9>250 then dec cy9,4
sync
next t
This is the monster bit.
sy=-357
for t=1 to 70
sprite 608,330,sy,2000
inc sy,5
sync
next t
When you have just the monster and the representation of the arena on screen, you should do a big sound effect and then get the monster to blast the entire area with some super-dooper attack.
Unfortunately, due to budget cuts, and the no-proliferation treaty, the super-dooper attack is a couple of flashing orbs and a “beam” of white from its mouth!!. But Im sure YOU can do much better.
This is the monsters attack.
z=1998
do
for t=2004 to 2008
sprite 609,310,130,t
sprite 610,320,120,t
sprite 611,330,140,t
sprite 1999,0,145,z
inc z
sync
if z>1999 then z=1998
next t
loop
return
Ok, and that’s your lot you lot.
You could add a routine to make the screen go totally white and then fade back the arena with everyone there, and THEN use the blood animation to denote that the enemy is damaged by the attack. But as I always do, I will leave it to you to do it as you will only learn by doing and not just reading and watching.
Also remember that I have put no sound effects in this 3rd tutorial which means that you can add them yourselves and learn to key them to the action. It looks much better with the right sounds, trust me.
As for the standard attack, well, let me give you an example of what you could do for an attack animation.
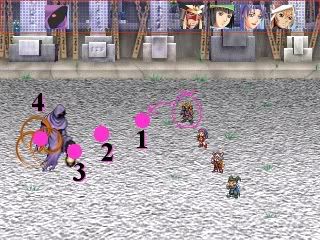
Get the character to jump quickly between points 1 to 3. Pause for a moment at 4. Animate the character doing an attack animation. Then put a sprite at position 4 and animate a flashing blade or another effect over the enemy.
Then get the character to jump from 3 to his start position and update the program.
I hope you have many hours (both good and frustrating) messing about with this tutorial, and please let me know if you use anything with in your first DBC/DBP programs, as its always nice to know that you’ve helped someone down the way.
Keep at it, and one day you will be able to produce your own creations and help other newcomers to this great language.
Cheers
Reaperman
Link for the files:
http://www.filefactory.com/get/f.php?f=411bff2f943e93f1a5ca4772
