Sorry your browser is not supported!

You are using an outdated browser that does not support modern web technologies, in order to use this site please update to a new browser.

Browsers supported include Chrome, FireFox, Safari, Opera, Internet Explorer 10+ or Microsoft Edge.

3 Dimensional Chat / texturing advice?

Author
Message
Geddon00
20
Years of Service
User Offline
Joined: 9th Nov 2005
Location: USA
Posted: 15th Nov 2005 00:29
I pretty much finished my 1st 3d model, and now I'm onto texturing it. Does anyone have advice on texturing 3d models or know a good site with texturing tutorials?
Zergei
21
Years of Service
User Offline
Joined: 9th Feb 2005
Location: Everywhere
Posted: 15th Nov 2005 14:36
In what prog do you model? As i work in 3dsmax, i found this very helpfull tutorial about modeling, uvw mapping and texturing.

http://www.3dtotal.com/ffa/tutorials/max/joanofarc/joanmenu.asp
Van B
Moderator
23
Years of Service
User Offline
Joined: 8th Oct 2002
Location: Sunnyvale
Posted: 15th Nov 2005 14:55
Take your time, practice, but firstly know what your dealing with.

I'll try and explain how UV mapping works, like the foundation - once you know that you know what your dealing with and things are much less of a mystery.

Basically, a mesh is made from polygons, polygons are made from 3 or more vertices. Vertices hold all the data really, like their location, colour, normal, and UV coords. Normals tell the polygon which direction it's facing, and colour spreads over the polygon - it's useful for vertice lightmapping and making individual vertices transparent. UV data is stored as X and Y values, every vertice has an X and Y UV coordinate, this is typically between 0.0 and 1.0. When you UV map, your affecting these coordinates to suit a texture, like a plain would have 4 vertices, one in each corner, so each corner vertice might have UV coordinates set to the corners of the texture too. When rendering, the 3 vertices are checked for UV coords and the triangle that is formed on the UV map is transfered to the polygon (like cutting it out of the texture and stretching it over the polygon) - this usually has nothing to do with the actual shape or size of the polygon.

I don't mind Lithunwrap, if your stuck then it'll let you get the job done for free. I usually stick to Decal mapping, which is like a straightforward position to UV coord conversion, like you could texture the model with a photograph of it in this mode. This leaves the flat polygons fairly stretched looking, so some care is needed. The other mapping technique I like is Cylinder mapping, it's like cutting along the seam and unrolling a carpet - like wrapped around. Cylinder mapping is good for things like legs.

Prepping your model before UV'ing is often vital - there's no point making work for yourself so any mesh or part of mesh that you can copy and mirror is often best deleted and remade from a UV mapped mesh, saves tons of time. Things like wheels can be tricky - I often decide how many sections the wheel uses, then just make 1 section, UV map that, then copy it around in a circle to make the wheel again, but perfectly UV mapped.

Practice.

A lot.


Van-B

Put away, those fiery biscuits!
Geddon00
20
Years of Service
User Offline
Joined: 9th Nov 2005
Location: USA
Posted: 15th Nov 2005 15:28
Zergei-I use wings3d to model(might switch to blender), wings 3d for uv mapping, lithunwrap for uv mapping and unwrapping, for creating textures i use photoshop, paint, and vanSEAM.

VanB-Thanks for the advice.
Seppuku Arts
Moderator
21
Years of Service
User Offline
Joined: 18th Aug 2004
Location: Cambridgeshire, England
Posted: 15th Nov 2005 18:25
What I would do is, make the UVmap as Van B explained.

But to actually texture, I find Photoshop or Paintshop pro is best for this (photoshop is much better though )

look at the texture you want, I usually find wood a good example, don't look at it as a whole texture, think of it as several layers, for wood

1st layer, brown cloudy like texture (Photoshop, cloud filter)

2nd layer, faint rings, use a lighter shade of brown, and the rings are pretty simple, then turn down the opacity of the layer (something like 10-20%, until it look good)

3rd layer, roughness(you can use this layer with 100% opacity as a bump map) you want it to be noisy, so in photoshop I use the noise filter, and adjust it until it looks right

4th layer, knots and dents, just draw the odd dent and knot by drawing them, and turn down the opacity (you can add this to your bump map at 100% too)

5th layer, other details, anything that you want added to the wood

Apply this knowledge to other textures.


Making bump maps.

They should be black and white really. And show the bumpy detail of stuff, you can draw lines and blur them, or use noise etc.

Here is an example, white background, use the thick brush, sqiggle around, leave white spaces, try and make it vaguely water like, blur well and use photoshops' ripple filter.

There you have a water bump map.


Here is an example of the two shown examples in a render
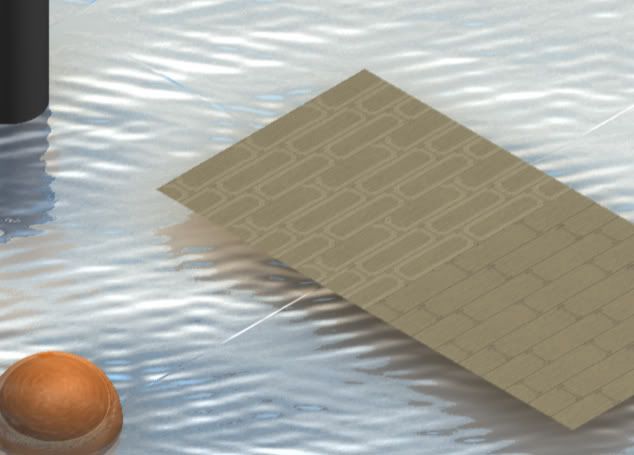


The water is simply reflection plus bump map (be careful with seams, as my image demonstrates)
The wood is made quickly just using filters in photoshop with what I explained above, with an image reference, they always will look better than shown

Your signature has been erased by a mod because it's larger than 600x120...

Login to post a reply

Server time is: 2026-07-21 12:57:06
Your offset time is: 2026-07-21 12:57:06