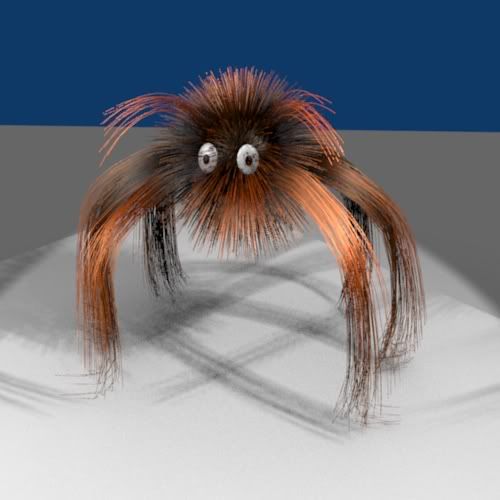
Ok. I'll teach you to make a hair ball.
Start up blender, delete the default cube, and add a sphere. 32 is fine for res.
Now go to object tab(F7) and click the physics button.
Now in the particles area, click new. There is a button called static next to RecalAll. Click that. Now go down and click Mesh And Vect. Mesh makes the sphere still visible, and Vect renders the particles as hair strands.
Click the tab that says particle motion, and then give it a Normal of about 0.020. That is how long you want it to be, unless you are using curve guides.
Now your sphere should have a bunch of hair sticking out very evenly, which looks bad. Go back to the original particles tab and click Rand and Even. Rand makes the particles in random places, and Even places them evenly. You can change the amount up to 100000 dependeing on how thick hair you need. So now we have a ball of fur. If you want, you can go to the particle motion tab, and add to the RLife, for a more shaggy effect. You can also use the force buttons to make it sag in a certain direction. Now lets give our ball a hair do!
Move the cursor over to the side of the ball. Do Space > Add > Curve > Bezier Curve.
If you are still in the physics tab, you should see a tab called Fields and Deflection. Click on that and select Curve Guide. The hair ball should react instantly. Now click on Use MaxDist, and set the field to around .50. While in object mode, drag the curve until its curve guide field is affecting some of the hair. Now you can edit the curve in edit mode as you would normally, and it will affect the hair. You can then duplicate the curve, put it in different places, to make your hair do. For exampe I made a hair spider.

Now you need to color the hair, unless you want grey straw.
Give the sphere a new texture and call it Hair. There should be a button Right under VCol Paint called Strands. Click that, and a menu will pop up. This lets you control the width of the hairs. I want mine to be somewhat small, so I left the start at 1.0, but changed the End to .250. The shape is how pointy they are. I changed this to -.292, which will make it somewhat pointy. Now I will give it a ramp shader. NExt to the material button is a button called Ramps. Click that and add a color ramp. Im hoping you already know how to use a ramp shader. I make a blend from orange to a light brown, and changed the Input to Normal. (If you don't know about ramp shaders, there is an excellent tutorial for them on blender site.) I rendered, and got a much better result!

Hope that helps!
EDIT: Also, ive noticed that AO (Ambient occlusion) gives hair a nice look that i like for this particular scene. Some scenes might not look good with it tho:

Im sick of Master Chief soo...ooga booga!!
Explain to me why some people pay money for 3d software? Its not 3d till its been blended. wwww.blender3d.org