Sorry your browser is not supported!

You are using an outdated browser that does not support modern web technologies, in order to use this site please update to a new browser.

Browsers supported include Chrome, FireFox, Safari, Opera, Internet Explorer 10+ or Microsoft Edge.

FPSC Classic Product Chat / Texture Normal Map Tutorial in GIMP (Screenshots)

Author
Message
Kravenwolf
15
Years of Service
User Offline
Joined: 14th Apr 2009
Location: Silent Hill
Posted: 5th Jul 2009 04:52
Texture Normal Map Tutorial in GIMP

Well, I figured it was about time to follow up the first GIMP tutorial I made a few months ago about creating your own custom text HUDS to use in FPSC. For anyone interested, that tutorial can be found here.


Normal Map Tutorial
First, you’ll need to have the normal map .ddl plugin for GIMP installed. You can find the free download here


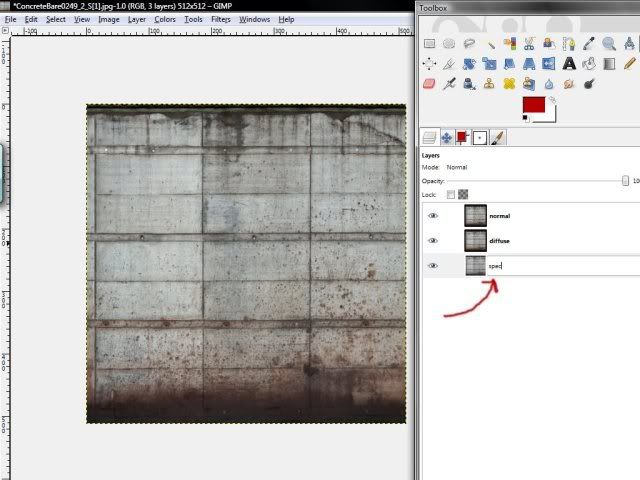
1. Open your texture in GIMP, and in the layers tab in the toolbox, right-click on the texture and duplicate the image twice so you have three layers of the same texture. Rename each of these layers ‘normal’, ‘diffuse’, and ‘spec’.


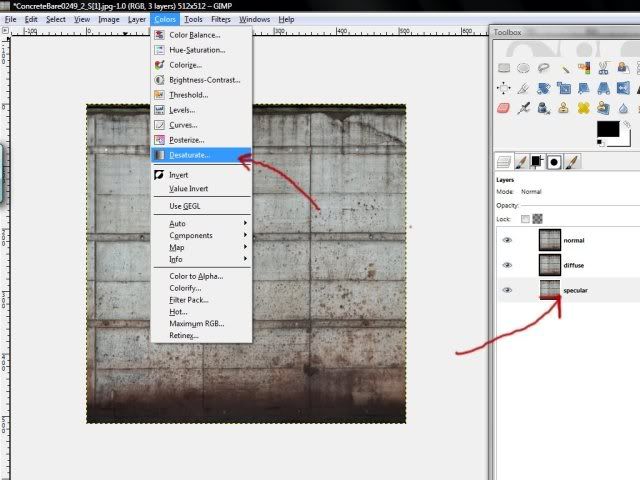
2. Select your spec layer, and go to colors > desaturate, to create your specular map. The brighter the specular layer the glossier the texture will appear with the normal map. With the spec layer selected, you can go to colors > brightness-contrast to darken the layer, which will make the normal map less reflective when using the spec map.


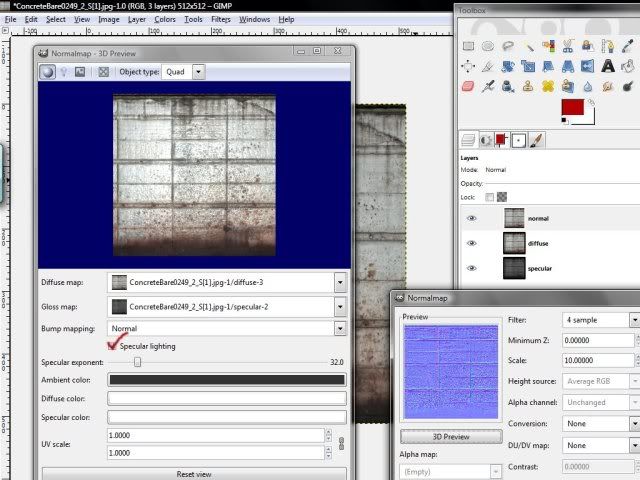
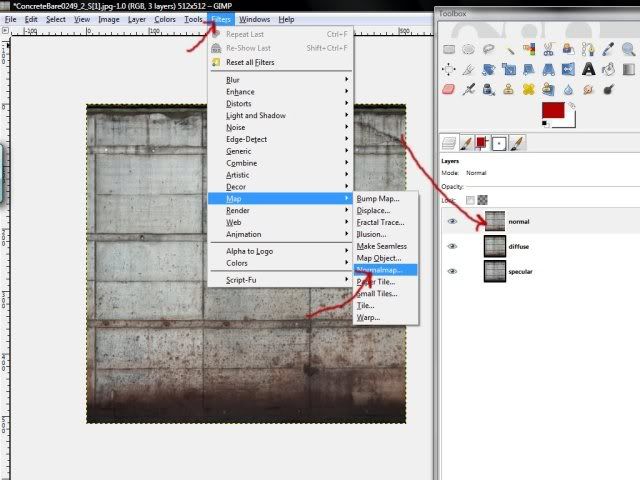
3. Now, you’re set up to create your normal map. With the ‘normal’ layer selected, go to filters > map > normalmap. Everything should be set up fine from default. From here, all you really need to mess around with is the scale. The higher the scale, the ‘bumpier’ the normal map will make your texture. The lower the scale, the ‘flatter’ the normal map will make your texture. Set the scale to 10.0, and click 3D preview.


Before you can view a preview of your texture with its normal map, you need to put the layers in their proper places. Give the diffuse map field the diffuse layer, the gloss map field the specular layer, and check the specular lighting option under the bump mapping field to test your specular level. If the texture is too shiny, cancel the normal map, and select your specular layer and go to colors > brightness-contrast and darken the layer. Reshow the normal map again, and it should be less reflective.


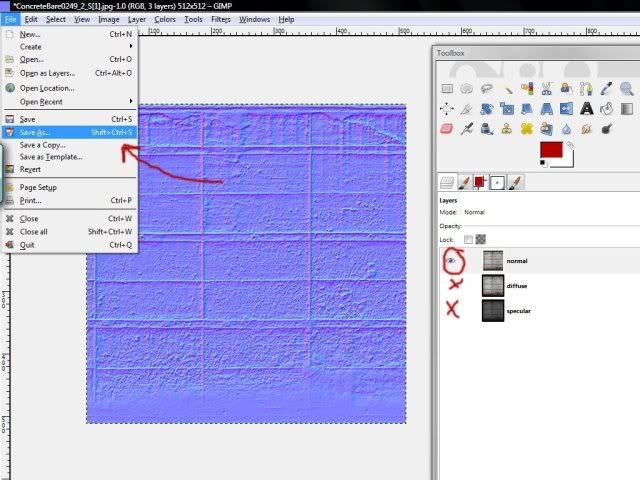
4. When you’re satisfied with the preview, click OK in the main normal map tab and GIMP will create your normal map. Obviously you’ll need to save all three layers individually. The easiest way to do this is to click the eyes next to the layers to toggle their visibility. If the eye is showing next to that layer, that is a visible layer. So to save all three images separately, make only one layer visible at a time, and with it selected save the image as a .tga file (_D, _S, _N). GIMP will ask you to ‘merge visible layers’. Do that and it will only save the layer you toggled visible.


Kravenwolf

Coach Shogun 20
15
Years of Service
User Offline
Joined: 27th Feb 2009
Location: In your mind, messing with your thoughts
Posted: 5th Jul 2009 05:26
Great tut man. A note for x10 users: For the spec map to work you have to go to layer mask, add layer mask, apply to alpha channel, and then fill it in full black. Kravenwolf, you might wanna add that in there at the bottom or something.

mAcpo
16
Years of Service
User Offline
Joined: 3rd Dec 2007
Location: USA
Posted: 6th Jul 2009 00:06 Edited at: 6th Jul 2009 07:50
Thanks for the tutorial!

I figured out how to put my normal maps on segments thanks to a combination of your tutorial to make the maps and studying rolfy's download from..
http://forum.thegamecreators.com/?m=forum_view&b=21&t=115557&p=1
Kravenwolf
15
Years of Service
User Offline
Joined: 14th Apr 2009
Location: Silent Hill
Posted: 15th Jul 2009 07:59
Glad to help out, mAcpo


Kravenwolf

DarkFrost
15
Years of Service
User Offline
Joined: 3rd May 2009
Location: ON, Canada
Posted: 18th Jul 2009 00:26
Are the normal maps what determine how light reflects off the model?

[img][/img]

Asteric
16
Years of Service
User Offline
Joined: 1st Jan 2008
Location: Geordie Land
Posted: 18th Jul 2009 02:02
Adds a sense of depth to a flat surface.

DarkFrost
15
Years of Service
User Offline
Joined: 3rd May 2009
Location: ON, Canada
Posted: 18th Jul 2009 03:48
Oh okay i see. Thanks

[img][/img]

SJHooks
15
Years of Service
User Offline
Joined: 13th Aug 2009
Location: Where you least expect me...
Posted: 15th Aug 2009 19:55
Quote: "Are the normal maps what determine how light reflects off the model?"
Nope.
Quote: "Adds a sense of depth to a flat surface."
Pretty much.
Quote: "how light reflects off the model?"
I think that would be a specular map for the lighting, and for reflections a specular reflection. Though I have no idea how to make them, its a part of what goes into the the Leadwerks engine games.
PW Productions
15
Years of Service
User Offline
Joined: 13th Mar 2009
Location: sitting in a chair.
Posted: 22nd Oct 2009 05:59
Hey, Kraven, this is a great tutorial, but this is a totally random question about GIMP since you know how to use it extremely effectively, how do you go about making perfectly straight lines? I kept trying to find a tool for it, but couldn't... Thanks for the great tutorial.

I've seen it all. Except for myself ever not failing at something.
General Jackson
User Banned
Posted: 22nd Oct 2009 06:03
The lasso tool

PW Productions
15
Years of Service
User Offline
Joined: 13th Mar 2009
Location: sitting in a chair.
Posted: 22nd Oct 2009 06:12
Oh, duh Sorry lol and thanks.

I've seen it all. Except for myself ever not failing at something.
General Jackson
User Banned
Posted: 22nd Oct 2009 06:23
No problem.

Duke E
15
Years of Service
User Offline
Joined: 10th Mar 2009
Location:
Posted: 22nd Oct 2009 09:24
Quote: "how do you go about making perfectly straight lines?"


Can make straight lines with all the Gimp drawing tools (pen, brush, spray) by holding in Shift, then it makes a straight rubber band line from the previous drawing endpoint. Click the mouse where you want the line to end.

Regards
Amd Silver
18
Years of Service
User Offline
Joined: 18th Feb 2006
Location: /bin/null
Posted: 15th Feb 2010 21:24 Edited at: 15th Feb 2010 22:38
I understand that this topic hasn't been posted to in a while, but I think that I can add onto Duke E's answer.

If you hold CTRL while you hold Shift it will make the lines only in 15 degree intervals. So you can get lines that are perfectly up and down or left to right and the likes.

EDIT:
Due to the difficulty I had in finding this information I am adding it to this post. To add a normal map to an object you should set the Effects for the object to Bump Cube Reflect Alpha.

If I am wrong, someone please correct me.

Love,
Zell Faze

Login to post a reply

Server time is: 2024-11-24 14:58:21
Your offset time is: 2024-11-24 14:58:21