You need to edit the current gradient.
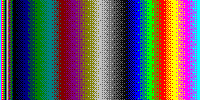
By default you will get a rainbow because your 'start color' for the default gradient is <gradient index 0> and the 'end color' is <gradient index 15>. Promotion renders the gradient based on
all the indexed colors from start to end, not
just the start and the end (unless they were right next to eachother).
So, in the default case you will have a gradient that is made up of <color index 0> blending into <color index 1>, <color index 1> belnding into <color index 2>, <color index 2> blending into <color index3> etc...
This creates an ugly rainbow that you are seeing.
Rainbow:
The way gradients are done in Pro Motion is different than other programs you may be used to. Generally in other programs you choose your foreground color and background, and the computer generates a gradient between those two colors (using a lot of colors).
Gradients In Pro Motion have nothing to do with your current drawing colors. You have to go into the 'colors'->'edit gradient'. There you can change your 'start color' by pressing shift + left click on a color, and your 'end color' by holding shift + right-click on a color.
In ProMotion you are responsible for how the gradient is created. And you need to be. In Pro Motion, unlike other paint programs that have nearly an unlimited amount of colors (eg. 24-bit, 32-bit), you have a maximum of 256 colors in your pallet (indexed 0-255). You can than reorganize your pallet colors into 16 custom gradients, each having a maximum of 16 colors.
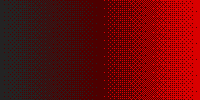
Now, if you wanted to do a simple gradient using 2 colors, you would place the 2 colors next to each other in one of your 16 custom gradients. Press shift + left-click on the first entry, then press shift + right-click on the entry next to it. Now choose the gradient tool, and select the gradient type, the dithering type, and click the place on the image where you want your gradient to start. Choosing your start location on the image is important because if you had a rectangle... and you clicked in the center of it (using a linear gradient); Promotion would create the gradient to the right and to the left; which may not be what you desired. To generate the gradient example below (going from dark red to bright red, left to right), you would have to click on the leftmost side of the rectangle.
I know all of this can be confusing at first, but the more you use the program you will see how beneficial it is to be able to define your own custom gradients, and how an indexed color pallet can be used to animate tiles and create other interesting effects.
Example:
Here is a Pro Motion, linear gradient, started from the max left of the canvas, & using
just 3 colors.
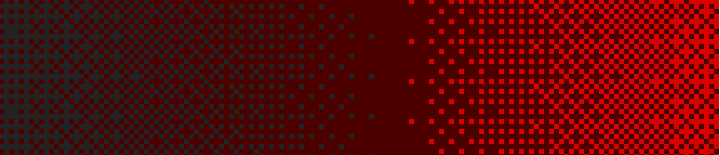
Notice all the shades that are produced from only three colors by varying the pixel pattern. Now to do that by hand, pixel by pixel, it would take a long time and require a lot of patience. The more colors in the ramp the smoother the gradient will look. So if I had used 5 colors instead of 3 (and the additional 2 colors were colors that naturally fall between the start and end) the gradient would look less pixelated.
Here is a pic showing the patterns better
Finally, to help create pallets & custom gradients you can use the 'ramp' button. It will automatically create the colors between your 'start color' and 'end color'. Place your 'start color' at a certain index... now skip an x amount of indexes (the amount will determine how many in-between colors you want)... then place your 'end color'. Click "ramp" and all the indexes you skipped will be replaced by colors between the start and the end.
Hope this helps
~zen
"When I look at that square... I wish FPSC noobs would stay on their side of the forums and stop polluting these boards." - Benjamin
