Texture Normal Map Tutorial in GIMP
Well, I figured it was about time to follow up the first GIMP tutorial I made a few months ago about creating your own custom text HUDS to use in FPSC. For anyone interested, that tutorial can be found
here.
 Normal Map Tutorial
First, you’ll need to have the normal map .ddl plugin for GIMP installed. You can find the free download
here
1. Open your texture in GIMP, and in the layers tab in the toolbox, right-click on the texture and duplicate the image twice so you have three layers of the same texture. Rename each of these layers ‘normal’, ‘diffuse’, and ‘spec’.

2. Select your spec layer, and go to colors > desaturate, to create your specular map. The brighter the specular layer the glossier the texture will appear with the normal map. With the spec layer selected, you can go to colors > brightness-contrast to darken the layer, which will make the normal map less reflective when using the spec map.

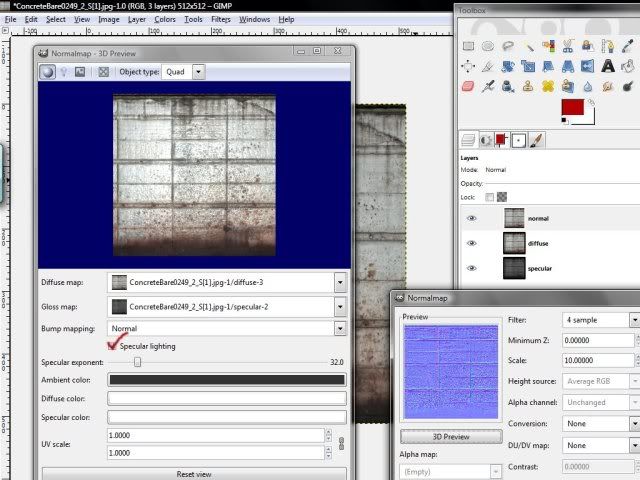
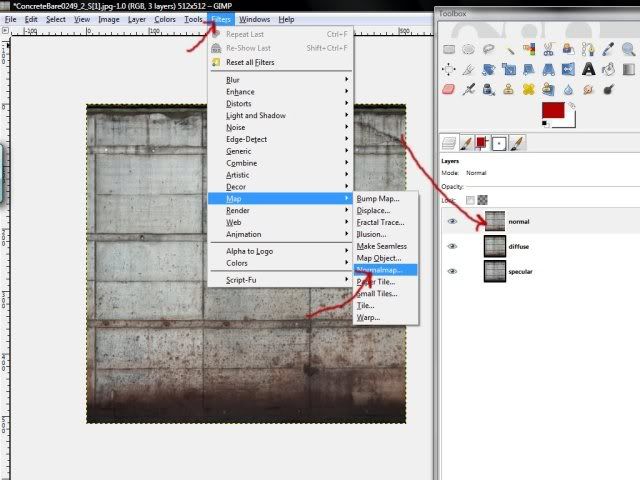
3. Now, you’re set up to create your normal map. With the ‘normal’ layer selected, go to filters > map > normalmap. Everything should be set up fine from default. From here, all you really need to mess around with is the scale. The higher the scale, the ‘bumpier’ the normal map will make your texture. The lower the scale, the ‘flatter’ the normal map will make your texture. Set the scale to 10.0, and click 3D preview.

Before you can view a preview of your texture with its normal map, you need to put the layers in their proper places. Give the diffuse map field the diffuse layer, the gloss map field the specular layer, and check the specular lighting option under the bump mapping field to test your specular level. If the texture is too shiny, cancel the normal map, and select your specular layer and go to colors > brightness-contrast and darken the layer. Reshow the normal map again, and it should be less reflective.

4. When you’re satisfied with the preview, click OK in the main normal map tab and GIMP will create your normal map. Obviously you’ll need to save all three layers individually. The easiest way to do this is to click the eyes next to the layers to toggle their visibility. If the eye is showing next to that layer, that is a visible layer. So to save all three images separately, make only one layer visible at a time, and with it selected save the image as a .tga file (_D, _S, _N). GIMP will ask you to ‘merge visible layers’. Do that and it will only save the layer you toggled visible.

Kravenwolf
